Setting up mobile proxies on Android

The article content
- What are the advantages of android and mobile proxy working together
- How to set up mobile proxies for android os?
- How to configure mobile proxies to work with android os without root rights
- Peculiarities of configuring mobile proxies to work with android os for mobile networks
- How to disable mobile proxies from working with android os
The Android operating system is installed on more than 70% of modern smartphones and tablets today. This development by Google has fallen in love with most users due to its detailed thoughtfulness, convenience, stability and reliability in operation. This operating system has an open source, allowing users to independently make changes to its work, adjusting to their own needs, revealing new features of the gadget. Users are also attracted by the Android application store, which currently has more than half a million applications, including games.
We can talk about the advantages of this operating system indefinitely. This also includes live wallpapers and widgets, flexibility of settings, a huge number of desktops, the ability to adjust their size, software updates over the air, and much more. But with all this, Android is not able to ensure the anonymity and security of networking. This shortcoming can be eliminated by additionally connecting a proxy server to the OS. What will it give? Where to get reliable mobile proxies? How to make the settings correctly?
What are the advantages of Android and mobile proxy working together
By connecting a proxy server to work with the Android OS, you get a reliable intermediary that will hide your personal data, such as the device's IP address, geolocation. The result is:
- complete anonymity on the Internet;
- high security level;
- the ability to simultaneously work without blocking with different accounts;
- faster internet connection;
- bypass regional locks;
- the ability to use automated software to promote pages on social networks, etc.
It remains only to buy reliable mobile proxies and connect them correctly to the Android OS.
Before proceeding with the instructions, you need a proxy for Android, you can buy a high-quality and inexpensive proxy server on our website.
How to set up mobile proxies for Android OS?
The first step is to purchase private mobile proxies. Free options that are freely available on the Internet should not be used. Their work efficiency is very low, because many people use such servers at the same time. As a result, the risk of blocking increases sharply, the level of security and anonymity of working on the network decreases. The MobileProxy.Space service offers inexpensive mobile proxies with unlimited traffic per channel to work with Android OS. After purchasing them, go to your personal account. Here you will see the IP address and port of the server through which the Internet will be accessed in the future. You will need this data during the setup process.
Now you can proceed to the connection. At this stage, there may be minor discrepancies related to the version of the OS or the type of shell used, but they are not cardinal and there should not be any problems with the configuration.
Do the following:
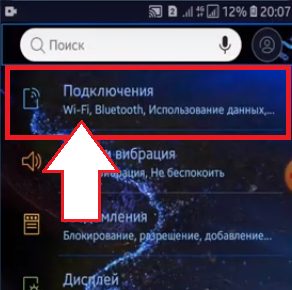
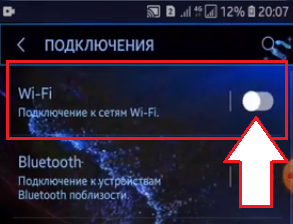
- Go to the "Settings" option. It's a gear icon. Here, in the menu, click on "Connections". In some OS versions, this option is called Network and Internet. Please note that the Android connection will be exclusively via Wi-Fi, so it must be activated. This can be done simply by moving the slider next to the inscription "Wi-Fi. Connecting to Wi-Fi networks from inactive to active position.

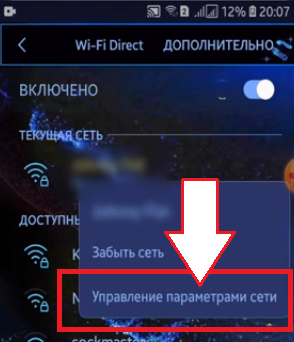
- Find your network. Click on it and hold for a few seconds to activate additional settings. A new "Manage Network Settings" window should open. We launch this option.
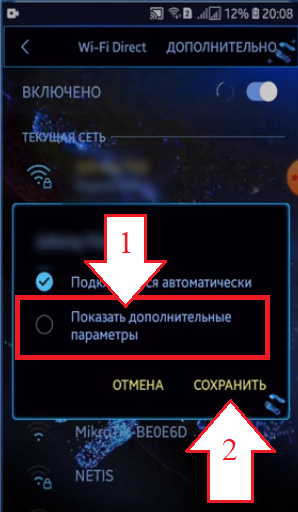
- In the window that opens, check the box "Show advanced options". Be sure to click on the "Save" button.
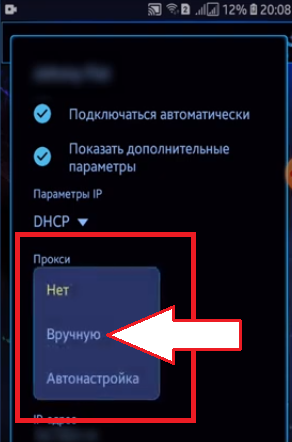
- We find the "Proxy" section in our settings. Of the proposed options "None", "Manual", "Auto-tuning" select "Manual".
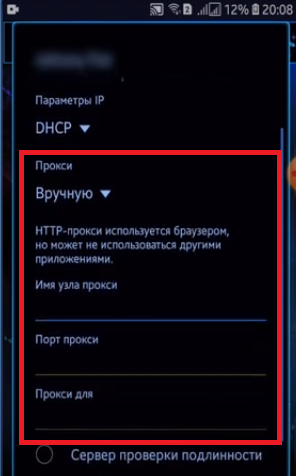
- The window expands additionally and the lines for setting the IP address and port of the server become active here. Remember that you have this information in your personal account after purchasing mobile proxy. Below in the line "Proxy for" you can list, separated by a semicolon, those sites, when working with which you will not need to use mobile proxies. Click "Save".
This completes the proxy connection to the Android OS. If during the work it becomes necessary to temporarily disconnect the server from work, then it will be necessary to repeat the steps described in paragraph 1-4 above, indicating in the "Proxy" block noting instead of "Manually" to the "NO" parameter.
This proxy connection method is relevant for root users. If you do not have them, then the server configuration will need to be done in a different way. We will also consider it.
How to configure mobile proxies to work with Android OS without root rights
If you do not have root rights, then you can connect a proxy server to work with the Android OS through the Drony application. It is freely available on the Play Store app. Download it to your gadget and upload it. Next, do the following:
- Go to the "Settings" tab. From the menu that opens, select the "Wi-Fi" section.
- Select the network that the Drony application will work with.
- Go to the "Network Details" section. In the proxy selection block, set "Manually". Next, enter the technical information of your server: its name (you can enter both the name itself and tcp / ip), port, username and password for accessing the proxy server. You must also select the type of proxy protocol.
- Go to the "Journal" tab and here we activate Drony by pressing the "ON" button.
- Check the proxy IP address using specialized online services to make sure the settings are correct.
Peculiarities of configuring mobile proxies to work with Android OS for mobile networks
We won't dwell too much on these settings, because we have to perform similar actions. Here you need to enter the "Settings for not listed networks" tab. and enter the technical data of the proxy server and authentication parameters in the appropriate blocks.
Please note that when using 3G and similar networks, you will need to download an additional browser from the Internet. Go to its settings and already there find options that provide the ability to connect a proxy and set the necessary data.
To check that the settings are correct and that work is now being done through a proxy server, use online services, such as 2ip.ru or whoer.net.
How to disable mobile proxies from working with Android OS
If it becomes necessary to disable the proxy server from working with the Android OS, this can be done either directly or through a special pre-installed application. The second option is the simplest. Please note: if the connection was made through the program, then it will be enough just to delete it.
Now let's look at a way to disable proxies from Android OS using ProxyDroid. Download it and install it on your gadget. Next:
- We go into the system settings, select the "Wi-Fi" function; and find your network. That is, the one through which the proxy server previously worked.
- We turn off additional settings, namely, we remove the IP address and port of the server. In the "Proxy type" block move the switch to the "NO" position.
That's it, mobile proxies are disabled. But you need to understand that such actions should be resorted to only in case of emergency, because after that you will be left without protection on the Internet. In addition, functionality will be significantly reduced. It will be much more reliable and efficient to keep the proxy server constantly active.