Configuring 3proxy
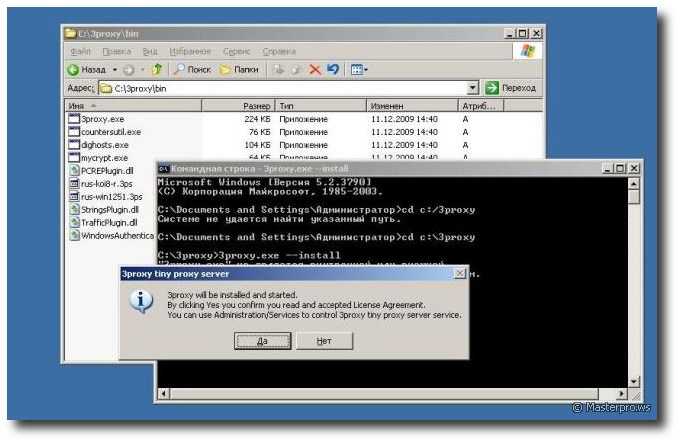
Table of contents
Install 3proxy as a service
I will skip the questions about what 3proxy is, where to get it and how to install it. I will assume that you found this article at the time of setup, in the end it is called that. This time, let's look at configuring on WINDOWS.
In my opinion, the most convenient thing is to work with 3proxy as a service. hence, you need to install it as follows. We extract the contents of the downloaded archive into a folder.
Open a command prompt (cmd.exe). Change to the directory with 3proxy and issue the command 3proxy.exe --install
It should look like this C: \ Program Files \ 3proxy & gt; 3proxy.exe --install - the path to the exe file must be yours!
The service must be installed and running. If the service does not start, check the contents of the log file, try removing the service line from 3proxy.cfg, starting 3proxy.exe manually and analyzing the error messages.
To remove 3proxy, stop the service and issue the command 3proxy.exe --remove
Config 3proxy
All the nuances and questions can be asked in the documentation for the program, if you need any perversions. https://3proxy.ru/ howtor.asp
And this is how the config should look for everything to work:
monitor C: \ Program Files \ 3proxy \ cfg \ 3proxy.cfg
auth strong
users login: password
users login1: password1
users login2: password2
users login3: password3
allow login, login1
socks -n -a -p3281 -i192.168.0.2 -e192.168.1.2
proxy -n -a -p3282 -i192.168.0.2 -e192.168.1.2
flushallow login2, login3
socks -n -a -p3283 -i192.168.0.2 -e192.168.1.3
proxy -n -a -p3284 -i192.168.0.2 -e192.168.1.3
flush
And now about everything in order
monitor C: \ Program Files \ 3proxy \ cfg \ 3proxy.cfg - this is the most important thing, we tell in the config that you need to monitor the contents of the config, when you make changes, the program will immediately pick up these changes without reboots and stops, in my opinion everything should work like clockwork.
auth strong - authorization by login and password, why don't I know an open proxy for you, so we'll password-protect everything!
users login: password
users login1: password1 is a list of users and logins and passwords
allow login, login1 is the permission for these users to work with those proxies that are written in the lines below. We indicate all logins that can work.
socks -n -a are parameters for working with socks
-p3281 is the port on which the proxy hangs
-i192.168.0.2 is the internal address from where incoming connections come to us, this is the ip address of your machine on the network.
-e192.168.1.2 is the address where the request goes, in our case it is the address of the device with mobile proxy on board.
proxy -n -a -p3282 -i192.168.0.2 -e192.168.1.2 - everything is the same only settings for HTTP proxy.
Any of the lines can be omitted if you only need one view.
flush - with this command we close the work with authorization of this proxy. After that, you can continue the configuration by repeating the same commands with other parameters, open allow again and close flush. Remember that the ports must be different, one proxy of the same type is a separate port.