DNS server - what is it and why?

DNS server (abbreviation for Domain Name System) – a special Internet technology designed to convert the name of an Internet resource into an IP address, which will allow users to access it through a web browser. We can say that this is a book of contacts, but not real people, but the Internet. This computer stores the IP addresses of the sites, which are tied to specific site names. The DNS server receives every request from the user. Then it is processed and redirected to the appropriate resource. Owners of such servers – internet providers. They are also responsible for the maintenance of this hardware. Thanks to the use of DNS servers, the speed of the Internet connection with a specific target resource is significantly increased.
Before moving on to a more detailed acquaintance with the servers themselves and the features of their connection, let's take a closer look at the Domain Name System technology itself and how it works.
Domain Name System basics
Domain Name System, i.e. DNS – a technology based on which Internet browsers such as Google Chrome, Firefox, Edge and others could find the site requested by the user not by link, but by name. And again the analogy with the phone book of a smartphone. To call the desired subscriber, we find his name in the contacts list and click on the "call" button. And then the phone already connects you with the desired subscriber. If, during the process of creating a contact list, you specify a name, but do not bind the corresponding number to it, then, alas, you will not be able to call.
And now let's transfer this theory to the site. The DNS server hosts a huge set of unique IP addresses for a site. This is a set of four blocks of digits of three digits each, separated by a dot. The numbers can be anything in the range from 0 to 255. That is, the IP address of the site can look like 000.000.000.000 – 255.255.255.255. But these are boundary options, but in reality they look like 211.147.058.169. and the like. And next to each of these addresses is the name of the corresponding site. When the user enters this name in the browser's search bar, his computer accesses the DNS server. Here, the name is compared with the existing IP address and redirected to the site.
In theory, everything seems to be simple, logical and understandable. But in practice, things are not so smooth. The fact is that far from each DNS server has a complete set of site names and their corresponding addresses. And if it turns out that the name you entered is not in its database, then the request will be redirected to another server, and so on. The probability that as a result you will still find the answer to your question is quite high.
But the question is: how long will it all take? The more servers involved in this chain, the longer the connection will take. Therefore, the best solution to this problem would be to use large-scale DNS servers, as an example, from Google Corporation. It has the largest database to date. Users will be able to use it instead of those provided by their local ISP.
Along with directly storing data about domains and redirecting user requests to them, the DNS server also performs caching of data from other similar hardware. We have already said that in an attempt to find the site of interest to the user, the local DNS server interacts with other servers. But here it selects the hardware that it finds in the region related to the requested site. So, if you are interested in a site with weather in Italy, then redirection to Italian servers will be automatically carried out.
In turn, the local DNS server will store this data for itself. That is, it will expand its base and, when a similar request is repeated, it will immediately give the corresponding result, that is, the speed of processing user requests increases several times. This is caching. But you need to understand that the cache will not be stored on the server permanently, because the hardware capabilities of the device are limited. The period of time during which this data will be stored depends on the server settings.
What happens if the IP address of a site changes? Alternatively, this can happen as a result of switching to another hosting. Initially, the server will try to find the result at the old address. But he will be able to find it only after a certain time, when the cache of local devices is updated. And as soon as he finds what he is looking for, he will resave its address, that is, instead of the old one, he will write down a new one.
Locations of the main DNS servers in Russia
Today, there are 13 major DNS servers in the world. They contain all information about the root DNS zone. They are located in different countries of the world. In order to increase the resistance of such hardware to various kinds of failures, external influences, including unauthorized access, their copies were additionally formed. As a result, we already have 123 main DNS servers. Most of them (over 30%) are geographically located in North America, a little less than 30% – in Europe. South America accounts for only 5% of cars, while Africa – only 2.4%. They are located where the web infrastructure is used most intensively. There are several such devices in Russia, namely in Moscow, St. Petersburg, Novosibirsk, Rostov-on-Don, Yekaterinburg.
But for all this to work properly, you need to make a number of simple adjustments. Now let's pay attention directly to how to connect the DNS server on the router.
Step-by-step instructions for configuring DNS directly on the router
The option of setting up a DNS server directly on the router is often used by large-scale Internet providers that have a lot of non-permanent users. This saves a lot of setup time by eliminating the need to connect on each device. But here the sequence of actions will largely depend on which router you have installed. Now let's take a closer look at the features of connecting DNS to the most popular router models today:
- TP-LINK Archer A6.
- Tenda AC7.
- Asus RT-AC1300G Plus V3.
Following the instructions given step by step, you can complete the settings yourself, that is, without involving Internet service providers.
TP-LINK Archer A6
Before proceeding to the appropriate settings, you will need to find out the IP address of a reliable DNS server that matches your queries. And now you can proceed to perform the following actions:
- Launch your Internet browser (it doesn't matter which one is installed on your computer). We write in the search line a combination of numbers 192.168.1.1 or 192.168.0.1 and click "Run". This will automatically take you to your router settings.
- Only an administrator can change the settings. And this means that you still have to have a username and access password. If you did not set them at the stage of the initial connection of the router to work, then use the parameters that come by default, namely "admin"; and "admin".
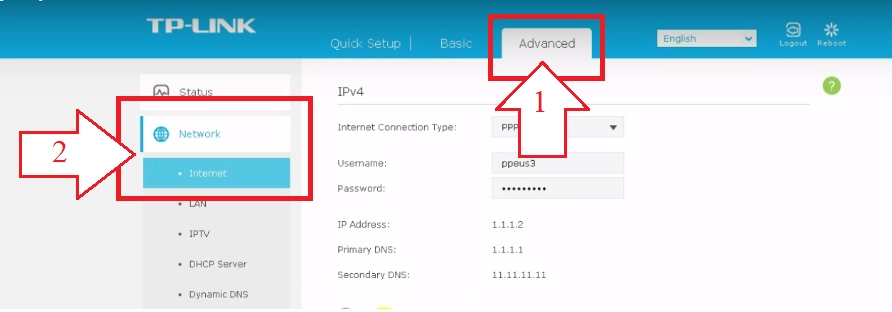
- In the settings window that opens, we find the "Advanced" tab; ("Advanced"). On the right side of the window there is a vertical list of options. Here we are interested in «Network» ("Network"), and already directly in it "Internet" ("Internet").

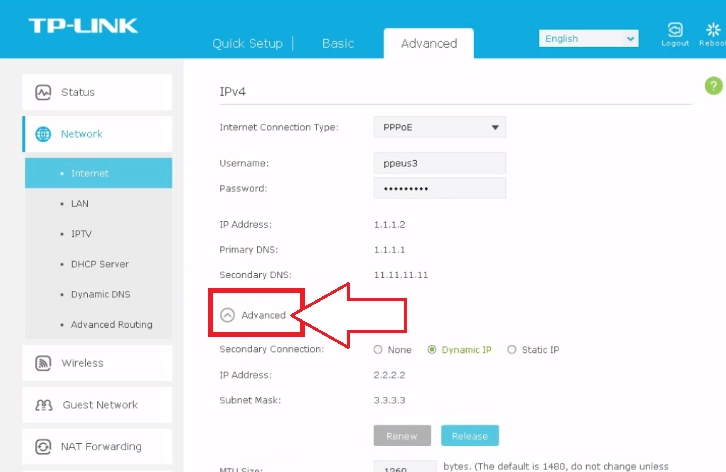
- Go to the right side of the working window and again find the inscription "Advanced" in it; ("Advanced") and click on it.

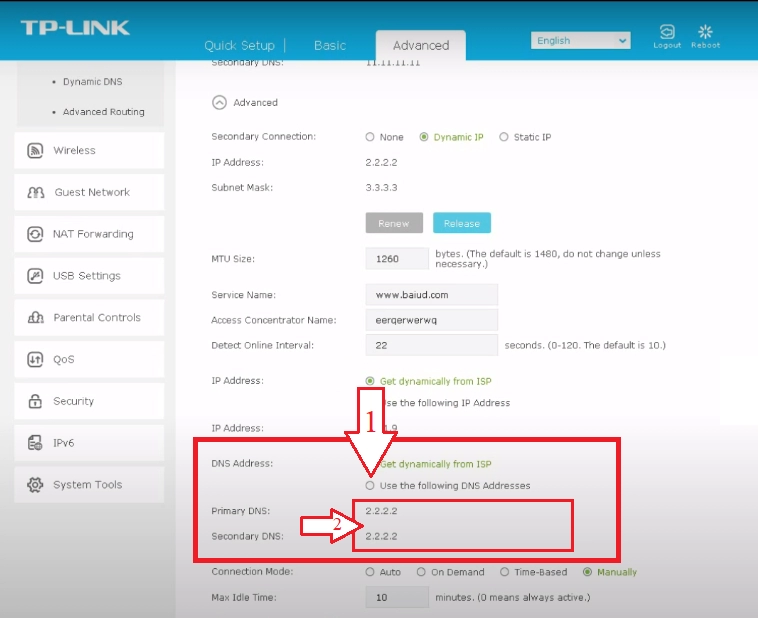
- We go down until we see the "DNS address" block. Here you need to check the circle next to the inscription "Use the following DNS Address". ("Use the following DNS address"). A little lower, in the column Primary DNS, we prescribe the primary DNS server, and below, in the column Secondary DNS – secondary. It remains only to click on the "Save" button; ("Save") in order for all our settings to be activated.

This completes the setup, you can get to work.
Tenda AC7
The DNS servers that were provided by your ISP are not to your liking for a number of reasons? They can be replaced with more suitable ones. Users of Tenda AC7 routers can do this in the following sequence:
- Connect to the router settings. The simplest solution – use your internet browser. Directly in the search line, write the request in the form 192.168.0.1 or 192.168.1.1.
- In the window that opens, pay attention to the vertical menu located on the left side (on an orange background). Here we find the "Internet Settings" tab, go into it.

- In the new window that opens on the right side of the screen, we are interested in two columns: "Primary DNS server"; and "Secondary DNS Server". Enter the relevant information here and click on the "Connect" button so that the changes you have made are saved.

Everything. A couple of minutes of time, and all the necessary settings are completed.
Asus RT-AC1300G Plus V3
This is a router that already has a built-in DNS service in its basic firmware and will automatically select the best and most reliable DNS servers. It remains only to activate them or make appropriate adjustments to its settings. We do it in the following order:
- Launch your internet browser. We enter requests 192.168.0.1 or 192.168.1.1 in the search line in order to get directly into the settings of your router. This will require authentication. If you set a username and password, then enter them in the appropriate boxes. If not, then we use the data that goes "by default": both the password and the login here will be "admin". That is, we enter these words in both columns.
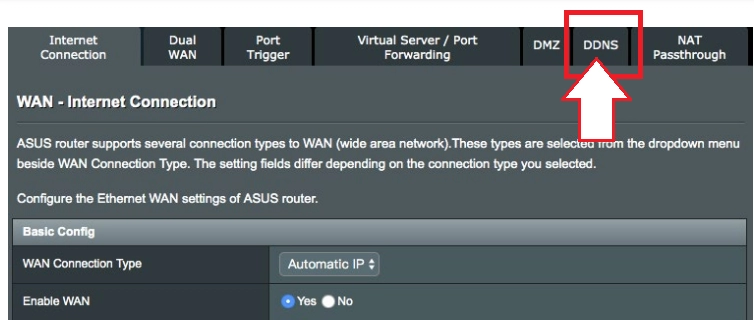
- In the Settings menu select the "Advanced settings" tab, go to it. Next, we are interested in the "WAN" option, in it, in the horizontal top menu, we find the "DDNS" tab, click on it.

- A little lower, in the column "Enable the DDNS Client" click on the circle next to the inscription "Yes". Its activation will be confirmed by the blue illumination of the circle. This will launch the DNS client.

- The next line below – "Server". There is a drop-down list next to it. From it, select the server that you would like to connect to work at a given time.

- More below – string "Host Name" ("Host name"). If you wish, you can rename it. If not, leave the base parameter. To save the changes made, you will need to click on the "Apply" button. ("Save").

Everything. We have dealt with these settings. There is nothing complicated and incomprehensible here.
Summing up
As you can see, using a reliable, trusted DNS server can significantly increase the speed of browsing the Internet, namely, minimizing the time it takes to receive a response from the site you need. And at the same time, it is not necessary to rely on the responsibility of the provider, because you can independently adjust the settings of your router and reconfigure it to work with good service. Yes, the connection process itself will differ slightly depending on which router you use in your work. But the sequence of actions is the same everywhere:
- Go to the router settings.
- Enter DNS addresses there or select the appropriate option from the drop-down list (if this option is relevant for your router).
- Save your changes.
Everything. There is nothing complicated and impossible in this even for an ordinary user. And you will be able to appreciate the benefits of making such changes from the first connection.


