Headless Chrome: features and mobile proxies
Surely, specialists who have been working in the field of IT-technologies for a long time have already heard such a term as “headless browser”, that is, Headless Chrome. This tool will be especially useful in the work of developers. It will help you easily test the code, check the quality of the finished product, its compliance with the layout, and solve a number of other tasks related to the frontend. If you work in this area, then it will certainly be useful and informative for you to get acquainted with such a software product as the Axios library.
Now let's dwell in more detail on what the Headless Chrome browser is, with its features. Consider the most attractive scenarios for its use. We will also tell you how to ensure stable and efficient work without risks and restrictions using mobile proxies.
What is Headless Chrome?
In a literal translation from English, the word «headless» sounds like "headless", hence the name "headless browser". Among its features are:
- No real content rendering. That is, everything he does is displayed in his memory.
- Minimum internal memory requests. Since there is no need to render heavy PNGs and images, the needs will be much less.
- Higher speed. Again, this is due to the fact that you do not have to waste time displaying content on a real display.
- The presence of a software interface for efficient and convenient management. Yes, here you will not see the classic buttons, windows, icons. But this does not mean that there is no control – it is there and you will be able to work comfortably with the browser.
- The ability to set literally to "bare" Linux server. This point will be relevant for cases where you already have Red Hat or Ubuntu just downloaded. All you have to do is install the package and upload the binary there. And all – The browser starts working right out of the box. And there is nothing supernatural here.
If you look at the pictures below, you can see how the usual browser.
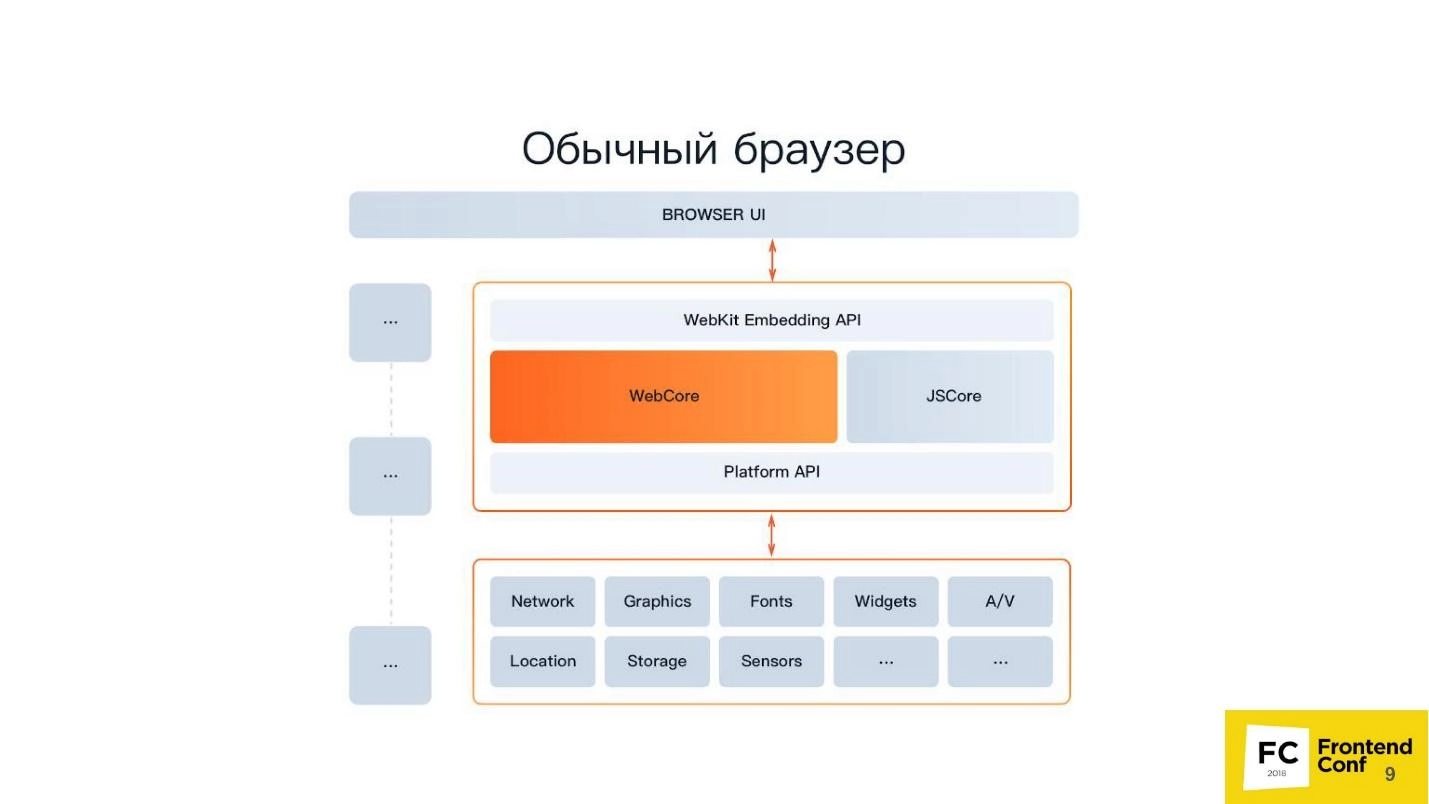
This picture shows a classic WebKit-based browser. It makes no sense to study all the icons in particular, because we are not talking about them now. Now it is important for you to pay attention to the upper block "Browser UI", or rather to its presence. This is the user interface with all its menus, windows, tooltips and other "goodies".
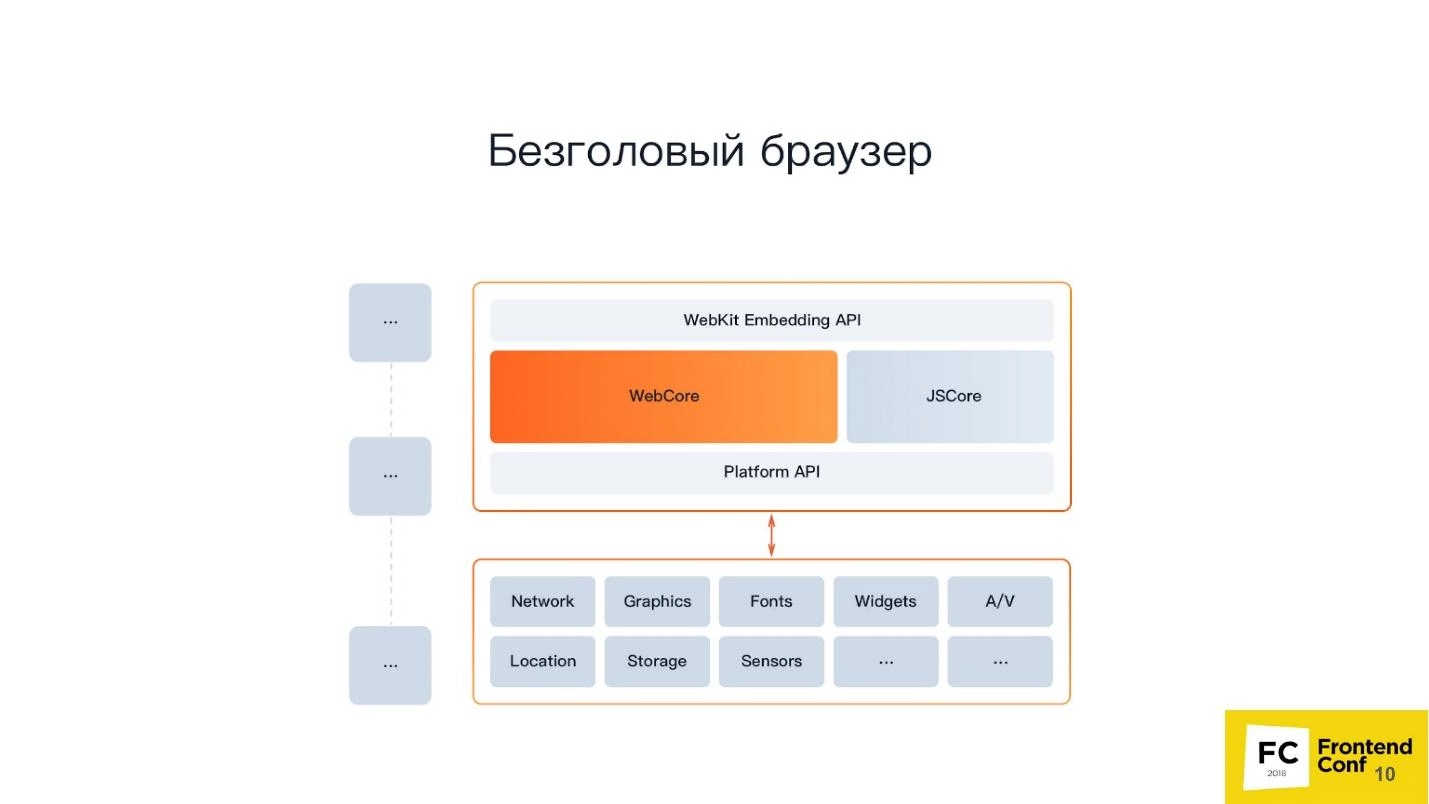
Here we see everything the same, BUT without the "Browser UI" block. That is, Headless Chrome does not have a – the browser itself. Now that you understand what exactly we are talking about, let's move on to a more detailed acquaintance with the product.
How Headless Chrome works
Headless Chrome entered the market in 2016. The Chrome browser was the first to implement "headless" mode. That is, the Headless browser is based on Chrome – a branded version of Chromium with proprietary codecs, integration with Google services, etc. It has special "renderers" "RENDERER". They render the content of the page, i.e. your window. Each tab has its own renderer. That is, the more tabs you open, the more rendering processes Chrome will launch. And your program will go on top of all this. That is, if we take Chromium or Headless Chrome, then either Chrome or the application that you plan to embed in it will go on top. The scheme of work here can be compared with Steam, despite the fact that it is just a browser for the site of the same name.
There are two ways to embed Headless Chrome into your app:
- Standard, using the Puppeteer library.
- With the use of the Headless library component, that is, a library implemented in the most headless mode and you already embed it into your program, as an option, in the C++ language.
Why C++? The fact is that the capabilities of Headless Chrome can be used in different ways. If you choose the first option, then communication with the headless browser will be conducted using web sockets. If you plan to embed the Headless library into a desktop product, then you cannot do without a native interface. And it is written in C++.
You will have to use additional tools in the work:
- Custom networking. This is a costume implementation of your work with the Internet. Relevant for cases where a very clever authentication protocol is used for security purposes, which is not supported by browsers. If you use a custom handler for such a network, you can simply pull one of the already implemented libraries into operation and connect it to Chrome.
- Mojo modules. This is a kind of analogue of native bindings in Node.js to your own native libraries created using the C ++ language. At its core, Mojo modules do the same thing. That is, you will need to choose one of your native libraries and write a Mojo interface for it. After that, it will be possible to pull out the methods of your native library already in the browser itself.
Introducing Chromium Components
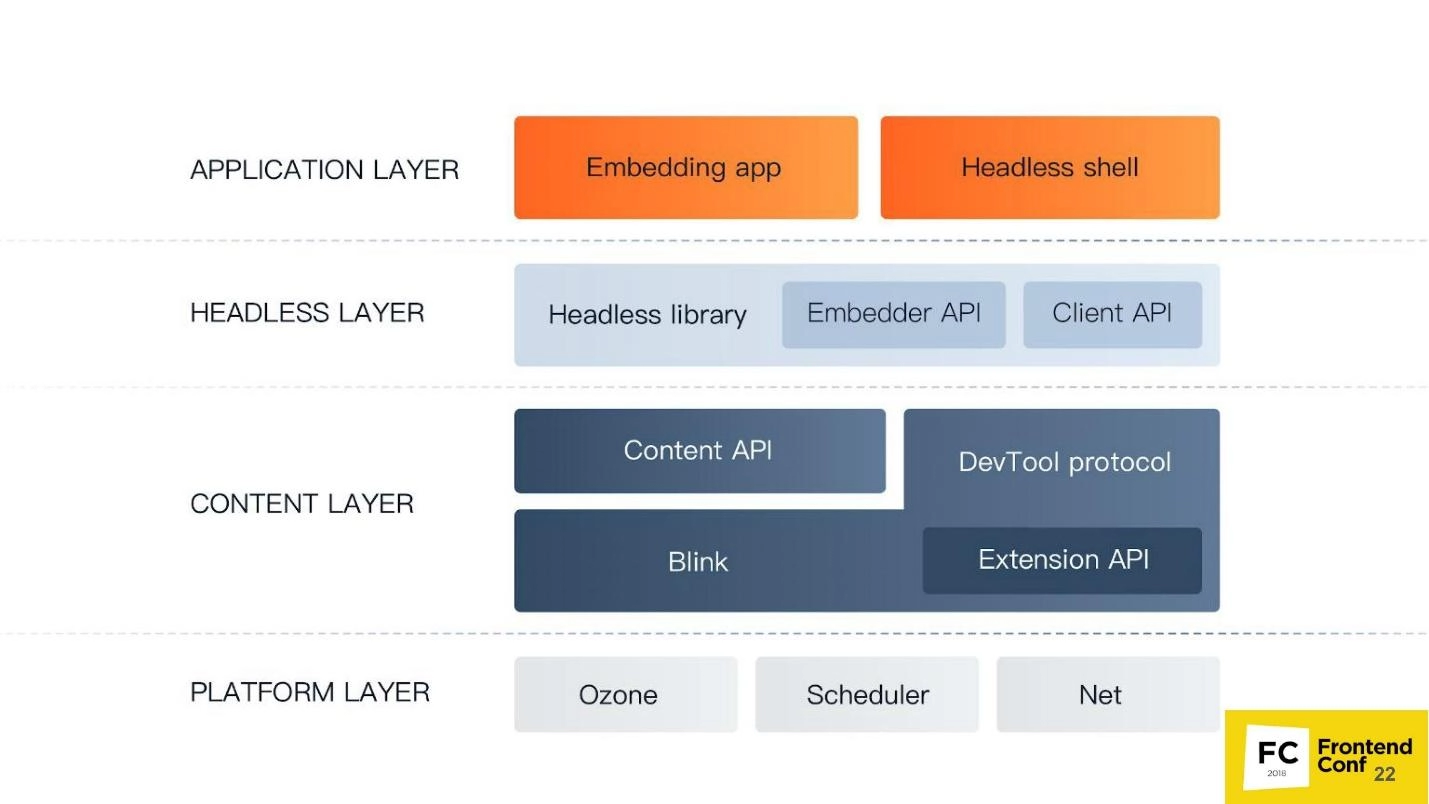
The main components of Chromium are visible in the picture. Pay attention to their layered arrangement from bottom to top. Any developer should understand how the tool with which he works is arranged. This will help you quickly find a bug in case of a serious bug in production and fix it. This is also true for Headless Chrome, because it has a number of oddities that you will have to deal with in work. And if it turns out that you "fell out" stack trace, then, knowing the structure of Chromium, you will at least know in which direction you "dig".
The following layers are provided:
- Platform layer. This is the lower level, consisting of three components: Ozone, Scheduler, Net. Ozone is an abstract window messenger. That is, it is with him that the window messenger of your operating system will interact. If we talk about Windows OS, then this, in fact, will be the Windows window messenger. If we are talking about the Linux OS, then there are two options: X-server or Wayland. Scheduler – this is already a scheduler that manages all the threads and processes that happen in multitasking Chrome. But the Net component is responsible for working with the network, as an example, editing content, creating headers, parsing HTTP.
- The most voluminous component in the Chromium structure, although it consists of only two components: Blink and Content API. Blink – this is the engine based on WebCore from WebKit. It is able to pull out HTML as a string, execute JavaScript, parse. This limits its functionality. It includes a modified version of WebCore and API for all those extensions that you use in Chrome, including an ad blocker, as well as the DevTools protocol (more on that below). The Content API is an interface that greatly simplifies working with Blink. It will help you not get lost in the over a million interfaces present in the web engine. Thanks to it, you will only have to enter HTML, Blink will automatically process it, build the CSS OM, strip the DOM, implement JavaScript, run all the necessary handlers, timers and related tools.
- Headless layer. Three components are provided here: the Headless library itself, which we have already mentioned above, the Embedder API – interface for embedding it into the application, as well as Client API – interface to be used by the Puppeteer library.
- Application layer. This is the last component of the – application layer. Will contain directly your applications, as well as companion mini-applications.
Chrome DevTools protocol for managing Headless Chrome
One more point, which we will dwell on in more detail – Chrome DevTools protocol. Everyone who has used the developer panel or a remote debugger in working with Chrome knows about it. That is, it is through him that these tools "communicate"; with a browser. This includes installing a debugger, connecting geolocation, and viewing code coverage. This is only a part of the methods provided in the Chrome DevTools protocol, because in reality there are a lot of them. But, as practice shows, your developer tool has access to no more than 20% of them. But there you can do whatever you want.
There are only 2 components in the structure of this protocol:
- DevTools target. This is the tab you are working on.
- DevTools client. Developer panel launched remotely.
These two components are in constant communication with each other using JSON:
- There is a set of parameters that need to be implemented: command ID, method, etc.
- We send the appropriate request and get the same simple response. But here an identifier is already needed, because without it it is impossible to understand what answer you received for which command.
- We get the result with all the attributes you need.
Please note that your tab can forward events back to you. This way you will stay up to date with the changes that take place on your – the protocol will send you a notification.
How to keep Headless Chrome safe
Any work on the network is fraught with serious danger. Hacker attacks, unauthorized access, loss of personal data. All this and more is designed to prevent mobile proxies. Mediation servers will replace the real technical data of your device (IP-address and geolocation) with their own. They will also help you select the desired geolocation and mobile network operator in the workflow, which will allow you to bypass regional blocking, test the operation of software based on location. You can also work with them in multi-threaded mode, use applications to automate actions without fear of getting banned.
Only all these opportunities will be provided to you by exceptionally reliable private mobile proxies, in particular from the MobileProxy.Space service. Click on https://mobileproxy.space/en/user.html?buyproxy to learn more about the product, offers and buy the right one for you. If you encounter any difficulties or questions – 24/7 technical support is always at your service.