How to set up a proxy on windows 10?
There are two options for the development of events, or you have private proxies with authorization and their configuration will require special software, or you have open proxies without authorization. We'll cover both.
Configuring proxy on Windows 10 without authorization.
The following steps for configuring a proxy server in Windows 10 will apply to Ethernet and Wi-Fi network connections, but these settings will not be used during the VPN connection.
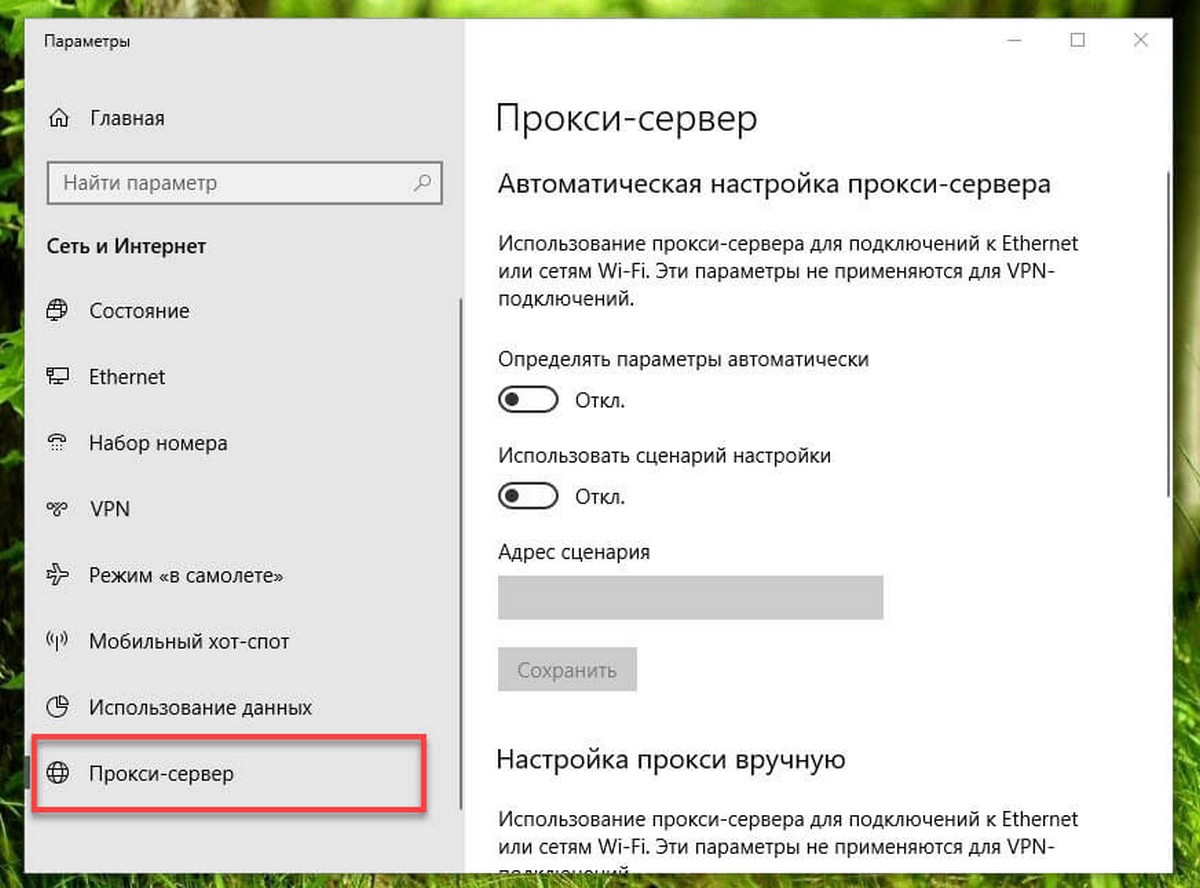
Step 1. Open the app 'Options' , the fastest way is to press the keyboard shortcuts Win + I .
Step 2. Go to 'Network & Internet' .
Step 3. Click 'Proxy Server' .
Note: Before proceeding, it is important to know the proxy server address or the address that hosts the proxy script. A proxy server address is similar to an internet link (e.g. z.mobileproxy.space).
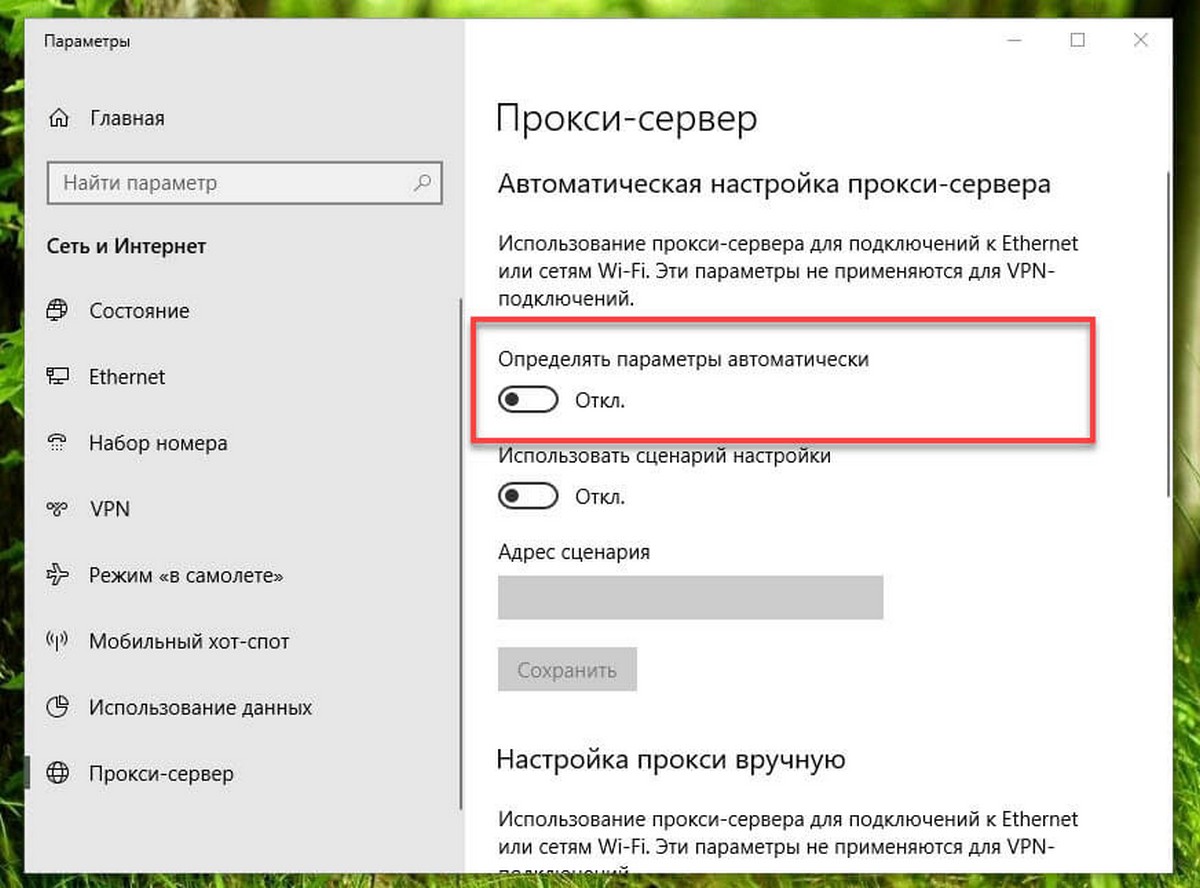
Configure automatic proxy settings.
There are three ways to use a proxy, including automatic proxy configuration.
If 'Automatically detect settings' is enabled, Windows 10 will try to detect settings using Web Proxy Automatic Discovery (WPAD). Organizations typically use this feature to automatically configure or change proxy settings on computers connected to their networks.
If you do not want your device to automatically detect settings, you need to disable automatic settings switch.
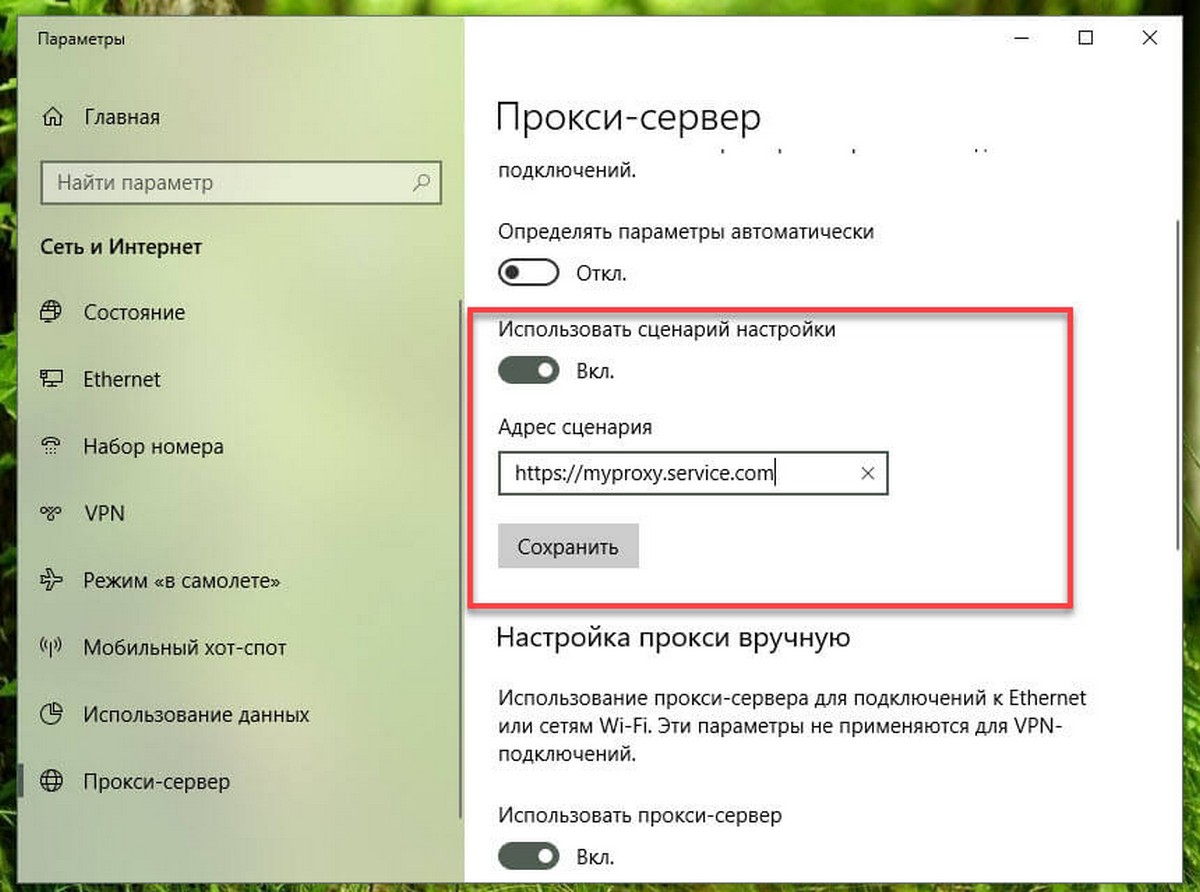
Configuring an automatic proxy server using a script.
You can also configure a proxy server using an installation script. You will need to manually configure this setting by adding the address of the server hosting the script, the proxy server will be configured automatically.
To configure a proxy server using a script, follow these steps:
Step 1. In the 'Automatic proxy configuration' section, turn on the 'Use configuration script' switch.
Step 2. In the line 'Script address' enter the address of your script (or .pac file).
Step 3. Click 'Save' .
Configure a proxy server using manual configuration.
Alternatively, you can completely configure or change the proxy settings manually on your Windows 10 device using the following steps:
Step 1. Under 'Manual proxy settings' turn on the switch 'Use proxy server' .
Step 2. In the 'Address' field enter the address to connect to the proxy server.
Step 3. In the `` Port '' field enter the port number required for the proxy to work.
Step 4. Click the 'Save' button.
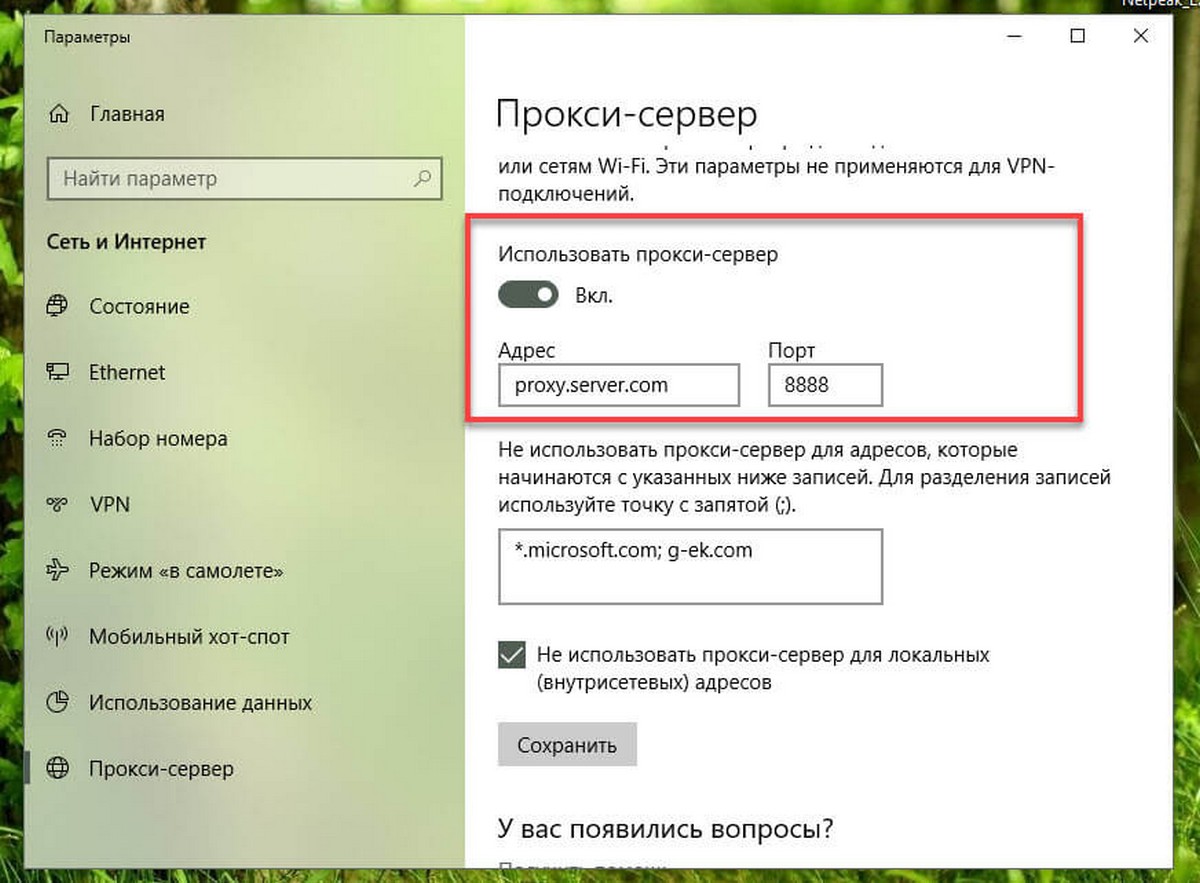
After configuring the proxy server, network traffic will automatically pass through the proxy server. Provide a list of addresses that will not use the proxy server.
You can use the text box in the `` Do not use a proxy for addresses '' section to specify these addresses using a semicolon (; ) to separate each entry. If you have multiple addresses of the same domain, you can use the asterisk as a wildcard.
For example , * .website.com will match the entire URL in the asterisk part, including forums.site.com , doc.site.com etc.
Technically, there is no need for local network traffic to go through a proxy server unless your organization requires it, unless you need to connect to local resources usingproxy server, check the box for `` Do not use proxy server for local addresses '' .
How to set up a proxy with authorization in Windows 10?
Windows 10 does not support an auto proxy username and password, and this was done for security reasons. Therefore, we will show you how to use private proxy with authorization using a third-party application, namely Proxifier.
Proxifier & ndash; it is a great tool with which you can force programs that by default cannot work through proxy servers to work with them.
You can download the Proxifier program on the official website - https://www.proxifier.com/
This program does not have support for Russian users, so there are often questions about setting it up. In our article, we would like to tell you how to use Proxifier
Configuring Proxifier
First of all, after we have launched the program, we need to configure it to work with a proxy.
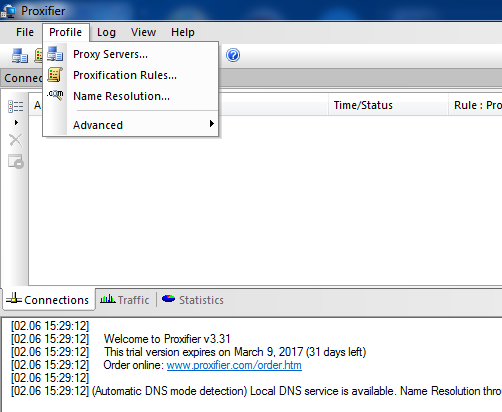
In the menu, open the `` Profile '' section and select `` Proxy Server '' in it
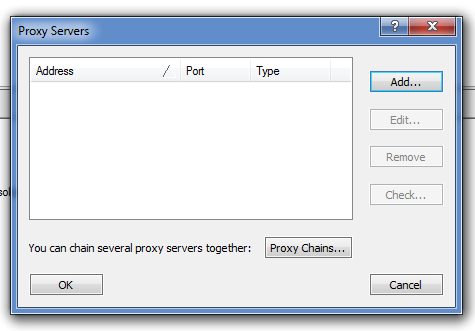
In this window, click on the `` Add '' button
Next, in the `` Address '' field, we need to enter the address of our proxy, in the `` Port '' field we enter the port from the proxy. Below we select the protocol we need. Our proxies support both protocols, so if you take a proxy from us, you can choose any protocol convenient for your work.
The Authentication field is required if your proxies have login and password authorization. Enable button is responsible for enabling authorization by login and password in the program. If you checked this box, then below in the `` Username '' and 'Password' you must enter the username and password from the proxy, respectively.
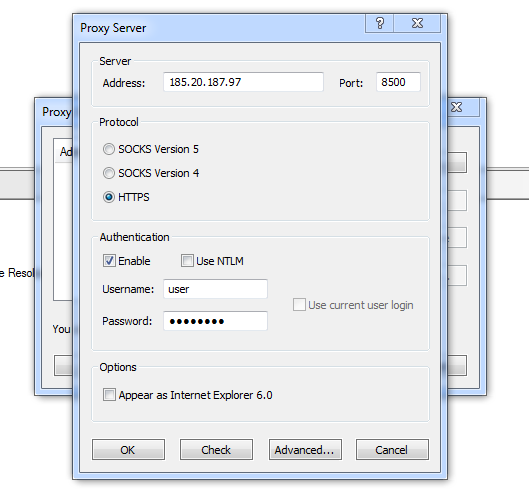
After filling in all the fields, press the button `` OK ''.
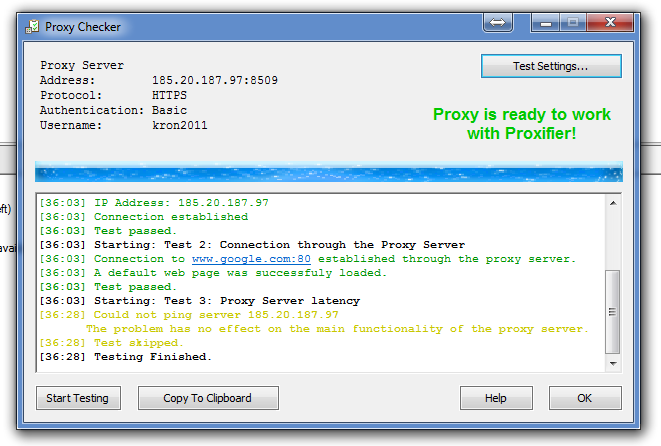
By clicking on the `` Check '' button we can check whether we have configured our proxy server correctly or not.
If everything is configured correctly, the result will be the same as in our screenshot.
Before buying a proxy server for Proxifier, remember that the program only supports Ipv4, Ipv6 will not work with it.
Where to buy mobile proxies?
You can buy mobile proxies for Facebook on our website https://mobileproxy.space/ . & nbsp ; We provide you with access to a huge pool of IP addresses (about 5000) of cellular operators and the ability to change them at your request through an API link. After the purchase, you will receive the access details and you can immediately start working. And one more thing, we have here Affiliate Program . We pay 16% of all user payments you refer. The money goes to your internal account automatically and is reflected in stories . & Nbsp; And the most important thing you can take on test mobile proxy for 2 hours after registration.