Instructions for setting up Google public DNS servers on Windows

DNS server, also known as – it is a piece of software that contains a database of public IP addresses and the hosts they are bound to. It is a kind of translator. Only instead of languages, hostnames and their IP addresses are associated here (by the way, you can check your IP address here). The output is a data set – A URL that will already be understandable to the user. For work, specialized software is used, as well as separate protocols of interaction. The entire Internet is based on the operation of DNS servers. This decentralized and hierarchical directory contains information about all devices, services and other resources connected to the network.
The provider, connecting the user to the network, binds him to a specific server. Basically, this is the device that will be geographically located as close to it as possible. This will ensure a faster connection. But there are often exceptions. In some cases, the capabilities of such a server will not be enough for the user, or he may not suit him for a number of reasons. And then the most logical and correct solution would be the additional use of public DNS servers in the work. here (the best public DNS servers).
But now we'll take a closer look at Google Public DNS – Google's Internet service that provides users with public DNS servers. Here are step-by-step instructions that will help you quickly and correctly connect them to your work. we will tell you how to ensure maximum efficiency and security of actions on the network using mobile proxies.
Google public DNS servers
Google Public DNS – service, which was opened back in 2009. Its work is aimed at speeding up the loading of Internet pages, which is ensured by the high efficiency of data caching, as well as an increased level of protection against spoofing. Today, Google Public DNS has two categories of public server addresses:
- For IPv-4: 8.8.8.8 and 8.8.4.4. These are Google's public DNS servers and act as an alternative to their closed source counterparts.
- For IPv6: 2001:4860:4860::8888 and 2001:4860:4860::8844. It is highly likely that they will become very relevant in the near future.
According to the assurances of the service management, Google DNS servers are designed solely to speed up the network. They will not collect personal data of users. Their IP addresses will be automatically removed from the system after 48 hours, and their geolocation and ISP – maximum after 2 weeks. The company promises not to record the user's personal information (name, physical address, etc.) at all. That is, the data that the system will use is required solely to provide a high level of user service.
Now let's dwell in as much detail as possible on how to correctly perform a number of settings in order to connect the Google public DNS server to work on your device.
Step-by-step steps to connect Google public DNS servers on Windows
These settings will be made directly on the Windows operating system. They do not require special knowledge and skills from you, a lot of time. It will be enough just to follow the step by step instructions given by us, and you will be able to connect the Google public DNS server to work in just 5 minutes. We perform the following actions:
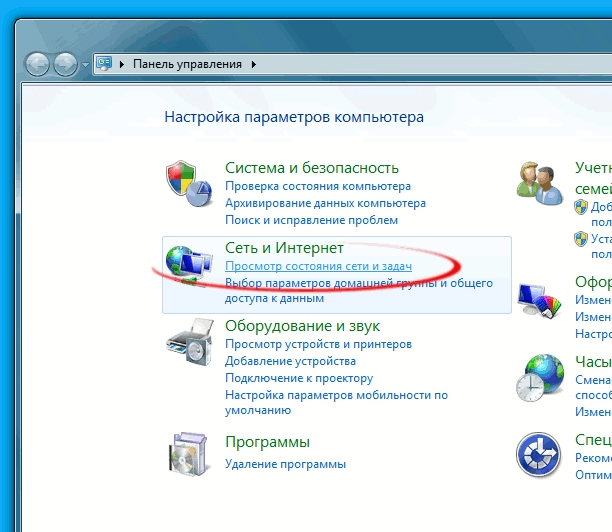
- Click on the "Start" button. In the tab that opens, select "Control Panel", click on it.
- Opens a window with a lot of options. Here we are interested in the "Network and Internet" tab. Under this inscription, we see an active link "View network status and tasks". Let's go through it.

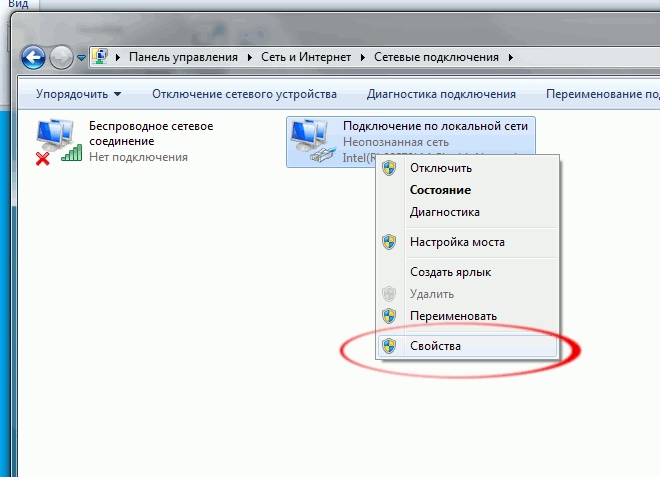
- In the new window we see a vertical menu on the left side of the screen. Here we are interested in the third tab from the top – "Changing adapter settings."
- You have two connection options: "Wireless Network Connection" and "Local Area Connection". We right-click on the option for which you want to set the Google public DNS server. From the drop-down list, select "Properties".
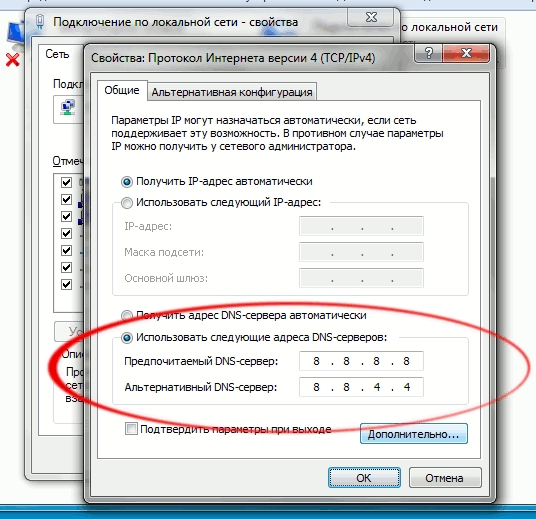
- In front of you is the active window "Local Area Connection – properties". In the "The marked components are used by this connection" block, find the line "Internet Protocol Version 4 (TCP/IPv4)". Click on it once to select it (highlighted in blue), and then click on the "Properties" button. under this block.
- In the new window that opens, we are interested in the block related to the DNS server (bottom). Here we check the box next to "Use the following DNS server addresses" in and fields that will become active, enter the relevant information: "Preferred DNS server"; specify 8. 8. 8. 8, and in the "Alternative DNS server" – 8. 8. 4. 4. Click on the "OK" button at the bottom of the window, thus completing the settings.
After completing all the steps, your work with the network through Windows OS will be carried out using the technical solutions of Google's public DNS servers.
Do not forget about security
Yes, the creators of Google Public DNS talk a lot and quite confidently about the protection of personal data, but still, we must not forget that we are talking about public resources. That is, those that can be used by anyone. And who can say what their intentions are. Therefore, in order to ensure a really high level of security when working with public Google DNS servers, we would recommend using mobile proxies, in particular from the MobileProxy.Space service. With them you get:
- guaranteed security and confidentiality of networking, which is ensured by replacing your real IP address and geolocation with the technical parameters of the proxy itself;
- the ability to simultaneously work with a huge number of accounts in social networks, bulletin boards, betting sites, instant messengers and other services without the risk of blocking, including using specialized software for autoposting, data parsing;
- Effective bypassing regional blocking and gaining access to any resources from around the world: it is possible to use rotation by geolocation and mobile network operators at any time;
- maximum functionality due to simultaneous operation on HTTP(S) and Socks5 protocols, which are connected via parallel ports (here you can quickly and check ports for availability for free, if necessary);
- simple and quick IP-address change: it is provided either automatically by a timer in accordance with pre-configured settings in the range from 2 minutes to 1 hour or by force, via a link from your personal account;
- access to more than 900,000 IP address pool: the number is constantly increasing;
- a professional and 24/7 technical support service that will quickly solve any gaps or answer your questions about the work of the proxy.
Click on https://mobileproxy.space/en/user.html?buyproxy for more details on the features capabilities of mobile proxies from MobileProxy.Space and take advantage of free 2-hour testing. With the offers of the service, your work on the Internet will be convenient, safe and efficient, including through Google's public DNS servers.