Requests library in Python: we guarantee reliable operation through mobile proxies

Currently, a fairly large number of different Internet applications use API in their work in order to connect to additional services that can expand their functionality. As an option, in this case, it will be possible to provide access to a site where weather information is displayed, pull up movie ratings, sports results, any other competitions, tweets. Moreover, via API it is also quite easy to connect to search engine results, image catalogs and more. Additionally, you can also expand the functionality of your application in this way by connecting a payment service, planning tools, translations, sending messages, transferring files. And all this can be implemented directly inside the script, that is, without using a browser.
By and large, you can also implement all this yourself, but this will require quite a lot of time and resources from developers. And in principle, there is no need for such a solution at all, since the API offers to implement these works as quickly as possible, literally in a matter of seconds. You get a stable and reliable connection to the source of information, as well as to its data, functions, literally pulling all this into your product, expanding its capabilities.
But before launching these works, it is important to understand how everything is arranged and works here. In particular, when using the API, the system will send HTTP requests and receive responses to them. When performing these tasks, the Requests library can provide you with significant assistance. This is one of those solutions that will help you set up the most effective interaction between your local script and the online platform, as well as with the Internet as a whole. Today, this library offers developers an extremely wide range of functions for working with absolutely any type of HTTP requests and opens up extremely wide opportunities for using the API in the Python programming language.
Today, we will dwell in detail on such a product, Requests in Python. We will tell you how to correctly perform all the necessary settings, get acquainted with the features of the work, highlight the key requests that are used when performing these tasks. We will describe the main Response objects. We will also talk about why it is worth using mobile proxies in this case and how to perform all the necessary settings, thereby providing yourself with maximum functionality and convenient work with this library in the Python environment. The practical recommendations you receive will help you connect Requests without any problems and start using it.
Installing the Requests library in Python: sequence of actions
Initially, we would like to draw your attention to the fact that our review today will be devoted directly to working in the Pycharm IDE. You should also understand that Requests in Python is a third-party solution for this platform, so the work will necessarily begin with installing this library. If you follow our recommendations, you will be able to complete this work as quickly as possible and without errors. In particular, you will have to implement the following steps here:
- Create a new project and open the terminal. Since we are talking about working with the Python programming environment, the library installation will be performed using the following command:

- For users who use the Pipenv virtual environment in practice, another command for installing the Requests library in Python will be relevant. In particular, you should enter the following:
- As soon as the specified commands are executed, the module download will start automatically. At this stage, you need to use the «pip freeze» command to clearly see which modules were installed in this case:


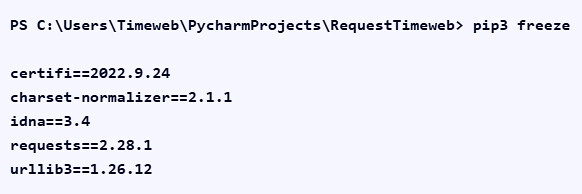
At this stage, it is important to understand what modules we are talking about in principle. Of the possible options, we will highlight the following:
- Certifi. This is a certificate package that provides the most secure connection.
- Idna. A library designed to support internationalized domain names in applications.
- Charset-normalizer. A library that can automatically recognize text content of an unknown encoding. An extremely useful module for developers, since all sites and services work on the extremely common UTF-8.
- Requests. This is already a direct library module.
- Urllib3. This module includes a set of functions and classes for working with URLs.
Now let's talk about the main requests that are used when working with the Requests library in Python.
First Requests in Python
Now we will move directly to working with codes that will help you get the necessary information about resources and talk about the key components of the Requests library. We will consider all these points in more detail below.
In any case, working with Requests in Python should begin with import. To do this, we need to contact the google.com site directly:
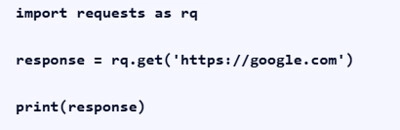
To display information, you should use the “Response [200]” command. Here you should use a GET request based on the HTTP protocol. Its essence is quite similar to the classic transition to the site by a special URL in the Internet browser. In response to such requests, we receive a Response object. It is endowed with a huge variety of properties and wide functionality. At the stage of outputting this object, we receive the response “200”. It will indicate that the library has successfully completed the sent request.
But here we can also refer to a non-existent section on the google.com platform to clearly see what kind of response about the absence will be received as a result:
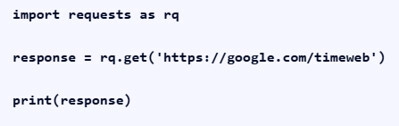
That is, the output in this case will be as follows: "Response [404]".
Now let's move on directly to getting acquainted with what requests in the Requests library in Python exist in principle and how to organize subsequent work with them. Above, we already said that in this case only HTTP requests are used. And the main one is the GET request. With its help, you will be able to view the contents of the resource without making any changes to it. However, to ensure maximum functionality with this library, you will most likely need a number of other requests. Please note that some of them may not be supported by a particular server at all.
So, at present, the Requests library in Python is capable of working with the following 7 requests:
- GET.
- OPTIONS.
- POST.
- HEAD.
- PATCH.
- PUT.
- DELETE.
To test this library, you can use the site https://httpbin.org. The developers specially created it so that novice users could practice and understand in more detail the specifics and features of Requests in Python.
GET request
GET is a request option that transfers the relevant information to the site already in its header. This means that this option should never be used when you want to send particularly sensitive data. Here we can include numbers and other information about bank cards, accounts, logins and passwords. But if this is, as an option, a search for a specific page on a news portal or in an online store, then you can safely use it.
To start the process of transferring information by the server, you need to add the “?” sign to its URL address, and then we write the data itself. As a result, you should get a request like «https://serverurl.ru/get?param1=value1¶m2=value2». It is very important to understand its structure. In particular, «https://serverurl.ru/get» is the URL itself. The expression «param1=value1¶m2=value2» is used as parameters here. If there are several parameters, they must be separated by an ampersand (&).
If we talk about the Requests GET request, then there will also be its own syntax. In particular, it will look like this: «requests.get ('URL-address', {key: value}, various arguments)». Here we also have the resource address, and the expression {key: value} hides a set of parameters. Please note that the various arguments are optional and the method includes them in the request automatically. Alternatively, you can include the timeout here. In practice, this request will look like this:
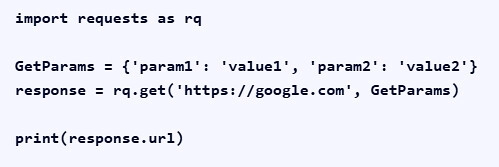
As a result of the output, we get the following solution: https://www.google.com/?par am1=value1¶m2=value2».
By and large, this completes our first acquaintance with this request.
POST requests
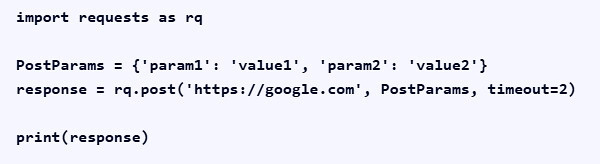
POST requests are used to send data to a site directly in the request body. That is, this is the information that is transmitted during the sending of a request to a resource. Here, the information will no longer be placed in the header, which allows for the transmission of confidential and sensitive information. Requests POST assumes the following syntax: «requests.post('URL-address', {key: value}, various arguments}». Here, by URL-addresses we mean the address of the resource to which the request will be sent, and {key: value} are its parameters. The peculiarity of this method is that all this data is independently included in the request body and they will be optional arguments here. There may also be additional arguments, which will also be optional. As in the previous case, this can be a timeout time.
Here we would like to draw your attention to the fact that if you decide not to specify these very optional parameters, then when using GET and POST requests, you will get the same results, provided that the same URL is used. In practice, this solution in the Requests library in Python will look like this way:

As a response, you get the following output: «{'param1': 'value1', 'param2': 'value2'}».
Using the json() method in practice, we get the request body from the library. But if we sent the same request to the google.com website, the system would eventually give us the following error:
In this case, we get the following output: “Response [405]”. This marking hides the Method Not Allowed error, indicating that the resource does not support such requests. But to get acquainted with the requests relevant to this resource, you can use OPTIONS.
OPTIONS request
OPTIONS is used to find out which of the requests you send the resource will not block. The syntax itself in this case will look like this: «requests.option('URL-address', optional arguments)». If you send it to the google.com site, you will see what request options this site supports:
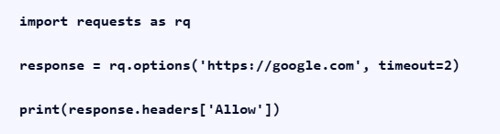
In this case, we get the following response on the output: «GET, HEAD». Accordingly, these are the requests that this resource supports in its work.
HEAD request
HEAD request assumes that the HTTP headers are returned as a response. It is used when the task is to get not the contents of a file, but additional data. This request is often used as a test option. In this case, the syntax looks like this: «requests.head('URL-address', various arguments)», where again by URL-address we mean the address of the site to which the request will be sent, and various arguments will be optional, like the same timeout time. If we apply this request to the google.com website, it will look like this:
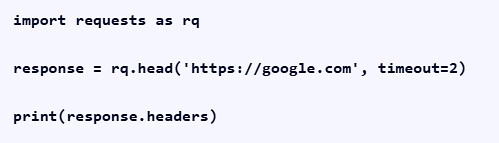
In this case, we received a large number of headers in the output.
PATCH requests
PATCH requests are intended for partial data updates on the site, for example, changing the token. In this case, the syntax will look like this: «requests.patch('URL', {key: value}, various arguments)». Let us repeat that the url address is — this is the address of the site itself, {key: value} are the parameters that the method will automatically include in the request body, and the various arguments are optional elements, such as the timeout time.
If we apply this request to the httpbin site, it will look like this:
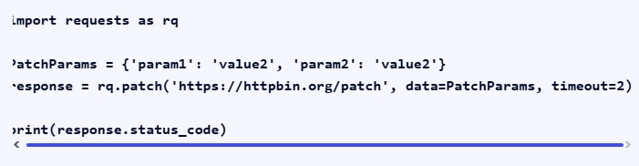
The output in this case will be: «200». This means that our request was processed successfully.
PUT request
Using a PUT request, you can create a completely new object or replace an existing one. In essence, it is quite similar to the POST method, but it is characterized by idempotency. That is, if the PUT request is sent again with the same data, the result will be unchanged.
To make the essence of this method clearer, let's consider it using the example of a database that stores logins and passwords. So, you, as a user, want to change your password. In the case of using POST, it will automatically add a new record with its own identifier (in this case, the login will be used here, unless other software checks are provided). But if you decide to use the PUT method, then this will no longer be the creation of another record, but an update of the current one, typical for this login.
The syntax of this request will look like this: «requests.put('URL-address', {key: value}, various arguments)». Here we have the address of the resource to which the connection is made (url address), parameters that the method will independently include in the request body ({key: value}), as well as optional various arguments.
For the httpbin site, this request will look like this:
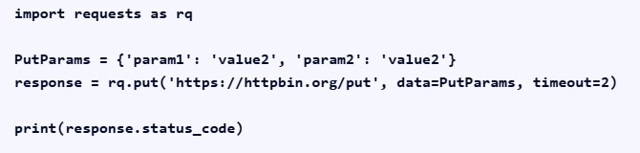
As an output, we get the message: «200», which indicates successful execution.
DELETE request
Already from the name, we can judge that the DELETE request is used to delete a specific object on the resource. The entry for this method will look like this: «requests.delete('URL-address', {key: value})», where by URL-addresses we mean the address of the site, by «{key: value}» the data that we currently want to delete (they will be included in the request body by the method).
The practical application of the DELETE request will look like this:
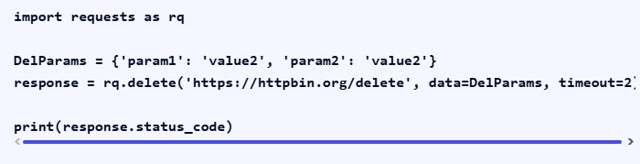
As a result, we get the following output: "200", confirming the success of the request.
What is the Response object
In the photo above, you have already seen how wide a range of methods and properties the Response object is endowed with. But in order to effectively use it in practice, it is important to be well versed in each of the options. Now we will give a brief description of each property of this object:
- Apparent_encoding. This is the encoding that is recognized by the charset-normalizer library. We have already talked about it above.
- Content. If you specify this parameter, then data in bytes will be sent to the output.
- Close(). This command will automatically close the connection to your server.
- Cookies. This option should be used if you want to send cookie files to the output.
- Encoding. This argument allows you to select the appropriate encoding option for decoding the received request.
- Elapsed. Using this command, you can send the time to the output.
- Headers. In this case, the site header will be sent to the output.
- Is_permanent_redirect. This property is used to define permanent redirects.
- History. With its help, a redirect can be sent to the output.
- Iter_content(). If you use this command, the data will be returned in parts.
- Is_redirect. This parameter determines the presence or absence of a redirect, depending on the code we get in the output.
- Iter_lines(). This property should be used if you want the data to be returned to you line by line.
- Links. In this case, the response headers will provide for the return of links.
- Json(). Surely, you have already guessed that this argument assumes the return of information in JSON format.
- Next. With this command, a PreparedRequest is sent for return.
- Request. In this way, you can return the result of a PreparedRequest.
- Raise_for_status(). Use this property to raise HTTPError exceptions.
- Ok. In this case, if the connection is successful, you get a True response, and if it is unsuccessful, you get a False response.
- Reason. This is used when you need a text representation of the object in the output.
- Status_code. This object contains the response code.
- URL. Accordingly, in this case, the URL of the resource you are working with is sent to the output.
- Text. The answer in Unicode will be displayed here.
Now you will be able to understand which property should be used when sending requests in a particular case, depending on the result you want to get at the output.
Why do Requests in Python need mobile proxies
A proxy server is a solution that will be useful and convenient when working with any Internet resources, services, and platforms. It allows you to replace the real technical parameters of the user device with other data, allowing you to bypass regional restrictions, block access, avoid sanctions for using automated solutions, and multi-accounting. This is what makes your work as flexible, efficient, convenient, and safe as possible.
A proxy server acts as an intermediary between your device and the target site. It will pass through itself all requests both forward and backward, performing the appropriate data substitution. All this works after preliminary settings in automatic mode, without requiring you to perform additional actions. Today, proxy servers are presented on the market in a wide variety of technical solutions. But the most advanced and easy to use will be mobile proxies. In this case, the work is carried out through the technical capacities of real mobile operators, which in itself increases the trust in them on the part of the search engine as a whole.
Using reliable mobile proxies in practice, you guarantee yourself:
- High levels of privacy when working on the Internet. Let's say you need to parse data from competitors' websites while avoiding blocking and other restrictions. By changing your real IP address and hiding your digital fingerprints, the system will not be able to identify you and your automated actions. This is also relevant for ensuring security when working on the Internet: without knowing the real address of your device, hackers will not be able to access it.
- Bypassing various blockings and access restrictions. In particular, a number of websites, programs, and even providers restrict access to certain resources due to regional restrictions. The most effective way to bypass this is to use mobile proxies, choosing a geolocation for which such blocking will not be relevant.
- Automatic load balancing. Surely you know that sending a large number of requests to a particular site can cause it to malfunction, or even become the cause of blocking. In this case, the proxy server will distribute requests as evenly as possible, minimizing such negative consequences.
Using mobile proxies in Python Requests will also be extremely relevant. After you install this library, it will essentially be ready for use, that is, you will already have the ability to send HTTP requests. But at the same time, your actions will be unprotected and easily identified by the system, which can cause blocking and restrictions in work. Therefore, to ensure the most stable and convenient work with the Requests library in Python, you will need to additionally connect a proxy server. We will tell you how to do this correctly below.
Configuring a proxy server for the Requests library in Python
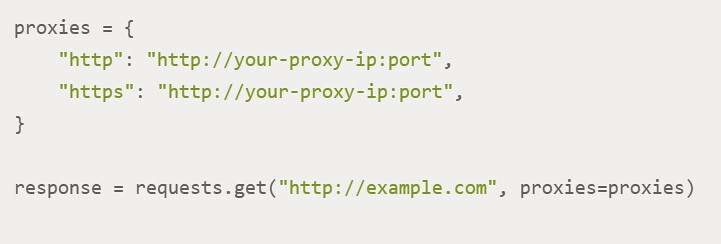
Using the Requests library, you can quite easily and quickly connect a mobile proxy for subsequent work in Python. All you need to do at this stage is pass your proxy address to the dictionary and then use it in the HTTP requests that will be sent later. In this case, your action looks like this:
If you use private proxies, you will be required to pass authentication. To configure it, you should run the following command:
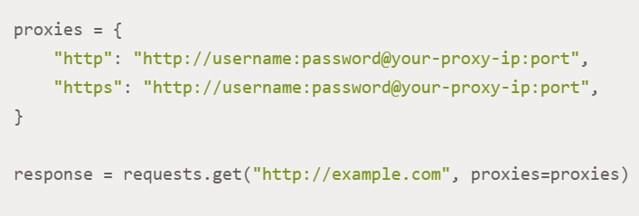
Here we would like to draw your attention to the fact that such information as username, that is, your login, and password, namely, the access password, must be entered without fail.
We would like to draw special attention to the features of using SOCKS proxies. This is the solution that guarantees the highest possible anonymity when working with online platforms that have fairly strict restrictions. In some cases, classic HTTP solutions may be ineffective in such conditions. To perform the appropriate settings, you first need to install an additional library using the command: «pip install requests[socks]». Subsequent use of the SOCKS proxy will look like this:
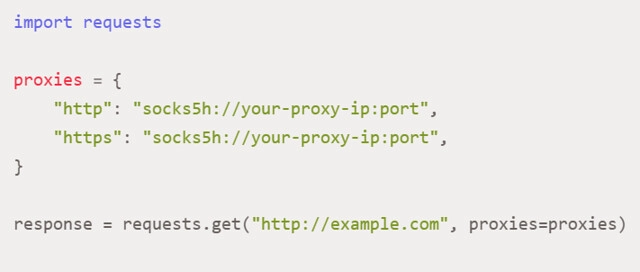
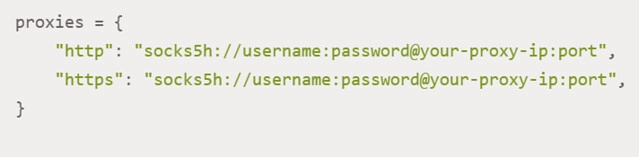
We repeat that when using private proxies, you will be required to pass authentication. Therefore, it must be added in advance as follows:
The last thing we want to draw your attention to in this review is the features of managing sessions with connected proxy servers in the Requests library in Python.
Providing flexible session management with proxy servers in the Requests library in Python
This option should be used in practice by those who plan to send a large number of requests through the same intermediary server. It would be better for you to initially set a proxy for the entire Requests session in Python, which eliminates the need to specify it in each of the processed commands. Moreover, along with simplifying the code, this solution also significantly improves work efficiency, increases the speed of task execution. So, to use a proxy directly in Requests sessions in Python, you need to use only the requests.Session() command. In this example, it will look like this:
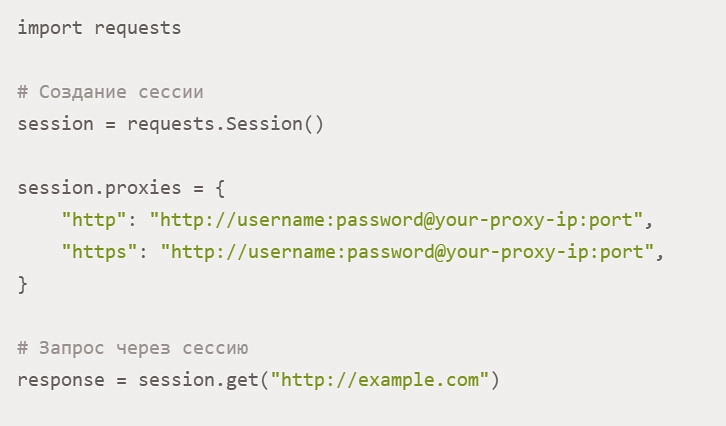
This will be enough to ensure that the proxy server you selected is automatically used during all sessions.
In some cases, especially with extremely active interaction with Internet sites, which will be relevant when parsing data and using other automated solutions, using the same intermediary server can lead to blocking. In this case, you will need to switch between requests to different servers or change the parameters when working with mobile proxies. Here the request will look like this:

Let's sum it up
We hope that the information we provided in today's review helped you navigate the features of the Requests library in Python, understand how to connect it to work and how to correctly use different requests, add objects. But in any case, it is important not to forget about the security and functionality of the work. Mobile proxies from the MobileProxy.Space service can provide this. This is one of the best solutions that the modern market offers in terms of functionality, reliability and price.
You can get to know in as much detail as possible what these mobile proxies are, evaluate the availability of tariffs, and a huge variety of geolocations here. You can also use free testing of the product to personally verify its high stability and ease of use. If you have additional questions, you will need to consult with specialists; the technical support service works around the clock.