Setting up mobile proxies in ProxyCap

ProxyCap – software designed to launch Internet products through proxy servers. That is, thanks to it, all network traffic will go through one proxy or through a whole chain of servers. Here, users will be able to specify those sites that will be handled exclusively through the "intermediary". Thanks to its wide functionality, the software allows you to tunnel requests of any software according to individual settings, automate processes that provide a high level of security and complete anonymity of networking. In addition, ProxyCap has a simple and intuitive graphical interface, which greatly simplifies both settings and subsequent work.
Using this software, you can create chains that include up to 16 servers. In this case, different types of proxies can be used: HTTP, HTTPS, SOCKS v4 and SOCKS v5. Another feature of – ability to support logging automation and SSH connection. You simply connect ProxyCap to work without any reconfiguration of your Internet clients.
Let's define the main advantages of working together between software and proxies. Let's get acquainted in more detail with the interface of the program. Let's dwell on the features of proxy settings for working with it.
Benefits of Proxy and ProxyCap working together
ProxyCap working together with – the simplest, most reliable and efficient solution for secure and stable networking. Among the features of the product are:
- wide functionality;
- tunnel requests of any software without exceptions;
- gaining access to any Internet resources, including those blocked in your country;
- support for the most popular and in-demand Internet protocols today: HTTP, HTTPS, SOCKS v4, SOCKS v5, SSH;
- the presence of a built-in checker to check the server's performance;
- the ability to create consecutive chains of proxies, including up to 16 machines;
- high level of work security due to redirection of all DNS requests through the server, replacing the real IP address and geolocation with proxy data;
- automatically start when the operating system is turned on.
ProxyCap interface: getting to know the main tabs
If you haven't worked with ProxyCap yet, it's time to move on to getting to know its interface, namely the main tabs and menus. And the first step is to download it to a personal computer. We start the program. Since this is done for the first time (there are no individual settings), the main window will be empty. On subsequent visits (after connecting the proxy), active intermediary servers will already be displayed in this window.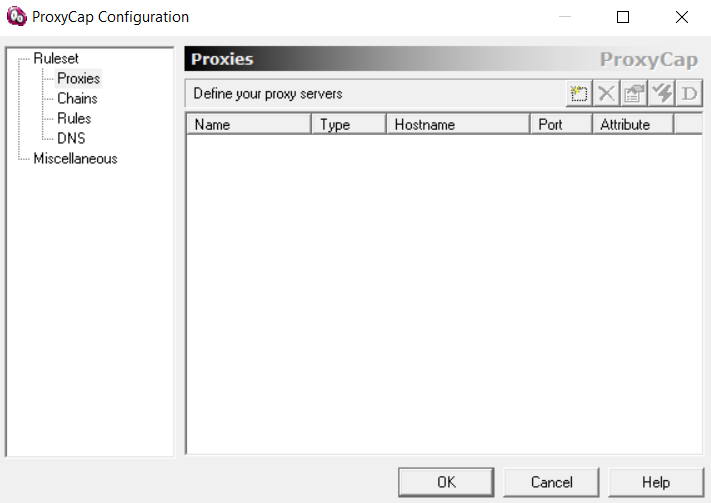
The block on the left shows the main working tabs of ProxyCap:
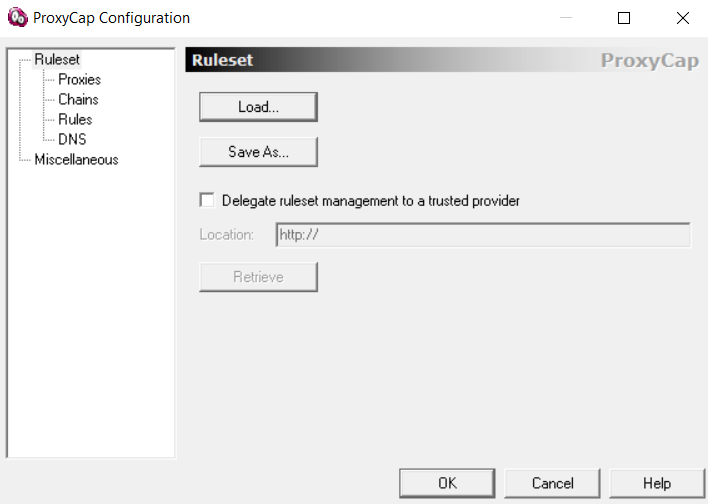
- Ruleset. In this tab, you can import and export working configurations. If there is a desire or need, you can "transfer control rights to legitimate providers" by checking the appropriate box and specifying the path to this provider itself.

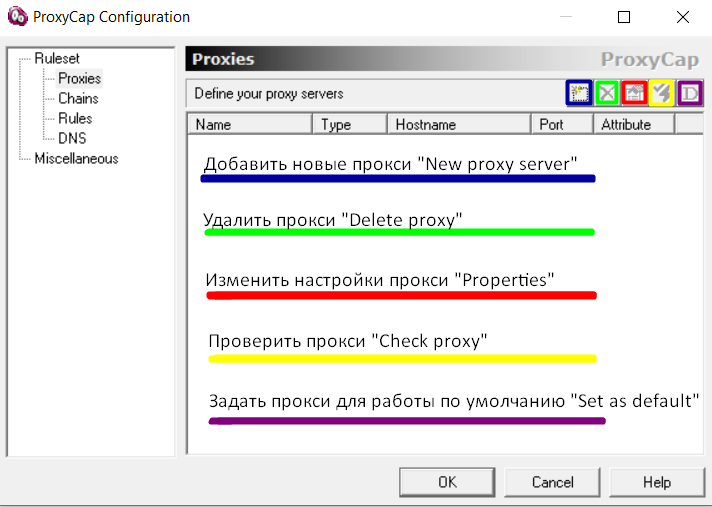
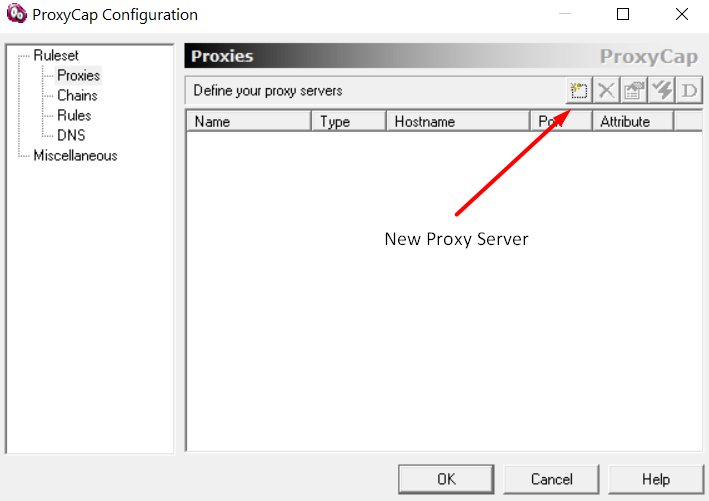
- Proxies. This is the tab where the initial proxy settings will be made. It is supposed to be possible to add new servers, remove those that are not used. It will also be possible to check the correctness of the proxy, change one or more settings. You can also specify in advance those servers that will be used by the program by default.

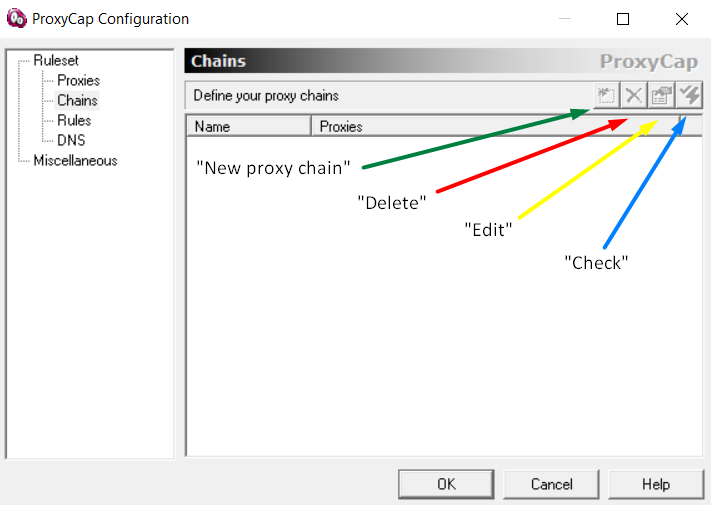
- Chains. This tab will need to be used when setting the basic settings for chains of proxy servers. The main tools are indicated as icons in the upper right corner of the screen. The first of them – "New Proxy Chain". Using it, you can create a new chain of proxy servers through which traffic will be tunneled to ProxyCap. If you need to delete a chain of servers, then you should use the second icon – "Delete". The third button in the – "Edit". It provides tools that will allow you to adjust the chain of servers you specify. After setting all the necessary parameters and making the appropriate changes, do not forget to click on the last, fourth – Check". It will automatically check if the proxy chain is working.

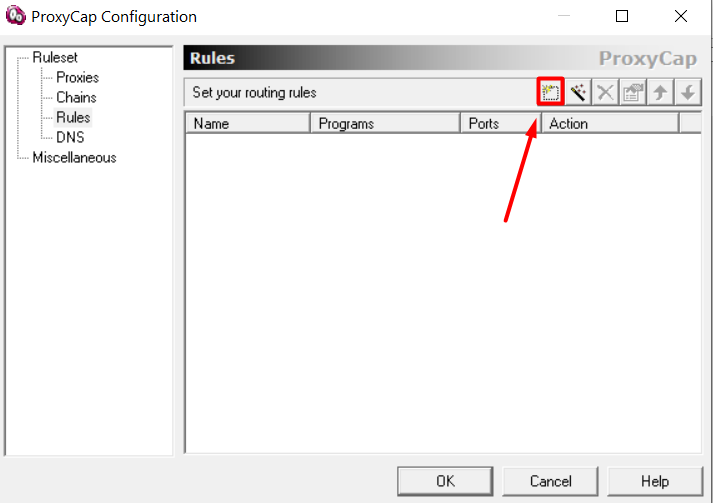
- Rules. This tab is intended to form the routing rules for all Internet connections that will be made from your PC. To make the appropriate settings, you should also use the icons in the upper right corner of the screen. There are 6 of them here. The first, "Quick Add Rule" (Quick Add Rule) and the second "New Rule Wizard" (Wizard for creating a new rule) will allow you to create these same rules. If they need to be edited, then click on the third button – "Edit", if you delete an outdated rule, then the fourth – "Delete". The last 2 buttons in this panel, one with an up arrow, and the second – down arrow – it is an opportunity to change the sequence of rules. The fact is that ProxyCap descends from top to bottom in the process of scanning them. And if you need to change priorities, then with the help of the last two buttons you can move a specific rule to the desired position.

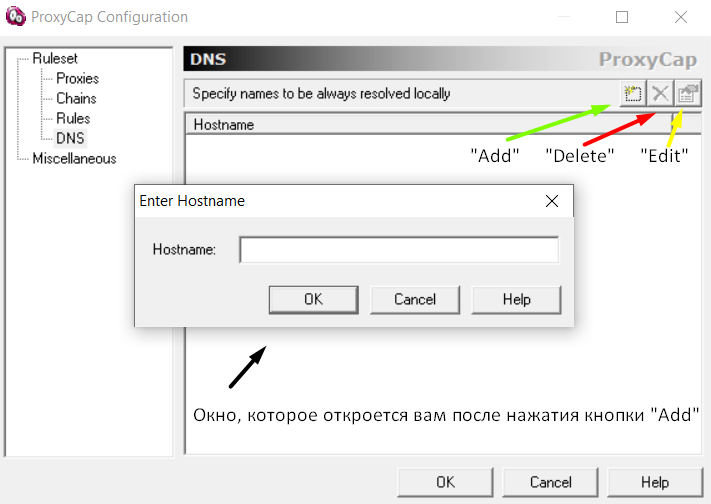
- DNS. This tab is designed to generate a list of domain names. Using the buttons from the top right corner of the screen, you will be able to add, remove or edit them accordingly.

Getting acquainted with the program menu
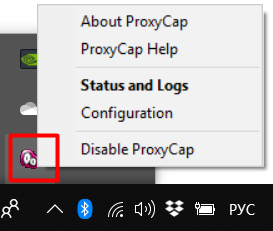
There is a pink and white icon in the lower right corner of the taskbar. This is the program menu. We click on it with the right mouse button. A window will appear with five options:
- "About ProxyCap". If you click on it, a window will open in which you can specify the serial number of the program. This will open up unlimited possibilities for its use. You will have access to all the features of the full version of the program, and not its test version.
- "ProxyCal Help". In this menu option, you will be able to get to know in detail all the functionality of the ProxyCap software. Please note that the description is in English.
- "Status and Logs". Thanks to this function, complex monitoring of logs and connections will be performed.
- "Configuration. Here you can find all the settings that you will need to make when you first enter the program.
- "Enable/Disable ProxyCap". This menu option will allow the user to enable or disable ProxyCap.
Sequence of actions for setting up a proxy in the ProxyCap program
Now that you have already got acquainted with the main tabs and menus of the ProxyCap program, you know where to look for certain working tools, you can proceed to the settings. Please note: It is assumed that you have already rented one or more reliable private proxy servers. You can do this with maximum benefit and convenience on the MobileProxySpace service. You get functional private proxies with unlimited traffic per channel at the best price and for any period of time, from 1 day to 1 year.
Next, we perform a series of actions in the following sequence:
- Install the program on the computer and run it. We have already said above that the settings window will be empty on the first launch.
- Go to the "Proxies" tab, which is located in the vertical menu on the left side of the screen.
- Click on the first button in the – "New Proxy Server". This feature allows you to add a new proxy server.

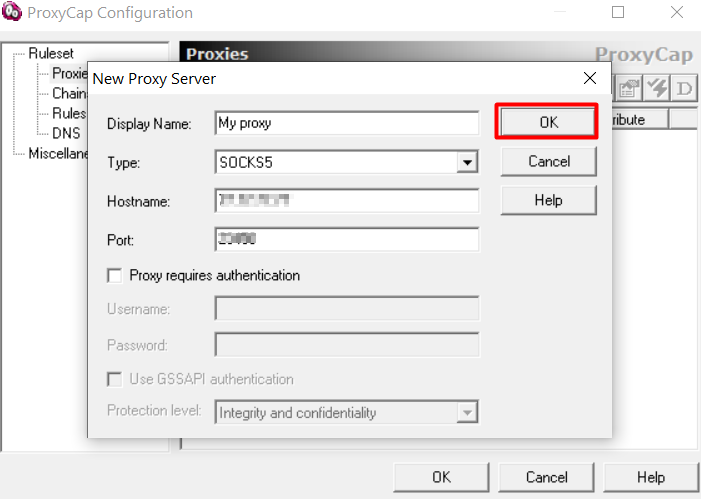
- A new window opens with blank lines. We enter the relevant information into them: the name of the proxy in the "Display name" line, the type of protocol used (HTTP, HTTPS, SOCKS v4, SOCKS v5, SSH) in the "Type" line, the IP address of the proxy server in the "Hostname" line ; and its port, respectively, in the "Port" box. Click "OK" to save your changes.

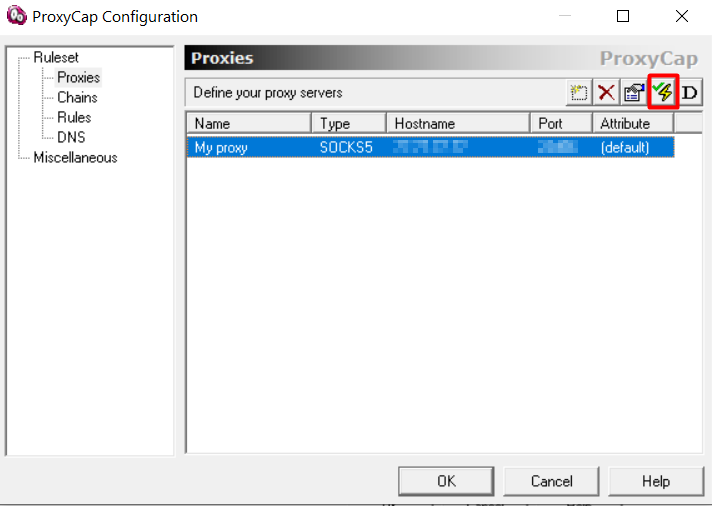
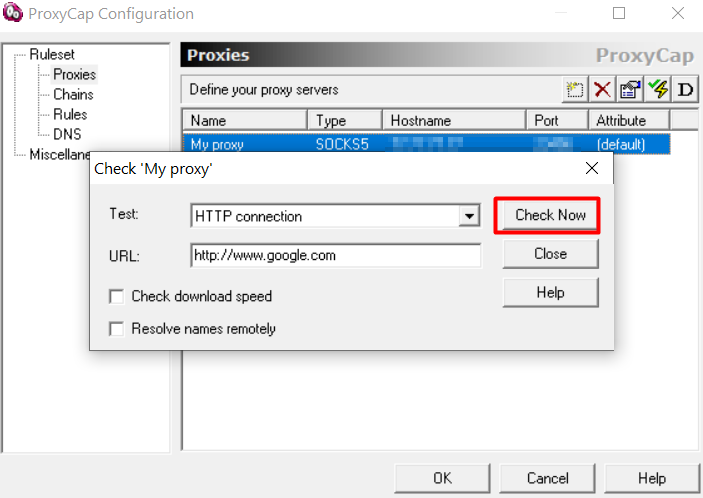
- Select the added proxy server in the working window (just click on it, it will get a blue highlight), and then click on the fourth button in the top panel (lightning bolt image) – "Check Proxy Server". So you check how working the server you connected will be. After clicking on this button, a new window will appear in which you should specify a link to a specific site, or you can leave what is indicated here by default - google.com (the work of the proxy will apply to all Google search results). Click on the "Check Now" button.


- A few seconds, and a new window appears on the screen with the results of the check. The inscription "SUCCEEDED" will indicate that the testing was successful, the proxy server is working. "FAILED" message will indicate that the test is not successful, that is, the proxies do not work. In the latter case, you need to check the correctness of the entered information and run the check again.
This completes the basic proxy setup for working with ProxyCap. But it is also important to set the rules on which the subsequent interaction will be based.
Setting up rules for ProxyCap and proxies to work together
In the same menu in which we just set new proxies, we find the "Rules" tab. It is in it that the rules for traffic tunneling are set. To complete the task:
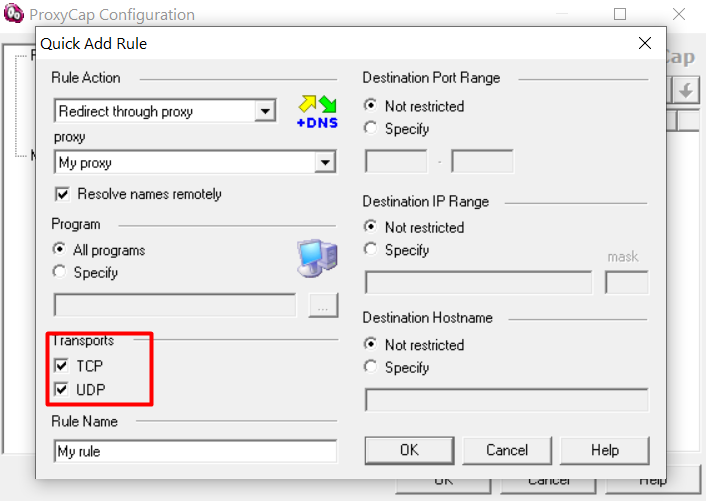
- Click on the first button in the toolbar – "Quick Add Rule". A new window opens.
 < /li>
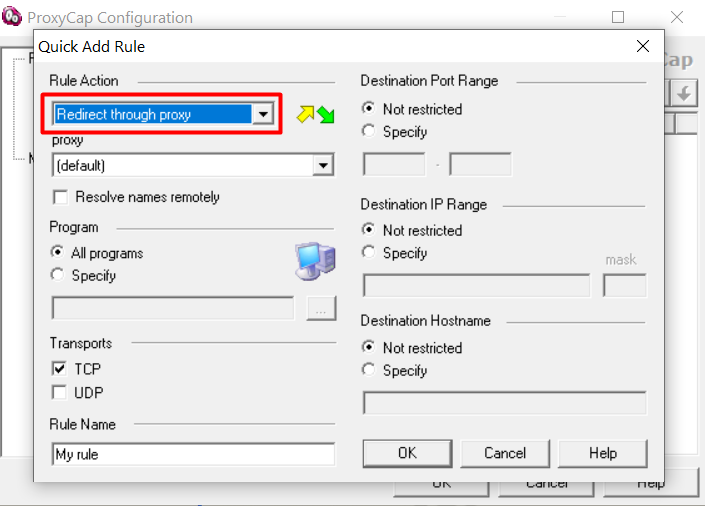
- Under "Rule Action" click on the hidden tab and select the "Redirect throught proxy" parameter from the proposed list.

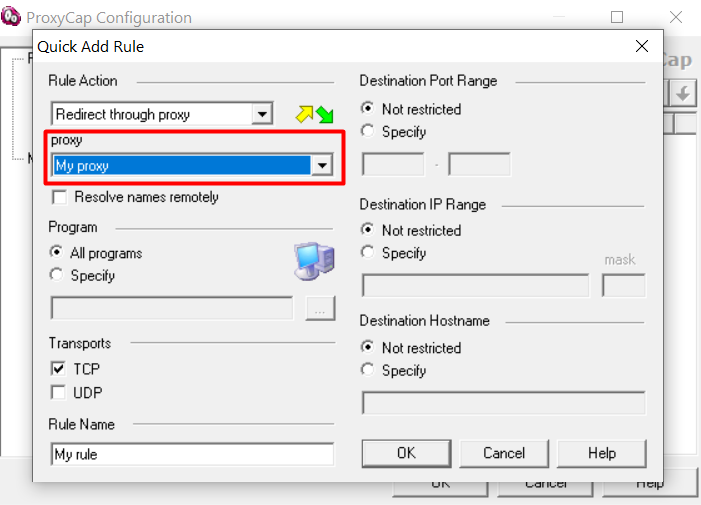
- In the "Proxy" box from the drop-down list, select the proxy server that you added at the setup stage.

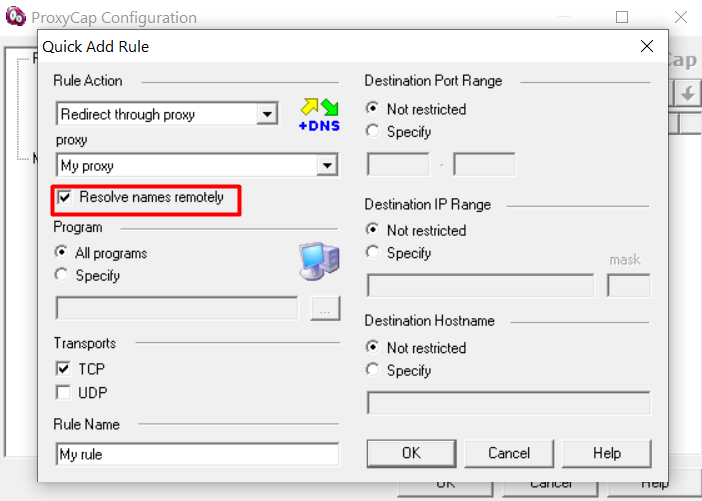
- Check the box to activate the "Resolve names remotely" option, which allows you to redirect incoming DNS requests to the SOCKS server. With this simple step, you can provide strong DNS data loss protection.

- The UDP and TCP protocols are checked below.

We do not make any other changes to this window, we leave everything else as it is by default. It assumes that the rule provides for tunneling for all applications without exception, including the IP/PORT range. If this option does not suit you, you can specify point configurations that allow you to manually select applications that will work through a specific proxy server. That is, thanks to ProxyCap, you can automatically launch certain proxy servers based on which program you plan to use.
Click OK to save your changes.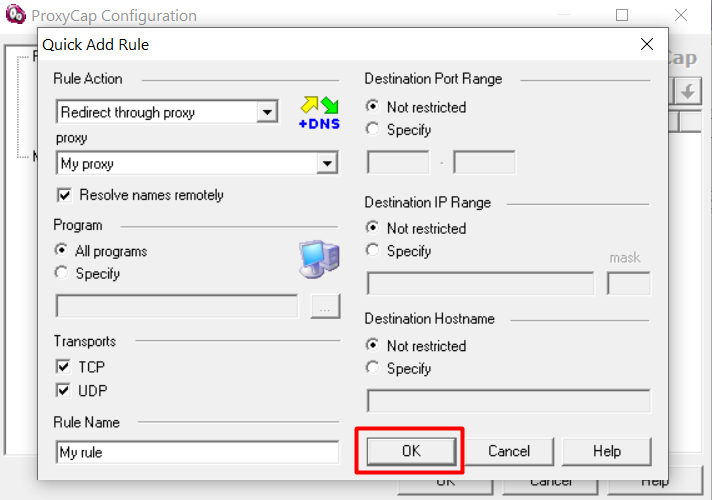
That's it, you can start working, forgetting about all kinds of restrictions, ensuring complete security and anonymity on the network.
