Filters in Google Analytics 4: why they are needed and how to set them up

Filters — This is one of the categories of Google Analytics 4 tools that allows you to interact with your data more easily and effectively. Thanks to them, you can highlight or change certain traffic flows at the presentation level, and limit some information taking into account the specifics of the upcoming work.
Now let's look in more detail at what data filters are, why they are needed, and what types they are. Let's get acquainted with the most popular solutions, and also show you how to set up an internal traffic filter and a traffic filter for developers. Let's describe what restrictions on filters exist in Google Analytics 4. We will provide answers to the most common questions from the user audience.
What are filters in Google Analytics 4?
Filters that Google Analytics 4 offers its users today — This is a convenient and efficient solution for many specialists. As an example, if you have a team of different specialists working on one project, that is, each of them is responsible for their own specific range of tasks, then a more appropriate solution would be to create their own views for each of them, that is, those that will include only certain sources. So, if this is an SEO specialist, then he needs indicators on organic, direct and referral traffic. An Internet marketer who specializes in contextual advertising is interested in paid traffic. But the web analyst must have complete amounts of data, so for him the view can be left completely unchanged.
Another area where filters are widely used — This is segmentation of the traffic source, which is important for advertising agencies. Thus, each performer in the process of providing services will see only his own data, without appropriating the merits of others.
Google Analytics 4 filters are also widely used to exclude certain IP addresses from traffic. This solution is often used for office employees. Other filter options are used, such as retrieving data for a specific subdomain or directory, converting addresses of dynamic pages into regular text strings, etc. For greater convenience, they are all divided into two large categories, which we will discuss below.
Many specialists who come across Google Analytics 4 filters in practice do not see the difference between them and segments. But there are a number of fundamental differences, in particular:
- The filter will be applied to absolutely all data at the presentation level. All these changes that the user will make through it cannot be undone. In addition, you will not be able to apply it to previously collected data.
- Segments do not provide the ability to filter statistical data by IP-address of the user, while in Google Analytics 4 this option implemented, and quite well.
- You can apply segments as many times as you need without fear of your account information being changed. In the case of filters, you must clearly understand that filtered data cannot be restored. That is, if you think that they might still be useful to you in your work, then create a separate view without any filters.
- You will not be able to apply filters to historical data. The data in the view can change according to conditions and begins to work only from the moment the filter itself is created.
- The filtration process itself proceeds from the bottom up. That is, if you use several filters in practice, then initially all the data from your view will be filtered by the very first indicator, and then by the second, third, etc.
Let's get acquainted with the types of data filters
Today, Google Analytics 4 provides 2 types of data filters:
- Internal traffic. Involves cutting off the traffic of certain employees. Here, the concept of internal traffic refers to the entire data flow that is created when various specialists visit the site: managers, suppliers, SEO specialists, copywriters, etc. That is, these are those users who cannot be classified as the target audience. And if it turns out that one or another team is actively working on a large project, then they will automatically generate an impressive amount of traffic. And this in itself will negatively affect the accuracy of the data displayed in reports. That is, using the appropriate filter, you can exclude such traffic and increase the accuracy of the final parameters.
- Developer traffic. Apply to traffic that comes from debugging devices. Unlike the previous category, here the traffic comes directly from the user audience, namely those who configure the resource or monitor it during the debugging process. This is a kind of testing stage that checks the operation of all the settings made on the site. But still, it also assumes the formation of impressive traffic, which will also cause inaccuracy in the obtained statistical data. If you filter it, the parameters associated with working in debug mode will remain exclusively in the DebugView report, which is intended for testing. It allows you to check absolutely all the changes that were on the site before deploying them to the production environment.
Acceptable filter states in Google Analytics 4
There are 3 states in which filters can be in the Google Analytics 4 service:
- Testing. We already said above that, unlike segments, filters cause irreversible changes in information. That is, what they remove from the report, you will no longer be able to see. Therefore, before taking any drastic actions, activating or, conversely, deactivating the filter, it would be a good idea to test it. Its distinctive feature is that it does not cut off all changes forever, that is, you can analyze how correctly it works. To use it, you must add it to the comparison report using a parameter such as Test Data Filter Name.
- Active. While in this state, the filter will irreversibly change the data. If you want to activate it, you need to click on the icon with the image of three vertical dots directly in the line where it is located and select the “Activate filter” option from the drop-down list. After this, the system will give you a warning that the changes made are irreversible. If you really want to activate the filter, then confirm your consent by clicking on the “Activate filter” button. If you clicked by mistake, then click on the “Cancel” button.
- Inactive. In this case, the filter will not make any changes to the data. It turns out that this way you deactivate a previously activated filter. To put it into operation, you need to do the same steps that we gave in the option above. That is, click on the icon with the image of three vertical dots in the corresponding line and select the “Deactivate” option from the drop-down list.
We would like to draw your attention to the fact that you can delete the filters themselves if you are sure that you will not need them in subsequent work. To do this, you need to go to the filter editing page, click on the icon with the image of 3 vertical dots and then click on the “Delete” button. from the drop-down list.
Now that you understand what Google Analytics 4 filters are, why they are needed, what types they are and what states they can be in, let’s move on directly to their settings.
Setting up internal traffic filters in Google Analytics 4: step-by-step instructions
Before proceeding directly to setting up filters in Google Analytics 4, you need to check what access permissions you have. To perform this work, administrator or editor access is required. Subsequently, your work will consist of 2 separate stages:
- Definition of internal traffic.
- Creating a data filter set.
Let's look at each of them in more detail.
How to configure internal traffic detection
To set up internal traffic detection in Google Analytics 4, you need to follow these steps:
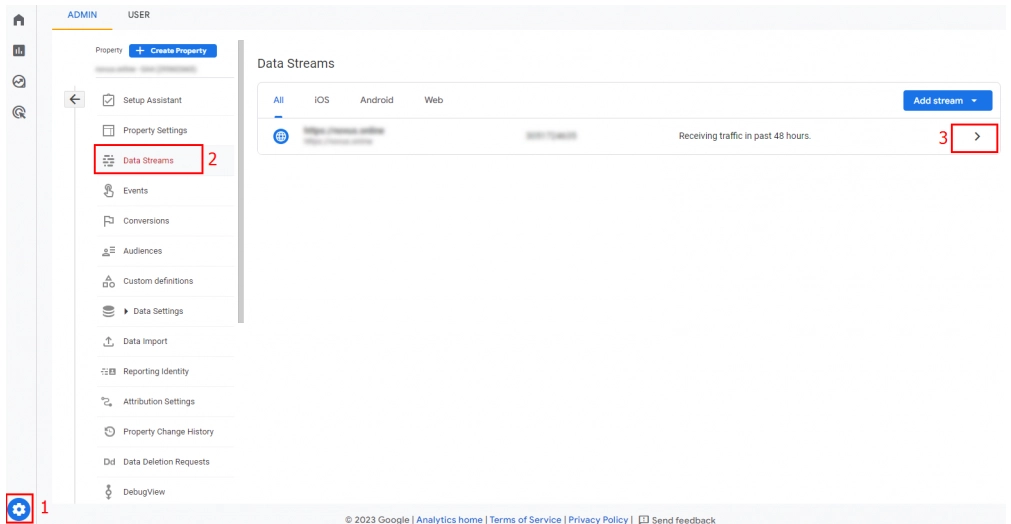
- Go to the “Administrator” tab (the image of a gear in the lower left corner of the active window). Here we select the “Resource” option. In the new vertical menu that opens on the left side of the working window, we find the “Data Streams” tool. In the main part of the screen, several threads will then open in front of you. Select the one that interests you at a given time and click on the arrow in the form of a “more” sign. at the very end of your stream line.

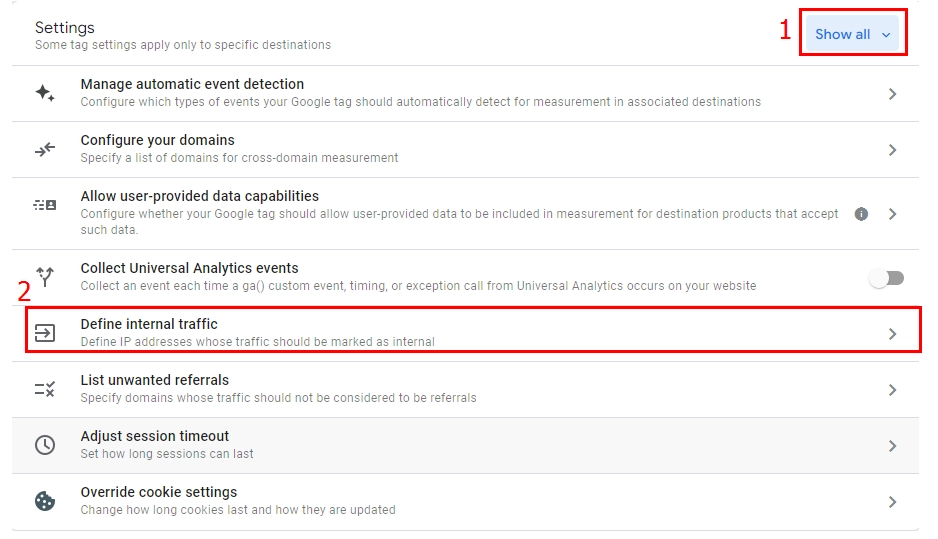
- Now a new window opens in front of you, containing information about a specific stream. We go down and find the “Tag Settings” parameter among the presented tools. To see all the settings that are present here, click on the “Show all” button. After this, you will have a drop-down list. We find in it such an option as “Definition of internal traffic” and click on the arrow in its line.
- Another window will open in front of you. And all these rules that are configured for this action will already be displayed here. If you are performing work for the first time, that is, there are no set rules, Google Analytics 4 will notify you about this using a corresponding notification. Here you can set these rules by clicking on the “Create” button. If you have any difficulties or additional questions, the answers to them can be found in the “Help” tab.
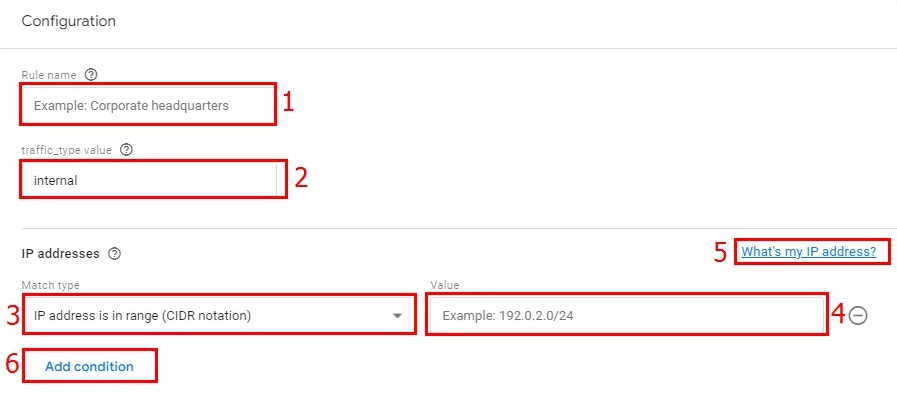
- After clicking on the “Create” button the service will open a new window in which you will need to set all the necessary rules. Initially, we indicate the name of our rule, by which you can subsequently identify it. In the field below we write the name of the parameter that will be clear to you. We would like to draw your attention to the fact that for different sets of traffic you will need to come up with different names. Therefore, in order not to be confused by subsequent work, approach this issue very responsibly. In the next window you need to click on the arrow, calling up the drop-down list. From it we select the type of match with the IP address that suits you. In the "Values" field We directly enter the IP address itself, transitions from which you do not want to take into account when generating service reports. If you want to exclude your IP address, you can click on the “How to find out my IP address” button. and enter the data already received in this field. If you want to exclude not one, but several IP addresses in one rule, then you need to additionally click on the “Add condition” button. It will be necessary to perform similar actions until all addresses are added to the rules.
- Save the changes and this completes the internal traffic filter settings related to its definition. We can move on to stage 2.

How to create a data filter?
To create a data filter, you must perform a number of actions in the following sequence:
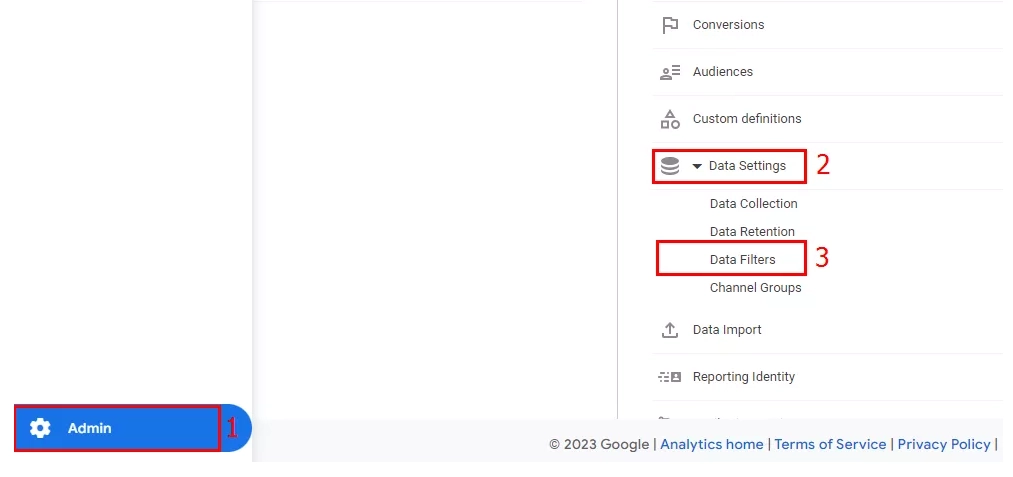
- Go again to the “Administration” section (this is the image of the gear at the bottom of the left vertical menu of the main screen). Next, go to the “Resource” tab. In the vertical menu that opens, first select the “Data settings” option, and from the drop-down list — "Data Filters" tool. Here we would like to draw your attention to the fact that the internal traffic filter in each of the Google Analytics 4 counters is automatically added to the testing state. That is, to check how they will work, you do not have to make any additional settings. Next, you will need to decide whether to activate this filter or deactivate it.
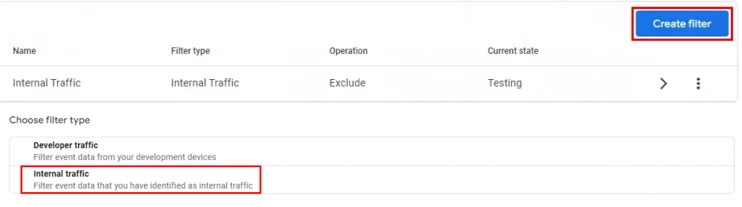
- In order to create the filter itself, click on the blue “Create filter” button. in the upper right part of the active window. After this, a new field will open where you need to select the “Internal traffic” option from the list.
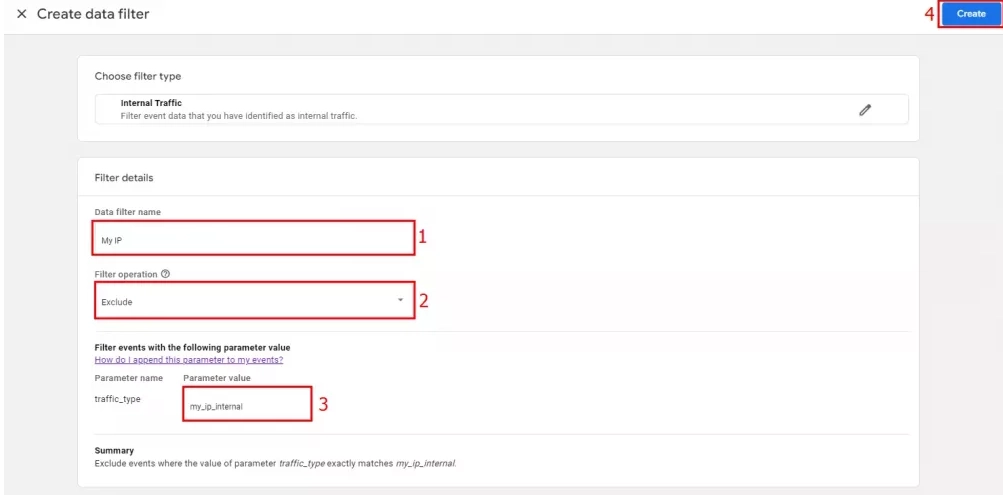
- In the filter settings window, you must fill in all empty fields. In particular, we initially assign a name to our filter. In the column "Operation" From the drop-down list, select the “Exclude” tool. By doing this, you prohibit the system from processing data using a specific filter, that is, the one you are creating at a given time. If, on the contrary, you want to use the data that will be obtained from this filter in your work, then you need to select the “Include only” tool. In the next window “Traffic type” We indicate the name that you entered at the previous stage, that is, when defining internal traffic. Click on the blue “Create” button in the upper right corner of the screen.
This completes all your work related to setting up an internal traffic filter in Google Analytics 4. Now let's move on to how to configure the traffic filter correctly for developers.
Features of setting up a traffic filter for developers
To set up traffic filters for a developer, you need to perform a number of simple steps in the following sequence:
- We go to the administrator section by clicking on the gear icon in the lower left corner of the active window. Here we select our resource and click on the drop-down list with settings. Of all the options that are presented here, we are interested in the “Data Filters” tab.
- Now in the new window, click on the blue button in the upper right corner “Create filter”. Another window will open in front of you, where you need to select the type you need. After this you will be taken to the settings window. Here you need to give the filter a unique, but at the same time clear name for you.
- Go to the “Operation with filters” field. Here, from the drop-down list, select the “Exclude” option if you want Google Analytics 4 not to process information based on the filter you specified, or “Include only all” if, on the contrary, you are faced with the task of analyzing only those flows that will issued by the system according to the filter you specify.
- Initially select the testing mode. Next, when the configuration settings are completed, click on the “Create” button. This creates your filter. The system will give you a corresponding notification on the screen.
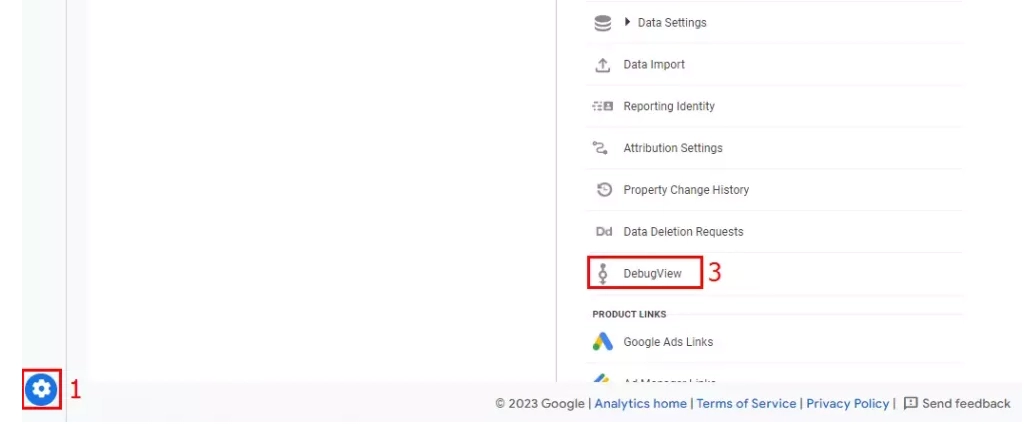
- That is, you have done everything to ensure that in debug mode Google Analytics 4 does not add relevant data to reports that could negatively affect the accuracy of the processing results. But if you need to view them, then you will need to go to the “Administration” tab, then select your resource and click on “DebugView” in the drop-down list.
This completes all the basic settings, and you can now proceed directly to work. But there are a number of other points that I would like to pay special attention to.
What filter restrictions are provided in Google Analytics 4
Before moving on to working with filters, you need to clearly know what restrictions exist from the Google Analytics 4 service. We are talking about:
- When working with one resource, you can use no more than 10 filters. This is the maximum that is provided in the service.
- If you have already set up a data filter, you will be able to use it within a day to a day and a half.
- When writing filter names, remember that the maximum length here is 40 characters. It is also very important to ensure the uniqueness of these names within the same site. Along with letters, underscores, numbers, and spaces can be used in names, but the first character must be alphabetic.
- If you have activated filters, their effect will be irreversible. You will not be able to see what information has been filtered even after you disable one or another filter.
- To make settings, make changes to filters, or delete them, you must have editor or site administrator access.
To summarize
Summarizing everything we talked about above, we note that today the Google Analytics 4 service provides 2 types of data filters. The first of them — This is the so-called internal traffic, which is formed when one or another specialist visits the site, be it a copywriter, opener, manager, or supplier. That is, in this case, using this filter, you will exclude from the statistics all transitions made by your employees. That is, all internal traffic is blocked, which is where the name of the filter itself comes from. In this case, the key parameter in the settings process will be the determination of internal traffic by a particular IP address.
Developer traffic already comes from users who specialize directly in setting up and monitoring the operation of a particular site in debugging mode. It also affects the accuracy of generated reports, so it is recommended to filter it. The only place where developer actions will not be disabled is debugging itself. You can view the corresponding report in DebugView. It would be useful to use this tool if you edit your resource, add new tags and would like to test them. Unlike setting up internal traffic, there is no need to define traffic here (there is no binding to IP-addresses).
And the last thing we would like to draw your attention to is ensuring the most stable and functional work on the network without any risks or restrictions, including gaining access to resources from any country in the world, using multi-threaded actions without blocking, banning . In this case we are talking about using mobile proxies from the MobileProxy.Space service.
Follow the link https://mobileproxy.space/en/user.html?buyproxy to navigate the functionality and features of the proposed solutions. The main points worth highlighting are:
- Access to a huge pool of IP-addresses belonging to different geolocations. You are guaranteed to have access to sites from different countries and regions of the world.
- Easy and quick change of IP-address. There are 2 options here: setting up an automatic change using a timer in the range from 2 minutes to 1 hour, or forcing a change using a link every time the need arises. These actions can be performed through the user’s personal account.
- Simultaneous operation on HTTP(S) and Socks5 protocols. A similar solution is implemented by connecting to parallel ports. You can be sure of high security, stability and functionality when working with these mobile proxies.
- Availability of round-the-clock technical support service, which instantly responds to user requests, solving technical difficulties that arise when working with a proxy.
- A free two-hour trial period is available so that anyone can make sure before purchasing that this is exactly the solution they were looking for for themselves.
Take advantage of the service's offers and see for yourself how functional, effective, and convenient the solution is at your disposal. You will be able to work with the Google Analytics 4 service without any restrictions, without fear of running into blocking or any other restrictions from the system.
We would also like to draw your attention to the current tariffs. They differ somewhat for different countries and regions, and also directly depend on the period of time you buy mobile proxies for. So, the most attractive solution in terms of price and reliability would be to purchase an annual tariff. Compared to a daily package, your benefit will be almost tenfold. You can also use the built-in services to determine the IP-address of port availability and Internet speed. These are the solutions that will make your work easier and more convenient.