Google Tag Manager: checking the website availability and correct operation

To track conversions and user activity on an Internet resource, webmasters use different tools. Google Tag Manager (GTM) is in high demand. This was facilitated by the simple and correct integration of the container into the page code, as well as the ability to perform fine and detailed customization for individual working conditions. But often a specialist has a number of questions related to the operation of this tool. How correct is Google Tag Manager at work? Is he present at all on the portal? The last question will be relevant if SEO-specialist starts working with a new site and must study it as comprehensively as possible.
Now let's take a closer look at how to check the presence of GTM on an Internet resource, as well as the correctness of its operation. Here are a few options, orienting in which you can easily choose the best solution for yourself. We will also pay attention to how to organize a stable and functional work on SEO-promotion of the site, without fear of running into blockages from anti-fraud systems. But, first things first.
TOP ways to check if a website has Google Tag Manager
In order to make sure that GTM is connected on the resource you are going to work with, you can use several methods:
- Analyze site code.
- Use Google Tag Assistant.
- Apply Chrome developer tools.
- Use Netpeak Spider.
Let's consider all these options in more detail. By following these instructions, you can easily check if Google Tag Manager is enabled on your site.
Searching in the site code
This method of identifying traces of Google Tag Manager on a particular resource — the simplest, fastest and most convenient to use. To implement the task you need:
- Go to the site you are checking.
- Press the key combination "ctrl+u" to go directly to the page code.
- Use the key combination "ctrl+f" to bring up the search bar. Next, enter the commands «gtm.js» or "googletag".

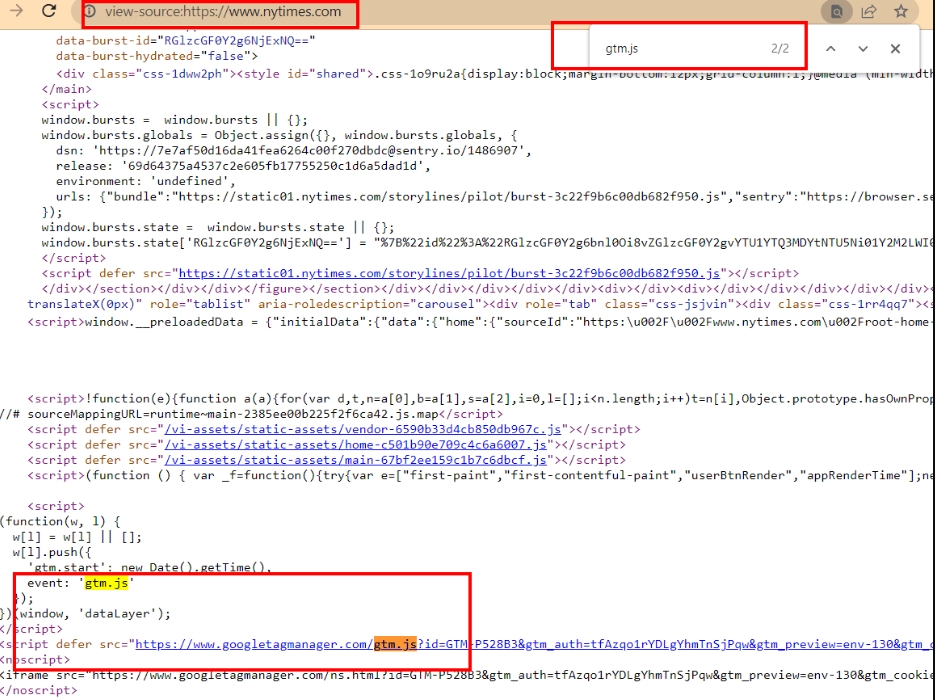
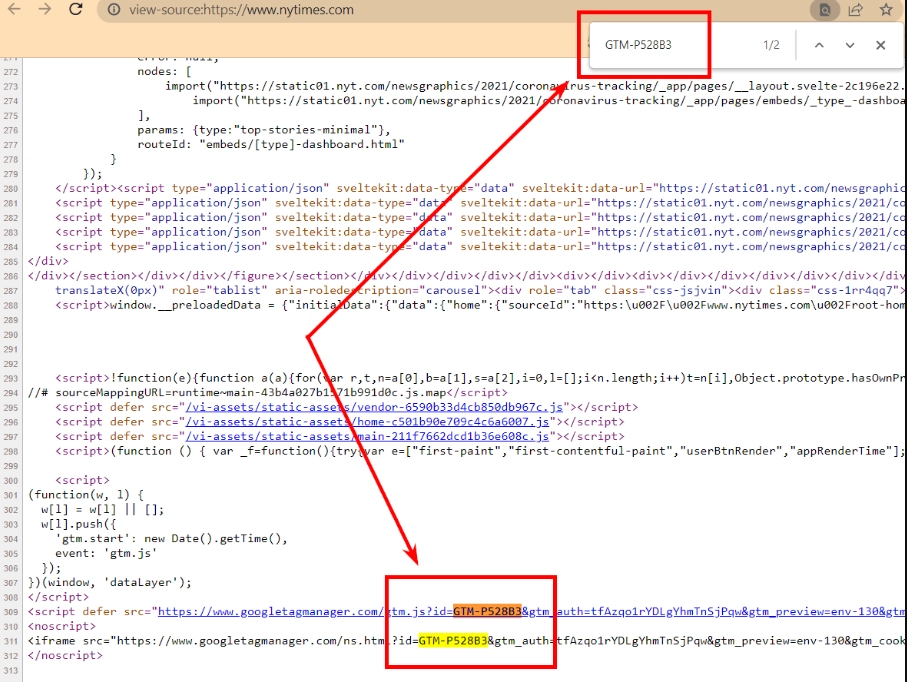
If the result is a match, then the GTM container on your site is enabled. Now it is desirable to additionally make sure that the code is embedded in the Google Tag Manager container with which you plan to work. The fact is that each of the containers has its own unique code (Container ID).
To see it, you need to log in to your GTM account. To do this, perform the following steps:
- Go to the site.
- We type the key combination "ctrl + u" to go to the page code.
- Using the "ctrl+f" key combination, call the search bar and directly enter the unique code of the container to which you have access in the GTM cabinet.
At this stage, you need to make sure that the Container ID of the container you retrieved from your personal account exactly matches the one specified in the code.
If this is the case, then everything is in order and you can proceed to the settings. But the main problem here is that in this way you can only check one page of the site. And this despite the fact that Google Tag Manager must be present on every page of your resource, otherwise you will not get a complete picture of the conversion and activities on the site. Unfortunately, you will not be able to perform a mass check using this tool. That is, the correctness of the work of the entire site cannot be judged by the results obtained.
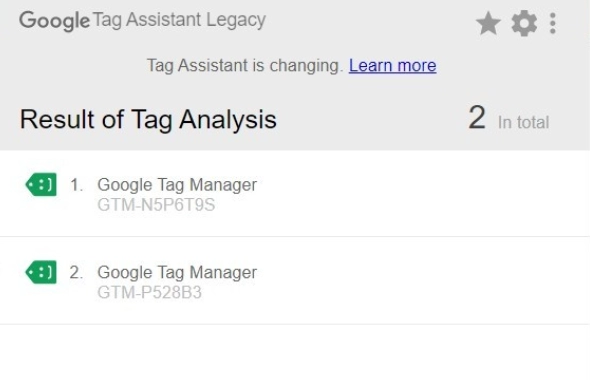
Searching with Google Tag Assistant
Google Tag Assistant is a browser extension that allows you to verify that GTM is installed correctly in just one click. The tags will be highlighted in different colors, allowing you to visually assess their status. To take advantage of this offer you need:
- Go to the Chrome store, find the assistant there and install it on your computer.
- Go to the page on which you want to check the availability of Google Tag Manager, its correct operation and launch the application directly from it. Refreshing the browser.
- Reopen Google Tag Assistant. If GTM is on your site, then the extension identifies it.
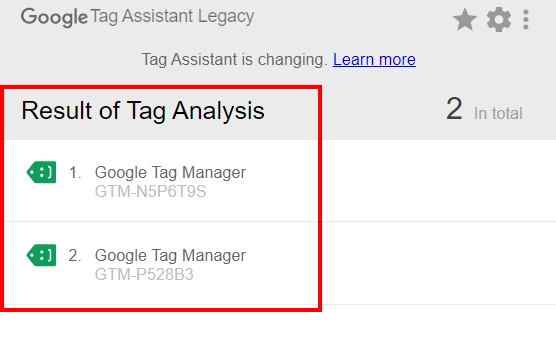
Unlike the previous version, this program checks absolutely all the pages of your site, but one by one one by one. That is, if you are working on a sufficiently large resource, checking all its pages with the help of Google Tag Assistant will require you to invest a significant amount of time.
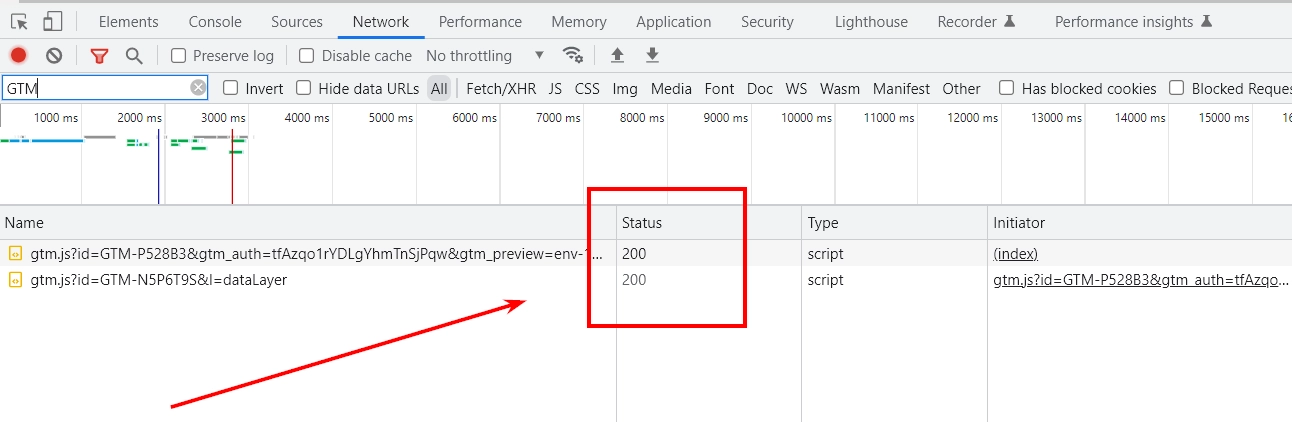
Searching with Chrome Developer Tools
In order to determine the presence of Google Tag Manager on the site, you can also use the developer console. This can be done in two ways:
- In the "Network" tab. In this case, you need to press the key combination "ctrl + shift + i", thereby opening the console. Next, click on the "Network" tab, and in the "Filter" field enter the phrase GTM. If, in response to such a request, the server sent you a “200” response, then this will indicate both the presence of the tag and its correct operation.
- In the "Elements" tab. In this case, you also need to press the key combination "ctrl+shift+i" and open the console. Already in it, from the keyboard, simultaneously press the "ctrl + f" buttons to open the search bar. We write the phrase GTM in it. If the Google Tag Manager container is implemented correctly, then the corresponding line will be highlighted.
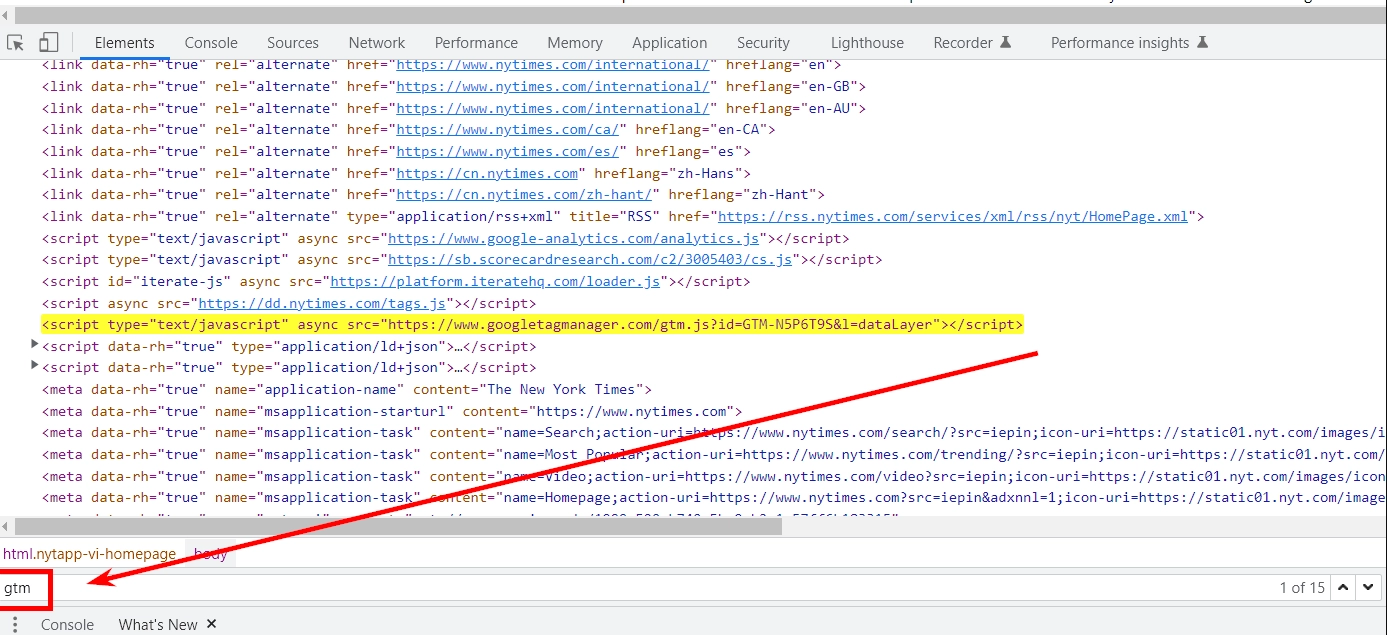
Among the disadvantages of using the Chrome toolkit, they also note the impossibility of simultaneously performing verification of several pages. Moreover, the presence of Google Tag Manager in the site code will not indicate that it works correctly.
Searching with Netpeak Spider
This is one of the best solutions if you immediately and as quickly as possible want to check several individual pages or all pages of a resource or domain for the presence of Google Tag Manager. To accomplish this task, you should use the Netpeak Spider application, in particular the Scraping function (parsing). In this case, the work is performed in the following sequence:
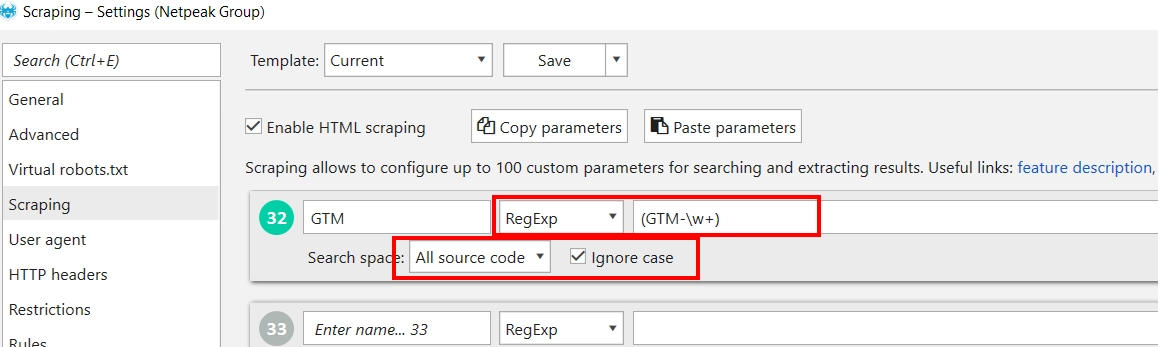
- Run the program. Go to the "Setting" tab and in it we find the option "Scraping".
- In the window that opens, select "RegExp" from the drop-down list; and specify "(GTM-\w+)" in line. In order to set the search area, you need to select the "All source code" option from the drop-down list. Also, do not forget to check the box next to ignore case. Click on the "OK" button.
- Now you need to load the list of pages or domains that you plan to check into the program. In the event that you want to check all the pages of the site at once, then you just need to enter the domain name. This will signal the program to parse the entire resource.
- Click on the "ADD" button to start the test and get a list with the results.
But Netpeak Spider also has its shortcomings. The fact is that this application is presented on the market only in a paid version. In addition, you must initially understand that checking all the pages of the site will take some time, that is, there will be no instant result.
Checking the correct operation of Google Tag Manager on the site
After you've made sure that GTM is already enabled on the site and the basic settings are done, it's time to check how well the tags work. As in the previous version, there are also several ways to test here:
- Using the preview console.
- With Google Tag Assistant.
- Using Google Analytics.
Let's take a closer look at all three options.
Using the Preview and Debug Console
This verification method is distinguished by the highest visibility and detail, which was appreciated by many experts. It shows with high accuracy which settings work and under what conditions. Along with this, all installed tags will be displayed on the console, regardless of whether the settings turn out to be correct or not. Thanks to this, you can view broken tags and make appropriate adjustments to them, thereby starting the work.
To use this method and check the correct operation of Google Tag Manager, you need to perform the following settings step by step:
- Open GTM and go to the "Preview" tab; (preview) located in the upper right corner.
- In the window that opens, you see an empty column in which you must enter the address of your domain, and then click on the "Connect" button; (connection).
- As soon as the connection is established, a notification will appear on the screen and you will need to click on the "Continue" button. (continue).
If you follow all the steps correctly, then after that the Google Tag Manager debug console will open on your screen, which will provide a complete list of all tags for a particular page.
A new — tab will also automatically open. duplicate page of your resource. In the event that there are tags on your portal that will be triggered when the page is opened, they will go to the "Tags Fired" category. in the debug console. Under each of the tags, a counter will automatically work. Those tags that will be inactive will automatically go to the "Tags Not Fired" list.
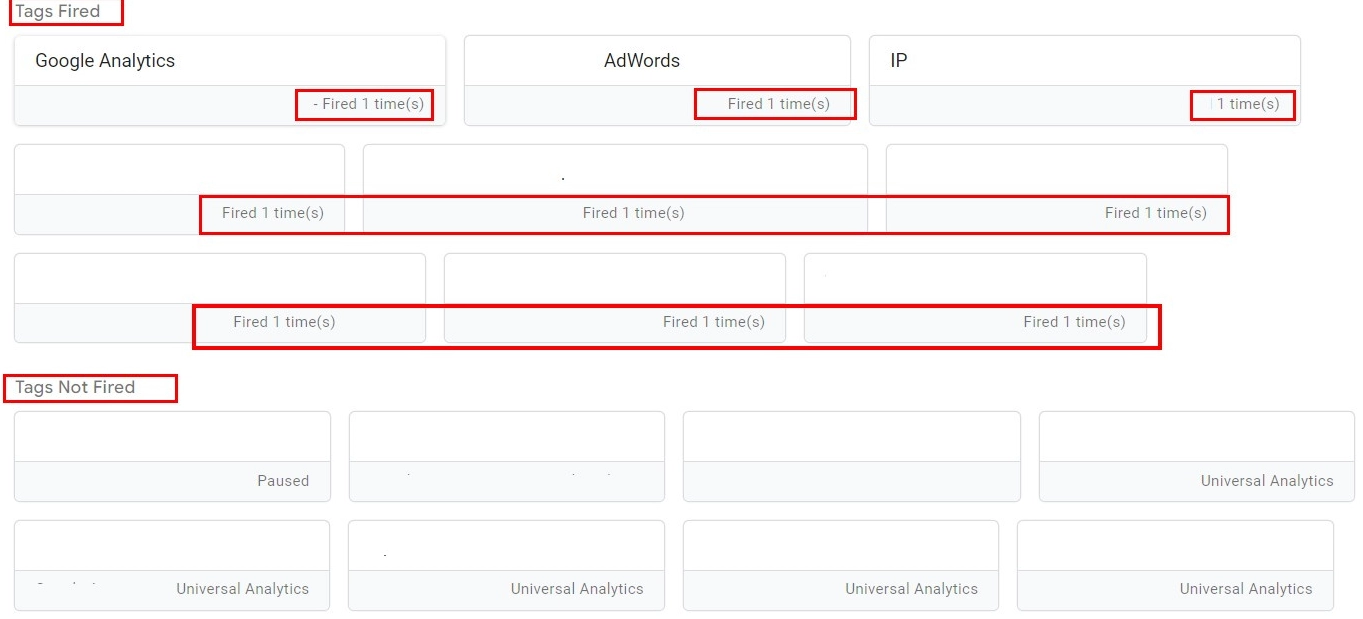
Now we check the correctness of the settings made on the page that will open automatically for you. Here you need to form the conditions under which the tag was configured. After that, the corresponding tag should jump from the "Tags Not Fired" list. to the "Tags Fired" folder, and the counter values should increase by one. But, it should be understood that if the tag is already present in the "Tags Fired" folder, but you decide to re-set the same conditions, then the counter will also work and add one to the old value.
If it turns out that you have created all the necessary conditions, but the tag does not work, or the counter fixes the wrong number of hits, then this will indicate an error that occurred during the configuration process. You will need to perform the appropriate check and correct the identified shortcomings.
Using the Google Tag Assistant extension
We have already said above that along with checking the presence of Google Tag Manager on the site, this application can also check the correctness of the settings, which will be indicated by multi-colored highlighting. Everything here is understandable on an intuitive level. If the backlight is green, then everything is correct and correct. If the tag is highlighted in red, gray or yellow, it means that mistakes have been made and they need to be corrected.
Using the Google Tag Assistant application, you can additionally record your actions, as well as monitor how triggers work on each of them. To do this you need:
- Go to the site that is currently being checked.
- Launch the Google Tag Assistant application from it and click on the "Record" button.
- Perform actions on the site that are required to fire triggers.
- To stop recording, you will need to click on the "Stop Recording" button.
As a result of such a check, in the window that opens, you will see a small report that will show the total number of pages, as well as the number of tags that worked.
To see the most complete result of the check, you need to click on the "Show Full Report" button. Please note: if the tags are highlighted in blue, then there are errors, but they are not critical and do not affect the effectiveness of the check.
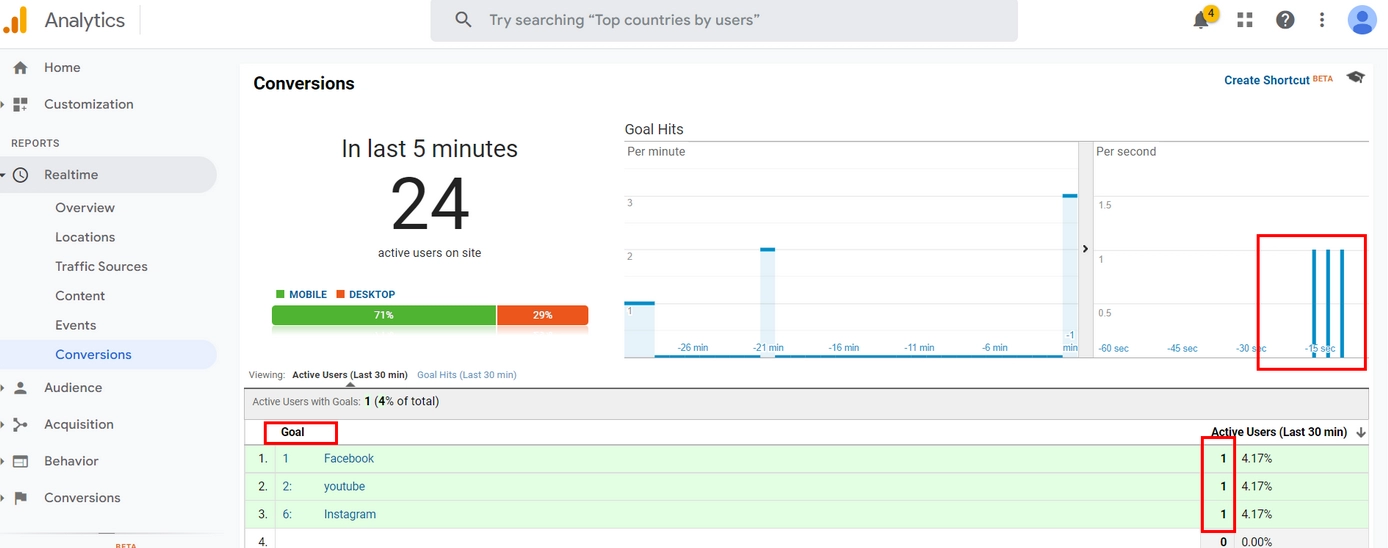
Using Google Analytics
Google Analytics — a tool that will allow you to monitor the correct operation of the GTM settings in real time. In this case, the work is performed in the following sequence:
- Go online to the Google Analytics resource.
- In the "Realtime" block select the "Conversions" option from the drop-down list.
- In a new window, we form a set of conditions on which the tag should work, and also fix this operation.
Again, if you've made adjustments and the tags still don't work, then you made a mistake at some stage and you need to carefully check and make adjustments.
Summing up
We have considered all the methods designed both to check the presence of Google Tag Manager on the site, and the correctness of its operation. Which way to use in your particular case — matter is individual. It all depends on what kind of resource you are working with, as well as what goals are being pursued in this case. In any case, these tools are quite simple, easy to use, although they will require some time and effort from you.
One more point that we would like to pay special attention to — security, privacy and network stability, which will be especially relevant for an SEO specialist. The fact is that the work to promote an Internet resource is associated with the need to perform multi-threaded actions. Often a webmaster needs to access resources that are blocked in his region. Mobile proxies from the MobileProxy.Space service are capable of providing all this. In this case you get:
- personal dedicated channel with unlimited traffic, as well as access to a huge pool of IP addresses;
- it is possible to change the address both forcibly via a link from your personal account, or automatically by setting a timer in the range from 2 minutes to 1 hour;
- High level of protection against unauthorized access and guaranteed anonymity of actions on the Internet, which is ensured by simultaneous operation on HTTP(S) and Socks5 protocols connected to parallel ports.
Follow the link https://mobileproxy.space/en/user.html?buyproxy to learn more about the functionality of mobile proxies from the MobileProxy.Space service and current tariffs. There is also a 24/7 technical support service at your disposal, which will come to the rescue at the first request. See the FAQ section for more information on the most common questions and answers.