How to Create a Telegram Bot for Proxy Monitoring: A Step-by-Step Guide for Beginners
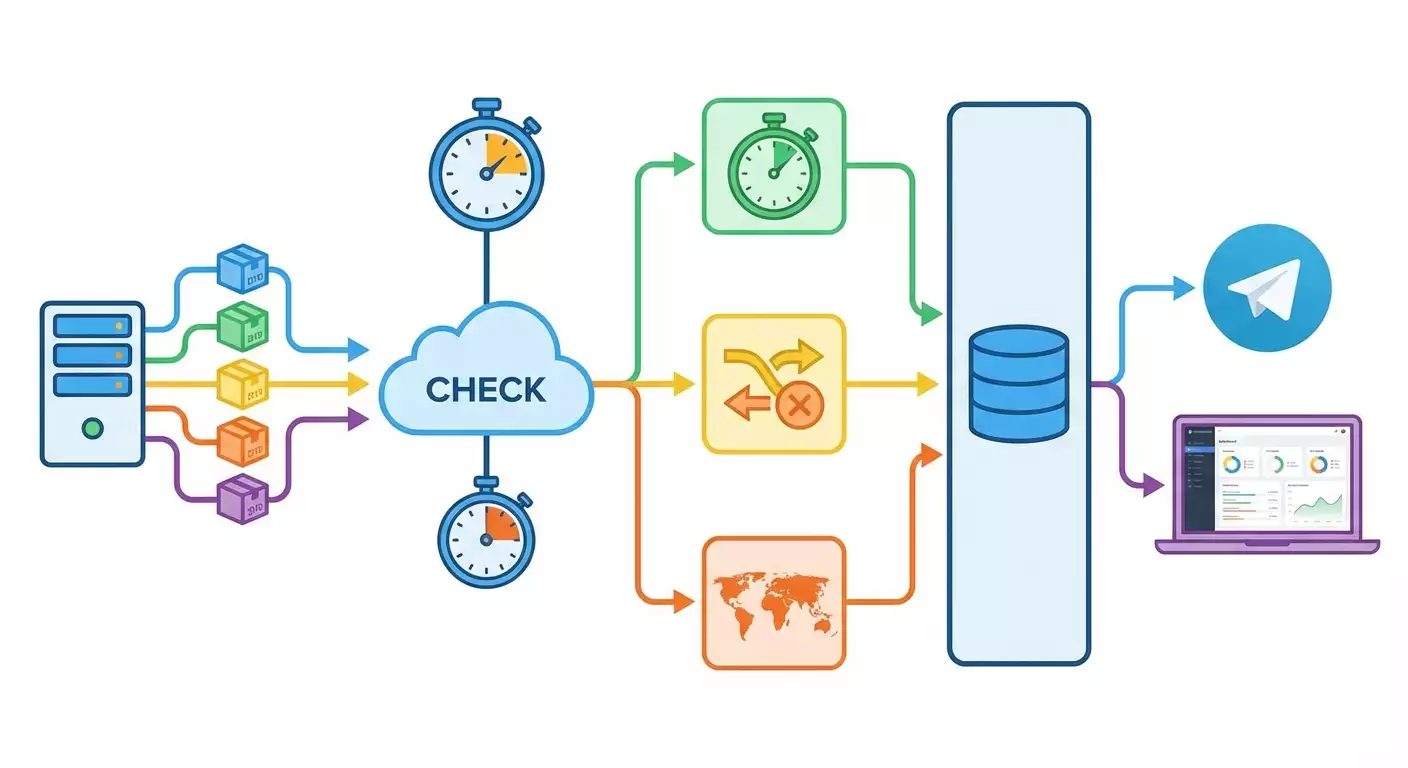
Table of contents
- Introduction
- Preliminary preparation
- Basic concepts
- Step 1: create the bot in telegram and set up access
- Step 2: prepare the python environment and project structure
- Step 3: write the proxy checking module: connection, latency, ip, geolocation
- Step 4: set up sqlite database and log history
- Step 5: implementing the telegram bot with aiogram 3
- Step 6: apscheduler check scheduler
- Step 7: integrate all parts in the entry point main.py
- Step 8: notification formatting and proxy grouping
- Step 9: deployment on vps (ubuntu) and autostart
- Verification of results
- Common mistakes and solutions
- Additional features
- Faq
- Conclusion
Introduction
In this step-by-step guide, you'll create a fully functional Telegram bot from scratch that automatically monitors a list of proxies, measures response times, detects IP changes after rotation, checks geolocation via the ip-api.com service, and sends timely notifications to Telegram in case of issues or degradation. We’ll walk you from the idea to deployment on a VPS with auto-start, SQLite history, and a simple dashboard with uptime statistics and log exports.
This guide is intended for beginners, but it also includes elements for more advanced users. If you've never written a bot before, don’t worry: we’ll explain every step, its purpose, and how to check the results. By the end, you’ll have a stable proxy monitoring tool that operates on a schedule every 5–15 minutes, can group proxies by region and type, and sends informative alerts to your Telegram.
Before we start, it’ll be useful to know how to open a terminal, install programs, and create folders and files. We’ll explain everything else. Completing all steps will take approximately 4 to 8 hours, including environment setup, coding, testing, and deployment. If you already have a VPS and basic Python skills, you’ll finish more quickly.
By the end of this guide, you will have: a working Telegram bot using aiogram 3, an asynchronous checking module with aiohttp, an APScheduler for periodic tasks, an SQLite database with logs and statistics, a simple web dashboard with essential metrics and CSV export capabilities, and instructions for maintenance and feature expansion.
Tip: It’s better to go through the guide step by step without skipping any. We've added checks after each phase so you can immediately verify that everything is functioning properly.
Preliminary Preparation
Before we start writing code, let’s prepare all the necessary tools and environments. This will help avoid errors and save time.
Required Tools, Programs, and Access
- A Telegram account to create the bot and receive notifications.
- A VPS or a local Linux computer (preferably Ubuntu 22.04 or 24.04). Windows and macOS can also be used, but we will demonstrate deployment on Ubuntu.
- Python 3.11 or newer. You can check the version with the command python3 --version.
- A terminal and basic sudo rights to install packages.
- A list of proxies for monitoring in the format host:port, plus a username and password if required. We will support HTTP, HTTPS, and SOCKS5.
System Requirements
- 1 CPU and 512–1024 MB of RAM is sufficient for monitoring 50–200 proxies at intervals of 5–15 minutes. For thousands of proxies, it’s better to have 2 CPUs and 2 GB of RAM.
- At least 1 GB of free disk space. SQLite is lightweight, but logs can grow.
- A direct internet connection. Access to the Telegram API and your proxies is required. Outgoing HTTP access is needed for ip-api.com.
What You Need to Install
- Python 3.11+ and venv for the virtual environment.
- pip for installing dependencies.
- Libraries: aiogram version 3, aiohttp, APScheduler, aiosqlite, python-dotenv (for convenient configuration), uvloop (optional for Linux), yarl (often included as a dependency).
Backup Creation
At the start, backup isn’t critical. After launching the bot, we’ll set up a simple backup of the SQLite database with logs and settings. This will allow you to revert in case of erroneous updates or file corruption.
⚠️ Attention: SQLite is contained in a single file. If it gets corrupted during a sudden power failure, you may lose recent entries. Therefore, enable automatic daily backups of the database file on your VPS using cron or systemd timers. We’ll provide a simple script for this at the end.
Basic Concepts
To avoid confusion, let’s agree on key terms and operational principles.
- Proxy — a mediating server through which your requests pass. They can be HTTP, HTTPS, or SOCKS5. Proxies may require authorization with username:password or operate via IP binding.
- Latency — the time it takes for us to make a request via a proxy and receive a response. Measured in milliseconds. The smaller, the better.
- IP Rotation — some proxies periodically change their external IP address. Our bot needs to monitor these changes and notify if the IP switches unexpectedly or doesn’t match the expected region.
- Geolocation — the country, city, and operator of the IP address. We acquire it via the ip-api.com service using the IP. This helps ensure that your proxy is located in the desired country.
- Degradation — the proxy responds, but significantly slower than normal or with frequent errors. We’ll differentiate between DOWN (completely unavailable) and DEGRADED (working, but poorly).
- aiogram 3 — a modern asynchronous library for Telegram bots. Simple and fast, supporting all current Telegram features as of 2026.
- aiohttp — for making asynchronous HTTP requests with timeouts and proxy support.
- APScheduler — a task scheduler that will execute checks based on a schedule every N minutes.
- SQLite — an embedded database. It’s just one file, fast and without server installation. Perfect for local logging and statistics.
The bot operates as follows: on schedule, the bot retrieves the list of proxies, performs quick test requests through each proxy, measures latency, retrieves external IP and geo-data, and saves results into SQLite. If a proxy goes down or noticeably degrades, the bot composes a neat message and sends it to Telegram. Additionally, the bot reacts to commands from the chat: showing status, uptime, recent errors, exporting CSV, adding or disabling proxies, changing intervals.
Tip: To avoid exceeding the limits of ip-api.com (usually 45 requests per minute for the free tier), we’ll implement a geo-data cache and limit parallel geolocation requests. This won’t slow down operations but will protect against blocking.
Step 1: Create the Bot in Telegram and Set Up Access
Step Goal
To obtain the Telegram bot token and create a private chat for notifications, so the bot can later send messages about incidents.
Step-by-Step Instructions
- Open the Telegram app on your phone or computer.
- In the search bar, type BotFather and open the official account with a blue checkmark.
- Press Start or type the command /start, then enter /newbot.
- Think of a name for your bot, for example, ProxyMonitorBot.
- Decide on a unique username for the bot that ends with bot, e.g., proxy_monitor_helper_bot.
- Copy the provided token. It looks like a series of characters and digits separated by colons.
- Create a private chat or group where the bot will send notifications. Add the bot there.
- Send any message in the chat so it appears in your account’s list of chats.
- Open a dialog with the bot and click Start to activate it.
Important: Keep the token secret. Do not share it with anyone. If the token leaks, a malicious actor can take control of your bot. If the token is compromised, select /revoke in BotFather to receive a new one.
Tip: Create a separate group for alerts where it’s just you and the bot. This way, notifications won’t get lost among other messages.
✅ Check: You have received the token and added the bot to the necessary chat. The bot responds to the /start command in a personal dialog.
Potential Issues and Solutions
- Issue: The bot doesn’t respond to /start. Reason: You didn’t press Start or the token was entered incorrectly in the code. Solution: Ensure the bot is activated and later we correctly reference the token in the .env file.
- Issue: You don’t see the chat ID. Reason: We haven’t gotten it yet. Solution: Later, a command in the bot will automatically show you the chat_id.
Step 2: Prepare the Python Environment and Project Structure
Step Goal
Create a working project folder, a Python 3.11+ virtual environment, install dependencies, and set up the configuration and directory structure.
Step-by-Step Instructions
- Open a terminal on your machine or connect to the VPS via SSH.
- Check the Python version with the command: python3 --version. If the version is below 3.11, install the latest one.
- On Ubuntu, execute: sudo apt update; sudo apt install -y python3.11 python3.11-venv python3-pip.
- Create the project folder: mkdir proxy-monitor-bot; cd proxy-monitor-bot.
- Create a virtual environment: python3.11 -m venv .venv.
- Activate the environment: source .venv/bin/activate.
- Upgrade pip: pip install --upgrade pip.
- Install dependencies: pip install aiogram aiohttp aiosqlite APScheduler python-dotenv uvloop.
- Create the folder structure: mkdir app app/modules app/db app/bot app/web.
- Create the files: touch app/__init__.py app/config.py app/main.py app/modules/proxy_checker.py app/db/models.py app/db/migrations.py app/bot/handlers.py app/bot/notifications.py app/scheduler.py app/web/server.py .env .env.example README.md.
Basic Configuration
Open the .env file and add the keys (replace values with yours):
BOT_TOKEN=your_token_from_BotFather TELEGRAM_CHAT_ID=number_or_leave_empty DB_PATH=./data/monitor.db PROBE_TIMEOUT=8 PROBE_RETRIES=2 CHECK_INTERVAL_MINUTES=10 GEO_CACHE_TTL_HOURS=24 IP_API_URL=http://ip-api.com/json PROXY_CONCURRENCY=20 GEO_CONCURRENCY=10 DASHBOARD_HOST=0.0.0.0 DASHBOARD_PORT=8080
Copy .env to .env.example and remove the secrets to share the project without tokens conveniently.
Tip: Keep the .env file outside the version control system. Add .env to .gitignore to avoid accidentally uploading the token to the repository.
Minimum Code Structure
The app/config.py file will read environment variables and provide configurations. The app/main.py file will run the bot, the scheduler, and the web dashboard. The proxy_checker.py module will perform all checks. The db folder will contain models and SQLite migrations. In the bot folder, we’ll write command handlers and send notifications. In the web folder, we’ll launch a simple web server with statistics and exports.
✅ Check: You have a virtual environment, dependencies are installed, the .env file is created, and the project structure matches the listed requirements. The command python -c "import aiogram, aiohttp, aiosqlite; print('ok')" outputs ok.
Potential Issues and Solutions
- Issue: pip reports an SSL error or is unavailable. Reason: No internet access. Solution: Check your network or use a local pip mirror.
- Issue: Python 3.11 is not available. Reason: Old OS. Solution: Update your system or install Python through the deadsnakes PPA or pyenv.
Step 3: Write the Proxy Checking Module: Connection, Latency, IP, Geolocation
Step Goal
Create an asynchronous module that quickly and reliably checks proxies: capable of making test HTTP requests through a proxy, measuring latency, identifying external IP, performing requests to ip-api.com, caching geo data, and properly handling errors.
Key Ideas
- To check availability, make a request to a lightweight resource such as https://api.ipify.org or any fast echo endpoint. We’ll choose to obtain the IP through a service and then get geo through ip-api.com or vice versa.
- Set the default timeout to 8 seconds and 2 attempts. These parameters can be configured through the .env.
- aiohttp works conveniently with proxies: pass the proxy parameter in ClientSession.request.
- For geolocation, we’ll cache data for 24 hours per IP to conserve quota.
- Check requests in parallel but limit concurrency with a semaphore to avoid overloading connections and exceeding ip-api limits.
Detailed Instructions
- Open the app/modules/proxy_checker.py file.
- Define the proxy model as a dictionary: id, label, type (http, https, socks5), endpoint (host:port), username, password, region, group, expected_country, last_ip.
- Create an asynchronous function build_proxy_url that composes a string such as scheme://user:pass@host:port from type, host, port, and optionally username:password.
- Create an asynchronous function fetch_ip(session, proxy_url) to retrieve the external IP through the proxy. Use the url https://api.ipify.org?format=json or a similar service that returns your IP in JSON. Measure the time before the call and after the response to get latency.
- Create a geo data cache: a dictionary in memory and a table in SQLite so that we don’t lose cache between restarts. The key is IP, and the value is JSON containing the country, city, organization, and caching time.
- Create a function fetch_geo(session, ip) that does a GET request to ip-api.com/json/{ip}?fields=status,country,countryCode,regionName,city,org,query. If the status is fail, return an error indicator. If successful, return the geo data.
- Implement the function check_proxy(proxy) with the logic: build the proxy_url, attempt to get the IP with a timeout, measure latency, then fetch geo data (from cache or network), forming a result: availability (ok), latency in milliseconds, external IP, country and city, and the result type: UP, DEGRADED, or DOWN.
- Define the criteria for DEGRADED: if latency exceeds your threshold, e.g., 1500–2000 ms, or if the error rate in recent checks is noticeable. For simplicity: if a response is received but latency exceeds 2 seconds — DEGRADED; otherwise, UP. If no response is received — DOWN.
- Return detailed results for logging: timestamp, proxy_id, status, latency_ms or None, IP or None, geo or None, error_reason, changed_ip (True or False if the IP differs from the previous one), changed_geo (if the country changed), region, group, type.
- Add exception handling: asyncio.TimeoutError, aiohttp.ClientConnectorError, aiohttp.ClientHttpProxyError, aiohttp.ClientProxyConnectionError, socket errors. In the error_reason field, write a brief description.
Example Code (Simplified, One Line)
Here’s simplified logic in one line: import asyncio, time, json, aiohttp; async def check_proxy(proxy, cfg, geo_cache, sem): async with sem: start=time.perf_counter(); purl=f"{proxy['type']}://{proxy.get('username', '')+(':'+proxy.get('password','') if proxy.get('username') else '')+'@' if proxy.get('username') else ''}{proxy['endpoint']}"; timeout=aiohttp.ClientTimeout(total=cfg['PROBE_TIMEOUT']); try: async with aiohttp.ClientSession(timeout=timeout) as s: t0=time.perf_counter(); async with s.get('https://api.ipify.org?format=json', proxy=purl, ssl=False) as r: data=await r.json(); ip=data.get('ip'); latency=int((time.perf_counter()-t0)*1000); if not ip: raise Exception('no-ip'); geo=geo_cache.get(ip); if not geo or geo['ts'] In real code, we’ll add logging to SQLite and semaphores for GEO queries, as well as careful timeouts and retries. ⚠️ Attention: Don’t send too many parallel requests to ip-api.com. If you have a list of hundreds of proxies, cache the results and limit the number of concurrent requests. This will protect against limits and errors. ✅ Check: Manually call the check_proxy function for one test proxy and print the result. You should see status UP or DEGRADED with measured latency and external IP. Create tables in SQLite for storing the list of proxies, check history, incidents, geo cache, and settings. This will give you detailed statistics and the ability to build graphs. CREATE TABLE IF NOT EXISTS proxies (id INTEGER PRIMARY KEY AUTOINCREMENT, label TEXT, type TEXT, endpoint TEXT, username TEXT, password TEXT, region TEXT, group_name TEXT, expected_country TEXT, last_ip TEXT, enabled INTEGER DEFAULT 1, created_at INTEGER, updated_at INTEGER); CREATE TABLE IF NOT EXISTS checks (id INTEGER PRIMARY KEY AUTOINCREMENT, proxy_id INTEGER, ts INTEGER, status TEXT, latency_ms INTEGER, ip TEXT, country TEXT, city TEXT, org TEXT, error_reason TEXT, FOREIGN KEY(proxy_id) REFERENCES proxies(id)); CREATE INDEX IF NOT EXISTS idx_checks_proxy_ts ON checks(proxy_id, ts); CREATE TABLE IF NOT EXISTS incidents (id INTEGER PRIMARY KEY AUTOINCREMENT, proxy_id INTEGER, opened_at INTEGER, closed_at INTEGER, kind TEXT, last_status TEXT, last_message TEXT, active INTEGER, FOREIGN KEY(proxy_id) REFERENCES proxies(id)); CREATE TABLE IF NOT EXISTS geo_cache (ip TEXT PRIMARY KEY, country TEXT, city TEXT, org TEXT, ts INTEGER); CREATE TABLE IF NOT EXISTS settings (key TEXT PRIMARY KEY, value TEXT); Tip: If you already store the list of proxies in CSV or JSON, add convenient imports to the database: a simple script reads the file and adds entries to proxies. ✅ Check: Run the init_db function and ensure the database file appears at DB_PATH. Test that the tables were created by executing a simple query select count(*) from proxies and getting a response of 0. Launch a bot that responds to commands, can send notifications to your chat, and reads settings from .env. Let’s configure basic commands: /start, /status, /chatid, /addproxy, /list, /enable, /disable, /interval, /export. In app/bot/notifications.py, create a function notify_change that formats messages about events. Example message: Proxy: EU-1 (http) Region: EU Group: EUROPE Status: DOWN Reason: timeout Last IP: 203.0.113.45 Expected: country DE Received: country NL Time: 2026-02-01 12:34:56 Latency: n/a. For UP use the label UP, for degradations use DEGRADED. Add a priority sorting: DOWN first, then DEGRADED, followed by messages about IP changes. Include emoji indicators for visual clarity, e.g., ✅ for UP and ⚠️ for DEGRADED and ❌ for DOWN. If TELEGRAM_CHAT_ID is not set, send to the current chat from which the command was issued. In production, it’s better to fix the chat_id in .env. Tip: For group chats, the bot may need sending permissions. Check the group settings to ensure the bot is a member with write permissions. ✅ Check: Run the bot locally and send /chatid. You should receive a numeric identifier. Set TELEGRAM_CHAT_ID in .env. Send /start and /status. The bot should respond. The /list command may be empty for now, which is normal. Set up periodic checks for all enabled proxies every 5–15 minutes based on the current settings interval, parallelize checks without overload, log history, and send alerts on changes. Tip: Add random jitter of 0–60 seconds to the schedule to reduce peak load and avoid perfectly synchronized requests. ✅ Check: Set CHECK_INTERVAL_MINUTES=1 temporarily and run the application. In the logs, you should see that checks execute every minute, and new rows are added to the checks table. Assemble the application as a whole: config, database, bot, checker, scheduler, and web dashboard. Ensure correct startup and shutdown, process termination signals. Here’s a simplified idea for a one-liner on startup: import asyncio, logging; async def main(): await init_db(...); dp=Dispatcher(); dp.include_router(router); scheduler=AsyncIOScheduler(); scheduler.add_job(run_checks, 'interval', minutes=interval); scheduler.start(); await asyncio.gather(dp.start_polling(bot), start_web_server(), wait_for_signals(scheduler)); asyncio.run(main()). Tip: Add detailed logging at INFO and WARN levels. This will help quickly understand what’s happening when starting up and during checks. ✅ Check: Run python app/main.py. The bot should respond to /start, the web dashboard should open at http://localhost:8080, and the scheduler should begin checks based on the interval. Make notifications clear, compact, and informative. Set up proxy grouping by regions and types to structure messages. ✅ Check: Temporarily replace one proxy with an intentionally non-working endpoint. Wait for the check. You will receive a DOWN notification. Restore the proxy to working, and you will see a recovery notification. Deploy the bot on a remote server, set up autostart via systemd, and ensure logging and simple updates. Tip: If you're using uvloop, ensure it is installed in the virtual environment. On Windows, uvloop is not used, while on Linux, it boosts performance. ✅ Check: The bot should respond to /start from your Telegram when the service is running. The log should show the scheduler starting, and the web dashboard should listen on port 8080. ✅ Check: If all checklist items pass and testing scenarios work, your bot is successfully deployed and correctly performs monitoring tasks. In app/web/server.py, spin up an aiohttp.web server. Display a summary on the main page: number of proxies, how many UP, DOWN, DEGRADED, average latency, uptime over 24 hours. Create an endpoint /export?from=ts&to=ts for CSV export. The minimum HTML can be a simple list and table with status. Graph visualizations can be added later through simple SVG. Tip: Add a button to toggle the interval directly in the dashboard that calls the endpoint and changes the value in settings. This speeds up management without requiring Telegram commands. Backup script for the database: tar -czf backup-$(date +%F).tar.gz data/monitor.db. Schedule a daily backup using cron or systemd timers. Keep at least the last 7 archives. ⚠️ Attention: Do not edit the database file on the fly. For manual changes, stop the service, make a copy, edit, and restart it. You’ve completed the entire journey from idea to working solution: created a Telegram bot using aiogram 3, wrote a proxy checking module with aiohttp, set up an APScheduler, stored history in SQLite, implemented notifications for downtimes, degradations, IP and geolocation changes, deployed the application on VPS with autostart via systemd, and added a simple web dashboard with log exports. Now you have a flexible tool that can be scaled: separating groups, adjusting thresholds, integrating graphs and reports, transitioning to PostgreSQL as load increases. The next step — automating maintenance: log rotation settings, daily database backups, and monitoring the bot using VPS system metrics. You can further develop: add a role model for accessing bot commands, implement SLA reports for groups, connect alternative geo-data sources, and create a web interface using any library that suits you. Good luck and stable uptime for your proxies!Potential Issues and Solutions
Step 4: Set Up SQLite Database and Log History
Step Goal
Database Structure
Detailed Instructions
Example SQL (in One Line)
Potential Issues and Solutions
Step 5: Implementing the Telegram Bot with aiogram 3
Step Goal
Detailed Instructions
Sending Notifications
Potential Issues and Solutions
Step 6: APScheduler Check Scheduler
Step Goal
Detailed Instructions
Tip:
Potential Issues and Solutions
Step 7: Integrate All Parts in the Entry Point main.py
Step Goal
Detailed Instructions
Potential Issues and Solutions
Step 8: Notification Formatting and Proxy Grouping
Step Goal
Notification Format
Proxy Grouping
Implementation
Potential Issues and Solutions
Step 9: Deployment on VPS (Ubuntu) and Autostart
Step Goal
Preparing the VPS
systemd Service
Potential Issues and Solutions
Verification of Results
Checklist
How to Test
Indicators of Successful Execution
Common Mistakes and Solutions
Additional Features
Advanced Settings
Optimization
Simple Dashboard
Backups
FAQ
Conclusion