Instagram Proxies: A Step-by-Step Guide for Setting Up on iPhone, Android, and Browsers
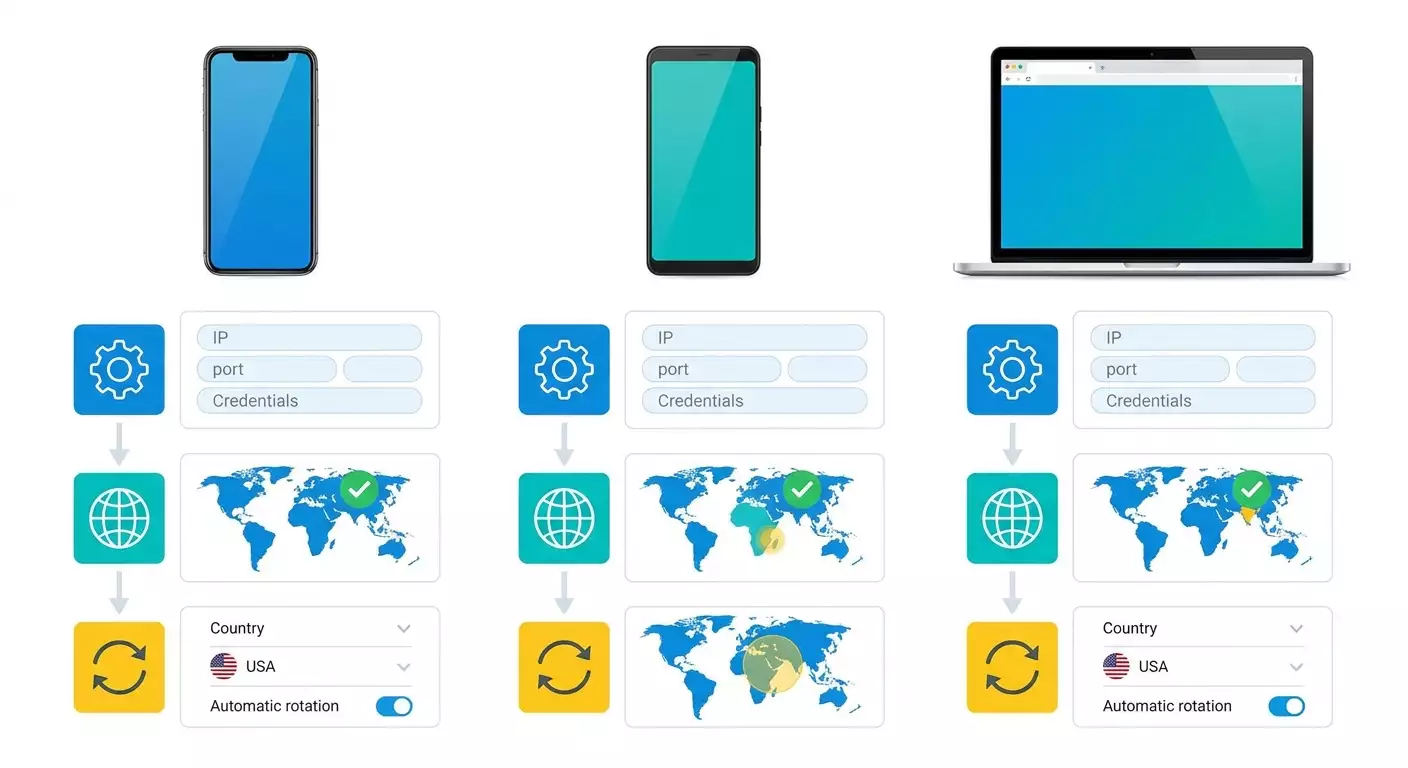
Table of contents
- Introduction
- Preliminary preparation
- Basic concepts
- Step 1: preparing and checking proxy data
- Step 2: configuring proxy on iphone via client profile (e.g., potatso/shadowrocket)
- Step 3: configuring proxy on android through socks5 client
- Step 4: configuring proxy in anti-detect browser
- Step 5: multi-account management — how to organize ip rotation and the rule “one account — one proxy”
- Step 6: selecting and testing geo, speed, and stability
- Step 7: fine-tuning dns and domain resolution check
- Step 8: security, accountability, and backup plans
- Checking the outcome
- Common issues and solutions
- Additional features
- Faq
- Conclusion
Introduction
In this step-by-step guide, you will learn how to properly configure proxies for working with Instagram on iPhone, Android, and anti-detect browsers. We will cover why system settings on mobile devices do not always apply to app traffic, which countries offer better speed and stability for SMM tasks and multi-accounting, how to set SOCKS5 parameters (server, port, username, and password), and how to organize IP rotation for reliable and predictable performance. We will also show you how to check that everything is working and what to do if your speed is below normal.
Who this guide is for: SMM specialists, content creators, project owners, arbitrageurs, marketers, researchers, and anyone managing multiple accounts or teams. The material is aimed at beginners but also includes advanced techniques for rotation and diagnostics.
What you need to know beforehand: basic concepts about proxies (what a server, port, SOCKS5 protocol, and authorization are), ability to install apps from the store, and careful handling of confidential information. Additionally, it's helpful to understand that different apps might use various networking mechanisms, so a simple system proxy setup does not always yield the desired effect.
Time required: 60–120 minutes for complete setup and testing, plus an additional 30–60 minutes for optimization and debugging if working with multi-accounting or IP rotation.
⚠️ Attention: Always act within the laws of your country and the platform's rules. Before starting, ensure that your tasks and methods comply with local laws and the internal policies of your company or client. This material is educational and technical; it is not intended to encourage any illegal actions.
Preliminary Preparation
Before you begin, gather everything you need to ensure the process flows quickly and without mistakes.
Required Tools and Access
- Proxy data: protocol type (SOCKS5), server address (domain or IP), port, username, and password.
- A smartphone running iOS (iPhone) or Android with access to the app store.
- A client app for working with proxies at the device or app level (for iOS and Android). Detailed setup instructions follow.
- If working via computer: a browser or anti-detect browser with profile and proxy support.
System Requirements and Recommendations
- A stable internet connection of at least 5 Mbps. Speeds below 5 Mbps may cause lag, slow feed loading, and errors during postings.
- A sufficient battery charge (no less than 40%) or connection to a power source.
- Available memory on the device (at least 500 MB for installations and logs).
What to Download and Install
- On iPhone: a client app for working with proxy profiles that allows setting SOCKS5, address, port, username/password, and specific DNS servers. We will show you setup using popular solutions where these parameters can be manually entered.
- On Android: a client app that can apply SOCKS5 to specific apps or all traffic and allows entering the address, port, and authorization.
- If working via computer: a browser or anti-detect browser with access profiles and fields for proxies.
Backups and Security
- Save a file with proxy data (in an encrypted password manager). Do not store usernames and passwords in notes without a password.
- Back up your working accounts: export 2FA codes, links to email and phone, device list.
- Document current network settings to quickly revert to the original configuration if necessary.
Tip: Use a password manager to store servers, ports, usernames, and passwords for the proxies. This will help avoid typos and speed up setup on multiple devices.
Basic Concepts
Key Terms Explained Simply
- Proxy — an intermediary server through which your network requests pass. The app sees the network as going "through the proxy".
- SOCKS5 — a versatile proxy protocol well-suited for apps and services, including media content and authentication in mobile clients.
- Backconnect Proxy — a type of proxy where the IP address can change automatically on a schedule or event, providing rotation without manual switches.
- Link Rotation — a mechanism for changing IP via a special URL trigger. Convenient for batch operations and multi-accounting.
- DNS — a service that translates domains into IP addresses. Sometimes useful to specify a particular DNS server for predictability.
Why System Proxy Settings Don't Always Work
On iOS and Android, system proxy settings for Wi-Fi do not guarantee that all app traffic goes through the proxy. Many apps connect directly or use their own name resolution mechanisms and networking libraries that ignore the system's HTTP proxy. Therefore, you might see that the browser loads pages through a Wi-Fi proxy, while a media app works unstable or connects directly. To manage the traffic of specific apps and guarantee passing through the specified server, specialized clients are used, allowing you to set routing rules and SOCKS5 and DNS parameters.
⚠️ Attention: The accessibility and operation policies of various services differ by countries and providers. Before setting up or using a proxy, ensure that your actions comply with local laws and platform requirements. Do not perform actions that could violate platform rules or laws in your country.
Recommended Countries (GEO) for Stable Performance
- USA — high stability, good data center infrastructure, predictable speed. Suitable for continuous work and team accounts.
- Germany — quality channels, low latency in Europe, often favorable rates from providers.
- Netherlands — stable data centers, good bandwidth, close to major European hubs.
- Moldova — often more affordable solutions with sufficient stability for SMM tasks; an interesting balance of "price/quality".
Minimum speed for comfortable work — from 5 Mbps. It is advisable to have a buffer: 10–20 Mbps for publishing stories and videos without long delays.
Tip: Choose geo according to the account's audience. If the primary audience is from Europe, then European proxies will provide lower latency and stable session warming.
Step 1: Preparing and Checking Proxy Data
Stage Objective
To gather and verify the complete proxy parameters (SOCKS5), ensuring subsequent setup processes smoothly without errors and repetition.
Step-by-Step Instructions
- Gather parameters: server address (domain or IP), port (e.g., 1080), protocol (SOCKS5), username, and password.
- Check that you have access to change the password and to the panel where limits, allowed streams, and rotation rules (if backconnect) are displayed.
- Note the geo for each proxy. Write down the country, city (if provided), and subnet type (mobile, residential, data center).
- Check the term of validity and limitations: number of simultaneous connections, total traffic, speed, allowed protocols.
- Create a table (or cards in a password manager) with columns: Name, GEO, Protocol, Server, Port, Username, Password, Limitations, Comments.
- Check the server's accessibility from your network: ping the domain (if possible from a computer) or use a diagnostic app on your phone to check port accessibility.
Important Points
Data accuracy is critical. Even one extra letter in the domain or an incorrect port will lead to connection errors. Always copy fields in full and check for spaces at the beginning and end of the string.
Expected Outcome
You have a verified set of parameters for each proxy and a clear card of data. You are confident that the server responds and the username/password are correct.
Possible Issues and Solutions
- Incomplete parameters. Solution: request the exact protocol, port, and authorization type from the provider.
- Server not responding. Solution: check address and port; try another network; clarify the server status with the provider.
- Username/password incorrect. Solution: reset the password in the panel or request new access.
✅ Verification: Ensure you can authenticate on the proxy through a test app or diagnostic panel; the address and port respond, and authorization occurs without errors.
Step 2: Configuring Proxy on iPhone via Client Profile (e.g., Potatso/Shadowrocket)
Stage Objective
To connect your iPhone to the chosen SOCKS5 proxy with the option for separate DNS configuration for predictable app performance.
Step-by-Step Instructions
- Install a client app on your iPhone that allows you to create a connection profile supporting SOCKS5, user authentication, and customizable DNS. Open it.
- On the main screen, press the button to add a new connection (usually an icon with a “+” or “Add”).
- Select the connection type: SOCKS5.
- In the Server field, enter the proxy server address (e.g., proxy-example.com or IP like 203.0.113.10).
- In the Port field, specify the port (e.g., 1080).
- Enable authentication and enter the Username and Password exactly as specified in the proxy card.
- Open the DNS section (or Settings → DNS) and set the primary DNS: 8.8.8.8. You may also specify a secondary DNS (e.g., 1.1.1.1) if required. This improves the predictability of domain resolution.
- Save the connection profile and give the app the necessary system permissions during the first time connecting (a system prompt will appear asking to create a secure network profile; confirm).
- Activate the profile (toggle next to the created connection). Wait for the status to show Connected.
- Open a browser on the iPhone and visit any website to check the IP. Ensure the chosen GEO's IP address is displayed.
- Launch a media app and check the feed loading, stories, and posting a short video (if this is part of your tasks).
Important Points
- DNS 8.8.8.8 should be set for stability and predictability in domain name resolution. If corporate policy prohibits external DNS, use an address permitted by the administrator.
- SOCKS5 is selected as the most compatible option for apps and media content.
- Authentication must be enabled if the proxy requires a username/password. Some providers may use IP binding — in this case, the authentication field is not required.
Expected Outcome
The profile is active, the shown IP matches the proxy's GEO, media content loads without noticeable delays, and actions are performed stably.
Possible Issues and Solutions
- Status does not change to Connected. Solution: check the address and port; verify the username/password; restart the app; ensure the proxy hasn't expired.
- Websites load, but apps are unstable. Solution: ensure the profile is active; check the DNS; confirm that streams aren't limited on the proxy side.
- Slow loading. Solution: check network speed; switch to a nearby GEO; verify speed limits with the provider; a minimum of 5 Mbps is required.
Tip: If you often switch between multiple proxies, assign each profile a clear name: “US-DC-01 10Mbps”, “NL-RES-02 20Mbps” — this will help you find the needed one faster.
✅ Verification: On the IP check page, the address from the desired country is visible; the app correctly loads photos and videos; postings proceed without errors.
Step 3: Configuring Proxy on Android through SOCKS5 Client
Stage Objective
To connect the Android device to the SOCKS5 proxy, applying proxying to selected apps or all traffic.
Step-by-Step Instructions
- Install a client app on your Android device that can configure SOCKS5 with a username/password and, if necessary, manage a list of apps for proxying.
- Open the app and create a new connection (button “+” or “Add”).
- Select the type: SOCKS5.
- In the Server field, enter the proxy address (domain or IP), and in the Port field — the port (e.g., 1080).
- Enable Authentication and specify Username and Password.
- If available, specify DNS address 8.8.8.8 as primary. You can also set 1.1.1.1 as an alternative.
- Select mode: proxy all traffic or only chosen apps. For precise configuration, add the needed apps to the list.
- Save the connection. When starting for the first time, the system may request permission to create a secure connection — confirm.
- Activate the connection and wait for the status to show “Connected”.
- Check IP in the browser and the operation of target apps with media content.
Important Points
- Application Lists. If possible, only add the required apps. This increases stability and conserves resources.
- Username/Password authorization must be correctly enabled. If IP binding is used, authorization may not be needed.
- DNS should be configured only if it complies with your security policy and local regulations.
Expected Outcome
The connection is active, the IP matches the proxy's GEO, target apps consistently load feeds, stories, and postings proceed without error.
Possible Issues and Solutions
- Connection drops. Solution: reduce the number of simultaneously proxied apps; check stream limits; switch to a closer GEO.
- Not applying to apps. Solution: check the app list in the client settings; restart apps; verify permissions.
- Speed is too low. Solution: test the network without proxy; if baseline speed is below 5 Mbps, enhance the channel or switch equipment.
Tip: Create two profiles: “Only Target Apps” and “All Traffic”. This allows for quick switching when diagnostics are needed and reduces unnecessary load.
✅ Verification: On the IP check service, the required country is displayed, and everything plays and loads in the app without noticeable delays.
Step 4: Configuring Proxy in Anti-Detect Browser
Stage Objective
To organize account operations through browser profiles with different proxies to isolate sessions and reduce data mixing risks.
Step-by-Step Instructions
- Install an anti-detect browser that supports profiles and unique proxies for each profile.
- Create a new profile and assign it a clear name: “IG-Moldova-Acc1”.
- In the profile settings, open the Proxy section.
- Select the SOCKS5 type.
- In the Host field, specify the proxy server address; in the Port field — the port (e.g., 1080).
- Enable authentication and enter Username and Password.
- Save the profile and launch the browser within this profile.
- Go to the IP check site and ensure the IP matches the selected GEO.
- Log into the account and check feed loading, posting content, or stories in the web interface (if supported by your configuration).
Important Points
- Separate Profiles = Separate Proxies. Never use the same proxy across different working accounts unless specified by your policy.
- Cookies and cache should be stored in each profile in isolation. Do not transfer cookies between profiles unless necessary.
- Choose GEO proxies according to the profile’s audience or your testing scenario.
Expected Outcome
Each profile has its proxy set, IP verified, browser work is stable, and accounts are isolated without overlapping network identifiers.
Possible Issues and Solutions
- IP does not change upon starting the profile. Solution: check if the proxy is enabled in profile settings; test accessibility; restart the profile.
- Pages load slowly. Solution: switch to a closer GEO; check channel speed; use a faster type of proxy.
- Random session mixing. Solution: keep track of profile naming and ensure clear linking of “account → proxy → profile”.
Tip: Create a profile template with typical settings and clone it for new accounts, changing only the proxy and basic parameters. This saves time and reduces errors.
✅ Verification: Launching each profile yields the required IP, sites load quickly, operations proceed without errors, and sessions do not overlap.
Step 5: Multi-Account Management — How to Organize IP Rotation and the Rule “One Account — One Proxy”
Stage Objective
To set up a secure multi-accounting scheme with minimal risks of overlap and maximum predictability.
Step-by-Step Instructions
- Determine the number of accounts and distribute the infrastructure according to the rule: “one account — one proxy”. This simplifies diagnostics and enhances stability.
- If dynamic IP is needed, use backconnect proxies. Choose a rotation interval: by time (e.g., every 10–30 minutes) or on-demand.
- For link rotation, prepare a URL trigger for changing the IP. Ensure that the change occurs predictably and is recorded in the provider's logs.
- Assign each account its own proxy with a description: “Acc#1 → US-RES-01 (rotation every 15 min)”, “Acc#2 → MD-RES-02 (rotation by link)”.
- Enter these pairs into a management table: columns for Account, Proxy, GEO, Rotation Interval, and Last Update Date.
- Choose active hours for each account to avoid creating traffic spikes at the same time during rotation.
Important Points
- One account — one proxy. This is a basic principle that reduces the risk of overlap, especially when working within a team.
- Rotation must be predictable. Excessive IP changes can trigger unnecessary checks. The optimal interval is 10–60 minutes, depending on tasks.
- Logs are important for auditing. Keep a record to understand when and how the IP changed, and what operations occurred.
Expected Outcome
Each account is tied to its proxy, rotation is configured and predictable, all actions are documented, and load is evenly distributed.
Possible Issues and Solutions
- Too frequent rotation causes instability. Solution: increase the interval, synchronize IP changes with downtime periods.
- Random IP overlaps between accounts. Solution: adhere strictly to the “1 → 1” rule, using separate proxy pools for different tasks.
- Error with link rotation trigger. Solution: verify the URL, authorization for the panel; set up a backup time-based rotation scenario.
Tip: For high-load tasks, use separate proxy pools for different teams or projects. This eliminates overlaps and simplifies responsibility allocation.
✅ Verification: You can open the table at any moment and see which account is tied to which IP, when the last rotation occurred, and check for overlaps.
Step 6: Selecting and Testing GEO, Speed, and Stability
Stage Objective
To ensure the chosen GEO provides the necessary speed, latency, and stability for your daily tasks.
Step-by-Step Instructions
- Select 2–3 GEO candidates: for example, the USA, Germany, Moldova.
- Measure speed on each GEO using a testing app or browser: aim for 10–20 Mbps for comfortable work.
- Measure latency to major services (ping), comparing stability throughout the day (morning, afternoon, evening).
- Conduct a test session: load feeds, stories, publish a short video. Record the time taken for operations.
- Compare results and choose the GEO that offers the best balance of "speed/stability/price".
- Document which GEO is tied to each account and what speeds you achieve.
Important Points
- Minimum 5 Mbps. Below this threshold, you will experience “freezes” and long loading times, especially when publishing videos.
- Peak hours may lower channel quality. Plan key operations outside peak times if possible.
- Stability is more important than maximum speed. Consistently 10–15 Mbps is better than 50 Mbps with drops and interruptions.
Expected Outcome
You have chosen a stable GEO, achieved predictable speeds, and understand which hours the network performs best. All data is reflected in your table.
Possible Issues and Solutions
- Speed fluctuates. Solution: test another GEO, another provider, or backup DNS.
- High latency. Solution: choose a GEO that is closer to your location or to your audience.
- Videos take too long to load. Solution: check the base channel; look for plans with higher bandwidth.
Tip: Implement a weekly quality control: a quick 5-minute check of speeds and stability for each proxy pool. This helps you foresee degradation and switch in time.
✅ Verification: Final tables indicate stable speeds on the chosen GEO, with operations proceeding equally fast on different days.
Step 7: Fine-Tuning DNS and Domain Resolution Check
Stage Objective
To make domain name resolution predictable, eliminating “random” connection losses and duplicate connection attempts.
Step-by-Step Instructions
- In the iPhone client, open the DNS settings for the connection profile and set 8.8.8.8 as primary DNS, and 1.1.1.1 as backup (if security policies allow).
- On Android, enable custom DNS in the client and specify the same addresses if available.
- Restart the connection, clear the DNS cache on the device (switch to airplane mode for 10–15 seconds, then return to the network).
- Check domain resolution using a diagnostic application: several popular domains should resolve to IPs quickly without timeouts.
- Test the media app's operation again: loading feeds, stories, postings.
Important Points
- Security policies. If corporate policy prohibits external DNS, use approved addresses.
- Changing DNS affects speed and stability in name resolution. This is particularly critical for media streams and frequent requests.
Expected Outcome
DNS operates stably, domains resolve quickly, and applications do not “hang” during connection attempts, reducing the number of timeouts.
Possible Issues and Solutions
- Resolution timeouts. Solution: change the primary DNS, check the backup, test on another GEO.
- Custom DNS not applied. Solution: update the client; check if custom DNS is supported by your application.
Tip: For mass tasks, keep a log of DNS delays. A small table with metrics allows for quick identification of degradation and changing settings accordingly.
✅ Verification: The diagnostic app shows quick resolves, and real application operations proceed without unexpected hangs.
Step 8: Security, Accountability, and Backup Plans
Stage Objective
To ensure resilience against failures and secure storage of accesses, preventing loss of control over the proxy infrastructure and accounts.
Step-by-Step Instructions
- Encrypt the storage of usernames/passwords for proxies and restrict access (role-based access, 2FA).
- Create a backup pool of proxies for critical accounts and document switching rules in case of failures.
- Set up an event log: who and when changed the proxy for the account, for what reason, and the outcomes.
- Weekly check the validity of proxies, traffic and stream limits, and authorization correctness.
- Prepare a rollback plan: how to revert to original settings in apps and browsers, where old parameters are recorded.
Important Points
- Minimum access. Grant permissions only to those who genuinely need to manage proxies and accounts.
- Plan B. Backup proxies and pre-written switching steps save hours of downtime during sudden failures.
Expected Outcome
Accesses are stored securely, events and changes are transparent, a backup plan exists, and tools for rapid recovery are available.
Possible Issues and Solutions
- Proxy data leakage. Solution: change all passwords, restrict access, analyze logs, and update security policies.
- Lack of backups. Solution: allocate at least two backup proxies for critical operations and document switching.
Tip: Separate roles: one person responsible for proxies, one for accounts, and one for postings. This reduces the risk of accidental changes and speeds up diagnostics.
⚠️ Attention: Never share usernames and passwords for proxies in open chats or paste them in screenshots. Use masking and secure channels.
✅ Verification: All accesses are recoverable from backup storage, the backup pool of proxies is active, and the switching plan is documented and clear to the team.
Checking the Outcome
Checklist: What Should Work
- The iPhone profile activates, the IP matches the selected GEO, and media content loads quickly.
- The Android profile activates, target apps are proxied, and operations proceed without errors.
- In the anti-detect browser, each profile has its proxy, the IP is verified and aligns with the plan.
- IP rotation is configured and predictable, and event logging is ongoing.
- The speed on the selected GEO is consistently above 5 Mbps.
- DNS resolution is fast, and timeouts are rare or nonexistent.
How to Test
- Check IP for each profile and device.
- Load feeds, stories, and post a test publication.
- Measure speed via browser or application.
- Artificially trigger IP change (if using link rotation) and check predictability.
Indicators of Successful Completion
- Feed loading takes up to 3 seconds, stories take 2–4 seconds, posting a short video occurs without repeated errors.
- Speed is 10–20 Mbps and higher during peak hours, with connection stability and no interruptions.
Common Issues and Solutions
- Problem: The app does not use the proxy. Reason: the system HTTP proxy for Wi-Fi is ignored by the app. Solution: use a specialized client that supports SOCKS5 and routing rules.
- Problem: Status does not connect. Reason: incorrect address/port/username/password. Solution: double-check the fields, remove extra spaces, test port accessibility.
- Problem: Media loads very slowly. Reason: low channel speed or remote GEO. Solution: check the base speed; choose a closer GEO; require a minimum of 5 Mbps.
- Problem: Sessions overlap. Reason: one proxy for multiple accounts. Solution: use the “1 account — 1 proxy” rule, clearly linking in tables and profiles.
- Problem: Unstable IP rotation. Reason: incorrect interval or errors with the trigger. Solution: fix the interval to 10–60 minutes; test the trigger link and provider logs.
- Problem: Timeouts during domain resolution. Reason: unpredictable DNS. Solution: set 8.8.8.8 as primary, 1.1.1.1 as backup where permissions allow.
- Problem: Loss of accesses. Reason: no secure storage. Solution: transfer data to a password manager, implement role-based access and 2FA.
Additional Features
Advanced Settings
- Domain routing: route only necessary domains through the proxy, and let the rest of the traffic go directly (if allowed by the client).
- Select IP pools by time: different IPs for day and evening sessions to distribute load.
- Segmentation by projects: separate pools for each project and team, with separate logs and reporting.
Optimization
- Media caching at the app level to accelerate repeated downloads.
- Regularly check GEO based on metrics: speed, latency, stability during peak times.
- Automation: scripts for link rotation, reminders for renewals and checks.
What More Can be Done
- Implement a “zero tolerance” policy for shared proxies across different accounts.
- Regularly review the list of GEOs and providers according to changing needs.
- Train the team in basic diagnostics: checking IP, speed, and DNS before handing tasks to support.
Tip: Conduct a quarterly audit of the infrastructure: relevance of GEO, price/quality, event logs, compliance with access rules.
FAQ
- Can I use a system proxy on my phone? In some cases, apps ignore it. For reliability, use a client that can proxy traffic for selected apps and work with SOCKS5.
- What is the minimum channel needed? At least 5 Mbps. Ideally, 10–20 Mbps for comfortable story and video loading.
- Which GEOs are more stable? USA, Germany, Netherlands. Moldova often wins on price with good quality.
- How often to change IP in multi-accounting? Usually every 10–60 minutes. Avoid changing too frequently without necessity; document the schedule.
- Is a separate proxy needed for each account? Yes, the “1 account — 1 proxy” rule minimizes overlap risks.
- Why specify DNS 8.8.8.8? For predictable domain resolution and reduced timeouts, if in line with your policy.
- What to do if the speed is low? Check base speed without the proxy, switch to a closer GEO, check provider limits and equipment.
- Can I proxy only one app? Yes, many clients on Android allow this. On iOS, check the capabilities of the specific client.
- How to store accesses securely? Use a password manager, role-based access, and 2FA. Maintain a separate change log.
- How to check if everything works correctly? Verify IP, measure speed, perform test actions (load feeds, stories, postings), and check for errors.
Conclusion
You have configured SOCKS5 proxies on iPhone and Android through specialized clients, set DNS for stability, prepared a multi-accounting scheme with the “one account — one proxy” rule, implemented IP rotation, and checked the speed on chosen GEOs. Now you have a clear operational scheme: defined profiles, isolated sessions, matching tables, and event logs. This will allow you to work predictably, scale teams, and diagnose problems more quickly.
What to do next: automate rotation, implement weekly quality checks of channels, expand the GEO pool for tests and backups. Progress towards advanced routing and analytics based on network metrics. Maintain discipline in accountability and security, and the proxy infrastructure will be a reliable support for your daily operations.
⚠️ Attention: Always comply with the legislative requirements of your country and the rules of platforms. This guide is educational in nature and describes technical methods of setup, rather than their specific application in contentious scenarios. Work responsibly and transparently.
Tip: Keep this guide as a checklist: before connecting a new account, go through the sections “Preparation”, “Setup”, “Outcome Verification”—this saves time and prevents most errors.