Nginx Proxy Manager: Getting to Know the Features and Configuring Them
The article content
- Reverse proxy and the specifics of its operation
- Getting to know nginx proxy manager in detail
- What is the difference between nginx proxy manager and nginx?
- Areas of use of nginx proxy manager
- Basic requirements for using nginx proxy manager
- Installing nginx proxy manager
- Sequence of actions for configuring nginx proxy manager
- Let's summarize
Deploying high-load online applications is a rather complex and delicate task, which mostly requires interaction with proxy servers. This is the solution that helps to bypass a number of restrictions, increase productivity, security at the launch stage and subsequent use of the product. Along with Forward Proxy Server, i.e. direct proxy servers, Reverse Proxy Server, i.e. a reverse proxy server, can also be used here.
This creates the most flexible and effective traffic management. Here, user requests will be evenly distributed between internal services at the processing stage. Also, a reverse proxy allows you to hide the real IP address of the service, which in itself guarantees higher security indicators when working on the Internet in general.
In today's review, we will focus on what reverse proxy servers are, highlight their main advantages. We will also consider in detail what Nginx Proxy Manager is and how it can be used in practice in most cases as a reverse proxy when working with web applications. We will provide a brief comparison of Nginx Proxy Manager and Nginx, as well as a number of examples of practical use of this solution. We will describe the preliminary requirements that will allow you to understand whether you can use this product in practice. We will also pay special attention to the installation of Nginx Proxy Manager and all the settings that need to be implemented to launch the product into use.
The information provided will allow you to get acquainted in detail with what this product is, as well as assess the prospects for its use in your practice. You will also be able to perform all the necessary settings yourself and as correctly as possible. So, first things first.
Perhaps you will also be interested in learning what mobile and server proxies are, choosing the best solution for your subsequent work.
Reverse proxy and the specifics of its operation
A reverse proxy server is the same intermediary server that will receive requests from users and then redirect them to one or several internal servers. That is, it also acts as a link between clients and those services that host content that matches the entered requests.
To make it clearer how systems with a reverse proxy work, we will describe the operation of the scheme without such a proxy and with it:
- Network without a reverse proxy. In this case, it is necessary to ensure that each application operates on a separate subdomain or port. All those processes that are related to load balancing and scalability are more complex to manage and require the involvement of specialists with certain knowledge and skills. The process of managing SSL-certificates must be carried out for each individual application, which in itself makes these works quite complex and labor-intensive to implement.
- A network with reverse proxies. Connecting such intermediary servers transfers the process of processing requests directly to the central point. At the same time, load balancing and scaling of internal server equipment is significantly simplified. You can also set up centralized management of all SSL certificates and configure their automatic update.
As you can see, connecting to work with the application of reverse proxies opens up new opportunities for faster and more efficient management of the system, and also significantly saves time and effort of specialists, allows you to get functional and easy-to-use solutions at the output. All this will also be relevant for Nginx Proxy Manager.
Features of integrating reverse proxies into your network
The entire process of integrating reverse proxies into a production network will involve configuring DNS server parameters and specifying the rules that will be used for forwarding. There are a number of nuances that we would like to draw your attention to from the start:
- DNS server configuration. Here we are talking about customizing a DNS record for your domain. It is important to specify the IP address of the server where the reverse proxy will be installed, in this case, Nginx Proxy Manager. Such work is performed directly in the domain registrar or on your internal DNS server.
- Configuring forwarding rules. Here you will need to go directly to the interface of the reverse proxies you have selected, and then in the settings menu, specify the rules that will be used for forwarding for your applications. We also recommend that you initially configure UDP and HTTP, HTTPS redirection here.
- HTTPS support with Let's Encrypt. We would like to draw your attention to the fact that the Nginx Proxy Manager tool supports automated management of SSL certificates via Let's Encrypt. This is what will allow you to manage them most effectively directly through the online interface.
That is, running a little ahead, we note that the setup process here is quite simple and will not require any complex settings and actions from you.
The main advantages of reverse servers in general
Before moving on to a more detailed acquaintance with Nginx Proxy Manager, we will highlight a number of advantages that will be characteristic of absolutely all reverse servers:
- Higher security indicators are provided by centralized management of SSL certificates. With this technical solution, you will be able to release for work only those ports that you will need at a given time.
- Higher performance indicators. You will be able to use your internal servers as rationally and efficiently as possible, including through load balancing, data caching.
- Simpler and more flexible management of absolutely all applications. It will be carried out from one interface, will not require additional connections, switching.
These features have led to the fact that the popularity and demand for reverse proxies has increased significantly recently. Perhaps it is time to implement their use within your business.
Getting to know Nginx Proxy Manager in detail
Nginx Proxy Manager is an online interface designed to manage reverse proxy servers, based on Nginx. With its help, the entire process of setting up proxying, SSL certificates, including Let's Encrypt, as well as a number of other Nginx parameters will be significantly simplified. You will not have to do all this work manually, make adjustments to the configuration files. Nginx Proxy Manager combines a well-thought-out and easy-to-use control panel. Here you can set up optimal request proxying parameters for yourself, manage extensions and users. In addition, the installation process itself and subsequent renewal of the SSL certificate will be automatic.
If we talk directly about the purpose and functionality of this tool, then it is worth highlighting:
- Simplified Nginx settings. This tool offers an innovative graphical interface that allows you to set up reverse proxies with literally a few clicks. This greatly simplifies the connection and allows even people who have never encountered Nginx before and do not have certain knowledge or skills to perform these tasks.
- Centralized proxy management. We have already mentioned that in Nginx Proxy Manager the entire management process is carried out from one point. All settings that will be performed here will be automatically redistributed to internal servers. Also, from one place you will control the operation of absolutely all devices used.
- Automatic SSL certificate management. Surely you know that having such a certificate is a must for every website, because it participates in traffic encryption, thereby ensuring high connection security. But the certificate has a certain validity period, after which it must be renewed. Nginx Proxy Manager will significantly reduce your efforts to install SSL and renew it by automating these actions.
- Flexible access control. You can set different access rules for a particular category of users. Due to this, subsequent work, including authorization, filtering of requests will be carried out exclusively in accordance with these requirements. This means that no third party will have access to information prohibited for him.
- Efficient load balancing. If several servers are used in the work, Nginx Proxy Manager will be able to provide the most even distribution of traffic between each device. This is what will increase the reliability, stability and performance of your web application.
All this information allows us to confidently say that Nginx Proxy Manager — a truly easy-to-use solution that can significantly save your time and effort on everyday tasks.
Distinctive features of Nginx Proxy Manager
Among the distinctive features characteristic of the Nginx Proxy Manager tool, it is worth highlighting:
- an innovative web interface based on a well-thought-out control panel through which all necessary settings will be performed;
- support for the Docker container for faster and easier deployment and subsequent management;
- automatic installation and renewal of SSL certificates: you will never find yourself in a situation where your site is blocked due to the absence of this document;
- high security indicators, which is ensured by hiding the internal server structure, which the right can be called an additional level of protection;
- open source code in combination with free use allows specialists to make changes to the product in accordance with the specifics of their own work;
- excellent flexibility in configuring proxy rules, including load balancing, request redirection, access control.
Main advantages of Nginx Proxy Manager
All those features of Nginx Proxy Manager that we talked about above allow us to highlight a number of the most significant advantages of this tool. In particular, we are talking about the following points:
- Ease and ease of use. Each of you can independently and quickly complete the upcoming work. This is relevant even for people who have not previously encountered Nginx.
- Improved security indicators. It provides not only absolute encryption of traffic, but also reliable protection of internal servers.
- Significant time savings on configuration, as well as during subsequent maintenance. Provided by automation of many works.
- No fee for use. Let us repeat that we are talking about an open source product that can be used by absolutely anyone. There are no more advanced paid tariffs.
- Higher performance indicators. Provided by load balancing, as well as caching of materials. In parallel with this, the load on some servers is significantly reduced, while others work practically in idle mode.
Also, there is no need to manually edit configuration files. All these works will be performed through the built-in interface.
What is the difference between Nginx Proxy Manager and Nginx?
The similarity in the names of Nginx Proxy Manager and Nginx leads to the fact that many users consider these two tools to be something similar. But, in fact, Nginx Proxy Manager has nothing to do with NGINX Inc. - the creator of the original Nginx web server. But still, these products have some common points. In particular, Nginx Proxy Manager is based on the source code of Nginx. This is where the similarity of the products manifests itself. With the help of Nginx Proxy Manager, the configuration and management of Nginx is significantly simplified, if it is chosen by the user as a reverse proxy server. In particular, thanks to this bundle, the need for manual management of domains, SSL certificates, access control lists, and various redirects is eliminated. All this is implemented through an advanced graphical interface. And if you do not want to delve into the specifics of Nginx, perform a lot of diverse work, understand the complex configuration, then it would be quite reasonable to use Nginx Proxy Manager for such management.
If you structure the difference between these tools, then the following points should be highlighted:
- Interface. Nginx Proxy Manager is a graphical online interface that provides flexible management of settings. But editing files and configuration in Nginx is done exclusively manually.
- Usage. Nginx Proxy Manager can significantly simplify the setup and subsequent work with Nginx, which will be highly appreciated by those who are just starting to work with this product. You do not have to delve into the specifics of configuration files, the command line.
- Functionality. In Nginx Proxy Manager they are quite extensive, among other things including built-in support for Let's Encrypt, which allows you to automatically receive and update SSL certificates, access lists, manage redirects, and domains. As a result, the entire process of setting up security is significantly simplified and accelerated.
- Development. Nginx Proxy Manager is a separate project, not a companion component of Nginx. It simply uses the same source code. Nginx is an independent reverse proxy and web server. Nginx Proxy Manager is a tool for more flexible and convenient management of Nginx.
- Security. Nginx Proxy Manager has tools that provide HTTP authentication and access list management. Thanks to this, proxy setup becomes more secure and convenient.
That is, it is important for you not to confuse these 2 tools. Let us repeat once again that Nginx is This is an advanced web server and reverse proxy that require deep and specific knowledge at the setup stage. With its help, you get maximum flexibility and control at the output. But using Nginx Proxy Manager, you can significantly simplify the management of Nginx. We hope that now you understand the difference between these 2 products.
Areas of use of Nginx Proxy Manager
Organization of centralized management is one of the key areas of application of Nginx Proxy Manager in practice. We have already said that this software is a convenient and thoughtful graphical interface that allows you to simultaneously manage absolutely all domains, reverse proxy parameters, and security certificates. In simpler terms, with its help, a system administrator can add new sites, set up redirects and connect HTTPS, and provide access control from one workstation. Again, this eliminates the need to manually edit the installation file for each individual service. This is what guarantees stability in subsequent work, as it allows you to avoid many errors associated with the human factor.
But this is far from the only functional purpose of Nginx Proxy Manager. Using it together with the Nginx proxy manager, you can significantly increase the level of security of cloud servers and resources. This is ensured by the presence of a number of built-in mechanisms, including those that provide:
- using authorization for a higher level of protection of individual directories, sites;
- encryption of traffic between the user device and the target server, as well as filtering IP addresses;
- using reverse proxies to reliably protect the real IP address of the user device, organizing confidential work on the network.
In practice, this solution should be used by absolutely all business representatives running their own applications on a cloud VPS. This is what will provide it with protection from external threats, as well as hide the architecture from outside view.
Basic requirements for using Nginx Proxy Manager
In order to be able to use Nginx Proxy Manager in practice, it is necessary to ensure basic compliance. In particular, this application can be installed if the following conditions are met:
- You have at least one server, a virtual machine, on which the Linux distribution is pre-installed. We would like to draw attention to the fact that all the settings that will be given further in our review are based on the Ubuntu 24.04 distribution.
- A server with at least 1 GB of RAM. This will be quite enough for testing the application. But still, more powerful equipment will be required for work. We would recommend starting with 2 GB of RAM and above. As for the number of cores, a 1-core processor will be quite enough for testing. But for work in real conditions, it is still optimal to connect a 4-core processor.
- You can create your server directly in the control panel by going to the "cloud servers" tab. Here, first of all, you select the region. We recommend betting on those geolocations where the ping rate will be minimal. This is what will ensure the fastest data transfer in subsequent work. Next, you select the configuration that corresponds to the specifics of future work. Let us repeat that at the testing stage, you can get by with weaker parameters, while for subsequent work, you will still need increased power.
The entire process of starting the server will take you about a couple of minutes, after which you will find the corresponding IP address and authorization data for connection already on the server dashboard.
Installing Nginx Proxy Manager
Working with the Nginx Proxy Manager configuration begins with installing this application. This can be done directly from the official website of the developer. In particular, you must first download and install Docker and Docker-compose on your computer. After downloading the installation files, perform the following work in the following sequence:
- Go to the Terminal and enter the command “sudo apt install docker.io -y” in the appropriate window. It starts the Docker initialization process. To install Docker-Compose after this, you need to enter the command “sudo apt install docker-compose -y” in the appropriate column. At this stage, be sure to make sure that these components are successfully installed. To do this, run the command “docker -version”, and then “=docker-compose --version”.
- Create a folder for your proxy manager. If you are using a device with the Windows operating system, then such actions are performed through the menu that you call by clicking the right mouse button. If you are working with Linux devices, you will need to use the command “mkdir ~/npm && cd ~/npm”.
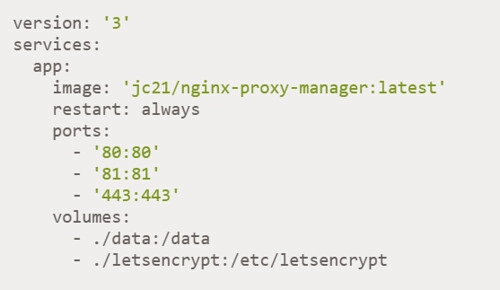
- In the created folder, you will need to create a separate file “docker-compose.yml”. If you are working with the Windows operating system, you will need to right-click and select “Create” from the drop-down menu, and then “Notepad”. Here, we immediately write “docker-compose.yml” in the file name, which will significantly simplify its identification later. Are you using Linux? Then your task will involve entering the command “nano docker-compose.yml”. Whatever operating system you are working with, the contents of your file should be as follows:

- Save this file by clicking on the corresponding button, and then launch the container itself using the «docker-compose up -d» command.
- Go to the browser and enter the address of your proxy server, as well as its port. These values are separated by a colon (IP address:port). Immediately after the site loads, a window for authorization will open in front of you. Here you enter the login and password for access. We would like to draw your attention to the fact that at this stage we are talking about the standard data provided on the developer's site. In particular, you will need to specify an email address such as «admin@example.com», and then the password «changeme». As soon as you subsequently make your first login, the system will immediately prompt you to enter your parameters.
This completes the installation of the Nginx Proxy Manager application. Now you need to make the final settings to launch it and adapt it to your own specific actions.
Sequence of actions for configuring Nginx Proxy Manager
Configuring Nginx Proxy Manager involves the implementation of three consecutive stages:
- Configuring a reverse proxy server.
- Installing an SSL certificate.
- Configuring authorization.
So that each of you can complete the upcoming work as correctly as possible, we will consider all these stages in more detail.
Configuring a proxy in Nginx Proxy Manager
The implementation of these works involves the implementation of the following points:
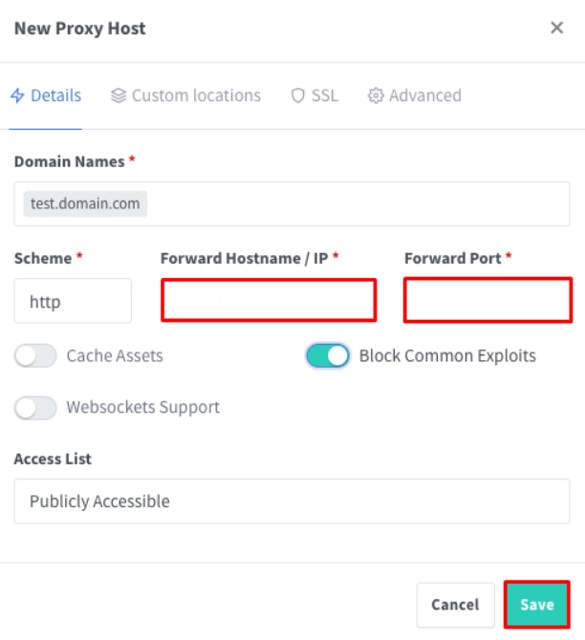
- Go to the «Proxy Hosts» tab, and in it select the «Add Proxy Host» option. After that, a small window will open in front of you, where you specify the information in the appropriate columns.
- Where you see the inscription “Forward Hostname/IP”, you will need to enter the IP address of the internal server.
- In the “Forward Port” column, specify the port to which the traffic will be subsequently projected.
- In the “Domain Names” line, enter the name of your domain. You can also specify any test option here.
- The “Scheme” column requires specifying the connection protocol used - HTTP or HTTPS. Please note that this will determine what type of connection your proxy server will use when connecting to the internal server.
- To activate protection against the most common hacker attacks, check the “Block Common Exploits” option. If your service uses WebSocket in its work, then you should also put the corresponding mark in the square next to “Websockets Support”.
At this stage, your final action will look like this:
Configuring a security certificate in Nginx Proxy Manager
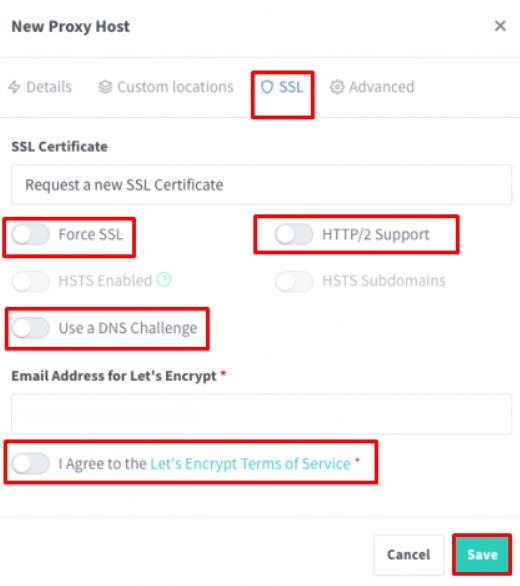
Now you will still have the settings window open. This is where we continue working. But you need to go to the “SSL” tab. Here we select the «Request a new SSL Certificate» option, and then activate the corresponding tools by checking the boxes next to them:
- Force SSL. Thanks to this, you will organize automatic redirection of traffic to HTTPS.
- HTTP/2 Support. Will allow you to optionally improve performance.
- Agree to Let's Encrypt Terms of Service. This mark will indicate that you accept the terms of use of a free SSL certificate.
Now you just need to click the «Save» button so that the tool automatically requests a certificate and installs it for you. Visually, upon completion of the work here you get the following solution:
Configuring authorization in Nginx Proxy Manager
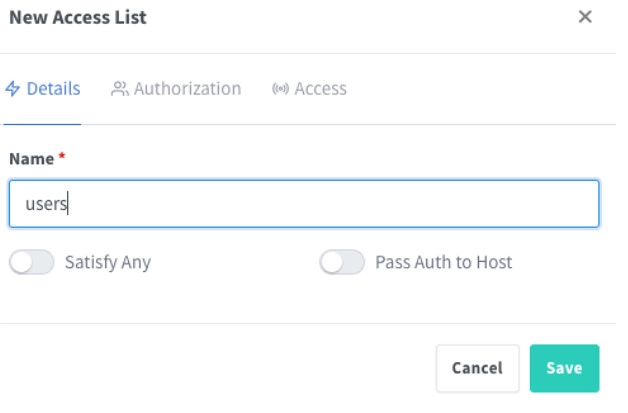
At this stage, your task will be to create a new access list directly in Nginx Proxy Manager. To do this, you initially go to the "Details" tab. Here you see a window in which you need to specify the name of the list. There are no special recommendations here, you choose the option that you consider most suitable for yourself.
Special attention should be paid to the "Satisfy Any" option. If it is not active at the moment, then access to a particular user will be provided only if absolutely all conditions are met simultaneously, namely authorization by login and password, as well as the IP-address of the device from which the connection is made. We recommend leaving it inactive, because this will provide quite good additional protection of resources.
Now you need to go to the "Authorization" tab and specify all the users you want to grant access rights to. For each of them, we specify the login and password. This is what guarantees basic HTTP authentication at the stage of connecting to the site. Next, go to the "Access" tab, where we write down the IP addresses. Please note: you can specify the addresses for which access will be allowed or those to which you want to block the connection. This is very convenient if you want to provide access only to a limited number of people or, on the contrary, exclude several users.
Once you have created the access list, you need to go back to the menu with the settings of a specific proxy host and here in the “Access List” column, specify the list that you have just created. Now each user who decides to go to the corresponding site will have to enter their login and password. If all the above conditions are met, they will get this access, if not, the connection will be blocked.
This completes all your settings, and you can start working directly.
Let's summarize
Now, after studying our review, you are probably convinced that Nginx Proxy Manager is This is a truly functional, convenient solution that will allow you to manage reverse proxy servers as quickly as possible, automate the process of connecting and renewing a security certificate, and provide access to cloud services. It will be useful for system administrators, software developers, and anyone who in practice is faced with the need to securely and centrally control a large number of services and sites. By and large, Nginx Proxy Manager can be used for personal purposes, including deploying a home server, organizing secure remote access to your own local network.
This application is compatible with various operating systems, is simple and easy to manage, eliminates the need to interact with the command line, manually writing code, which can also be attributed to quite significant advantages.
But it is still important to understand that decent indicators of security of work on the Internet in general, ensuring wide functionality - this is a result that largely depends directly on the proxy server that will be used in the work. And here we recommend paying attention to the product from the MobileProxy.Space service. These are mobile proxies that will provide high levels of privacy and security when working on the Internet, protection from unauthorized access, maintaining anonymity when working on the network, effectively bypassing regional restrictions and access blocking. You can use them in test mode before purchasing to ensure high functionality and reliability.
We suggest that you familiarize yourself with these mobile proxies in more detail at the link https://mobileproxy.space/en/user.html?buyproxy. If you encounter any difficulties or additional questions in subsequent work, please contact the technical support service. Specialists work around the clock. This means that your requests will be processed as quickly as possible, and you will be able to quickly return to functional work.