Connect Telegram bot to ChatGPT

Table of contents
ChatGPT — one of the most popular and well-known software solutions in the field of artificial intelligence today. It is actively used to generate text and graphic content, to obtain sufficiently competent answers to popular questions. With its help, prelanders are created, program codes are written, and many other tasks are performed. And now we will tell you in detail how to empower your own bot that works with Telegram channels with artificial intelligence capabilities. No codes, complex programming, minimal time and effort. Our offer will certainly be of interest to those who are not particularly satisfied with the work of bots created by other users, who want to create their own product, optimally oriented to the individual specifics of work. Literally an hour of time and you will have your own Telegram bot capable of "thinking" at your disposal. But, first things first.
Sequence of steps for creating a Telegram bot with ChatGPT
To create your own bot for working with Telegram channels with artificial intelligence capabilities, namely ChatGPT, you need a little time and strict adherence to our recommendations. When performing these works, we will need to implement 2 separate stages:
- Get access to the ChatGPT artificial intelligence bot.
- Connect ChatGPT to your Telegram bot.
Let's consider both of these points in as much detail as possible.
How to access the ChatGPT artificial intelligence bot
One of the simplest solutions to this — using the application SMMplanner. Here you just need to log in and use the neural network directly when creating a post. This option will be optimal for those who do not expect the bot to solve complex technical problems. To generate text content for posts and create a content plan, this method will be more than enough.
Initially, we need to go to the post preparation tab and describe the task for artificial intelligence in it:
- write text for the post;
- make a content plan for a week, a month;
- write hashtags;
- Generate a material based on an existing source.
We would like to draw your attention to the fact that you can use the SMMplanner application for free for 2 weeks. This is a trial period during which you will get full access to all the functionality of the service without any restrictions. This time will be more than enough for you to evaluate all the features of the application and determine whether you should continue using it, but for a fee, or look for an alternative. But we would recommend choosing the first option, as the service is quite advanced, easy to use and functional.
Now that you have access to ChatGPT, you can connect to the neural network and the Telegram bot.
How to connect ChatGPT to your Telegram bot?
Let's make a reservation right away that at this stage you should already have a Telegram bot at your disposal. It is advisable for you to save its name and Token API in advance, so that later you do not have to look for and do unnecessary work. Our task at this stage is to connect a neural network to it.
In this case, we will use the FlowXO constructor — a fairly simple and easy-to-use solution that does not require deep professional knowledge and practical skills. A well-thought-out and intuitive interface will significantly reduce the time spent searching for the desired option and, accordingly, creating the product. As a result, you will get a functional Telegram bot, which you can set urgent tasks for working with your account, as well as ask him questions.
That is, initially we need to go to the official website of the FlowXO constructor and register there. Next, perform the actions in the following sequence:
- Each time you visit the FlowXO service, it assumes that you will be on the main page of the constructor. In order to create a bot, pay attention to the vertical menu on the left side of the working window (filled with dark color) and select the "Bots" option here. After that, click on the green button "+NEW" in the upper right part of the working window and from the drop-down list, select Telegram.
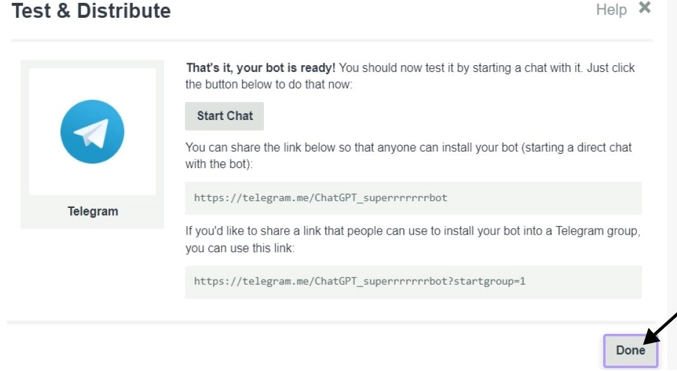
- After that, a new window with empty columns opens in front of you, which we need to fill out. In particular, in the string «Name» we enter the name of our bot. For the convenience of work, we set our bot to Russian (if your professional activity does not involve the use of another language). In the column "Bot Token" you need to enter the API Token, which you also saved along with the name. After that, click on the "Next" button. after that you will see a populated window. Once again, check all the information so that it is correct, and if everything is correct, click on the "Done" button.

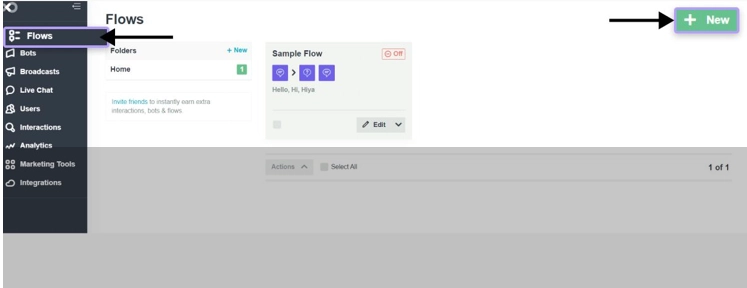
- The next stage of our work — creation of a logical chain. To do this, select the "Flows" option in the left vertical menu. Next, click on the green "+NEW" button in the upper right corner of the working window. After that, a window with a large number of options will open in front of you. Here we are interested in the very first option — "Blank Flow". This is an icon with a green circle and plus signs in the middle. So you have chosen a template for creating a "+NEW" chain.
- Now you need to select the appropriate trigger. To create a new one, we click on the button with the image of a snowflake "Catch all". After that, click on the "Connect to specific bots" button. and choose from the presented options for ChatGPT neural networks. After that, click on the "Next" button.
- To activate the flow, you need to move the slider in the upper right corner of the working window from the inactive "Off" position; to active — "On". At the bottom of the active window, find a gray circle with a plus sign in the middle and click on it. After that, you will be able to enter additional data.
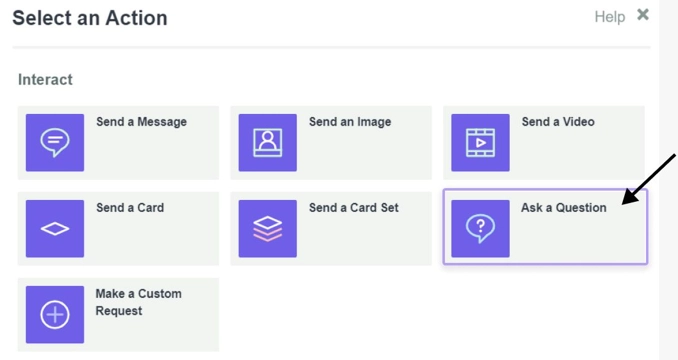
- In the "Select an Action" box we need to click on the "Ask a Question" button. We fill in the "Question" field by clicking in the upper right corner of the column on a kind of contour in the fish. Next, select the option "User First Name" and enter your request. By doing this, you instruct the bot to contact the user by his nickname with an offer to ask a question after the bot receives a request from the user.
- Scroll down the active window until we see the "Next" button. We click on it, and then we are interested in the "+ Add a Filter" button. This is necessary so that you can add a command based on which the bot will respond to the client.
- Find the "Value" field and click on the button that looks like the outline of a fish. This will open a drop-down list. Here we initially click on the "Message" button. Next, select the "Condition" option from the list, and "Equals" in it. Further in the field "Value" you need to write the command «/start». Now click on the "Save" button. With these settings, your bot will be able to respond to the user after running the "start" command: username: enter your request.
- When all the previous settings are done, you can bind the ChatGPT module to your Telegram bot. To do this, we again need to click on the button with the image of plus signs in a circle. From the proposed options, click on "Select an Action", and then "More services". Already here we select the "OpenAI" button. In the "Action" drop-down list you will be offered several options for connecting artificial intelligence. But in this case, we click on "Complete Chat (ChatGPT)".
- Choose the appropriate option for ChatGPT. There are several options here. So, Complete Chat (ChatGPT) involves the full use of the neural network. classify text — is a function that allows you to classify text written by the user. And the Edit/Correct Input button — this is editing / correcting the data that is being entered. If you want to force the bot to generate an image, select the Generate an Image option, and if you want to moderate the text, then click on Moderation. Another option Language Detection and Translation allows you to determine the language of communication and translate the text. We would like to draw your attention to the fact that the option "Complete Chat (ChatGPT)"; involves the use in practice of all the possibilities of these neural networks. If you want to create a multifunctional Telegram bot based on artificial intelligence, then you should choose this option. After that, click on the "Next" button.
- Generate the "OpenAI API Token" key. To do this, we need to use mobile proxies and go to the developer's official page in the OpenAI service. To do this, click here on the button "Create new secret key" and copy the resulting code, save it to yourself.
- We return to our constructor and in the "Authorize the Service" block; select the "Open AI API Token" box and insert your key from your personal ChatGPT account into it. Click on the "Next" button at the bottom of the active window. After that, a window with the "Settings" settings will open in front of you. Here in the "Prompt" field click on the fish symbol again and select the "Answer" option. By doing this, you will redirect all those messages that the user sends to the Telegram bot to ChatGPT.
- In the settings block, select the "gpt-3.5-turbo" model, and directly below this window, set the allowable number of tokens. We would like to draw your attention to the fact that the default number is 100, but you can enter another option, at least 1000. This indicator will indicate how many characters will be contained in the bot's response. It is not worth setting too small indicators, otherwise the text of the answer will be broken and this in itself will cause the user on the "other side" communication difficulty in the perception of the provided answer. But it’s also not worth asking too many tokens, because in this case the bot will think for too long before giving an answer. The user may simply not wait for it and leave the site. After setting these parameters, click on the "Next" button.
- We add a filter so that all actions of the bot are implemented only after the user gives a response. To do this, we need in the line «Value» select the "Answer" option, then from the "Condition" drop-down list. Here we select the option "Is not empty" and click on the "Save" button. At this stage, we have already completed a fairly large amount of work. In particular, we configured the bot to receive the "/start" command. from the user, prompted him to enter a request and redirected it to the ChatGPT neural network. But the transmission of a response from artificial intelligence to the user has not yet been implemented.
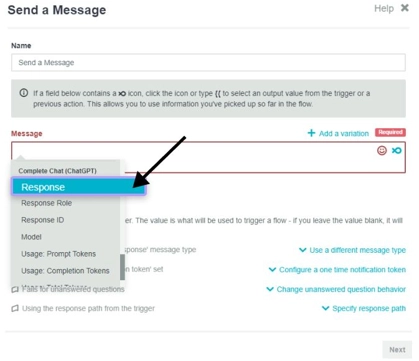
- Performing the last step of the settings in the "Flows" section. Here we click on the button with the image of plus signs in a circle. From the drop-down tabs, select "Select an Action", and then the option "Send a Message". Now we repeat the actions that we performed earlier, namely, we click on the image of the silhouette of a fish in the field in "Message", and then select the "Response" option, click on the "Next" button in the lower right corner of the screen. Optionally, you can add in the "Message" field text accompaniment, as the option "Reply to the request is ready." That is, this text will be written by the bot each time before sending the user a response to his request. In any case, do not forget to select the "Response" command.
- Adding a filter. For this, the entire line "Value" select the option "Answer", and from the drop-down list "Condition" — "Is not empty" and click on the "Save" button again. This is how we set the last actions that close the chain. That is, the bot will respond to the user after his command.
This completes all the work on connecting your Telegram bot to ChatGPT. Before launching the tool, you can test it, make sure the stability of the work and the correctness of the answers provided to the requests. We would like to draw your attention to the fact that the FlowXO constructor provides a lot of other options for setting up the bot from the neural network. In the workflow, you will be able to make your own adjustments here, add new functions, remove unnecessary things, and build new chains. It will even be possible to change the bot model, etc. All this will make your work as functional as possible, convenient and individual.
Another point worth noting is that the API key you generated will only be free to use with ChatGPT for 3 months. This is a standard condition for all registered users. After they connect to the neural network for the first time, they receive a free trial period of 3 months, as well as $5 in bonuses. When this period expires and the funds run out, the system will stop working. That is, in any case, you will have to choose the tariff that suits you and buy it. Of course, there is another option to organize work with a neural network from different accounts, changing them every 3 months. But this is not a solution to the problem, since you will have to make different settings each time. In addition, if the system identifies you, there is a high probability of running into a ban.
Summing up
In this review, you received detailed instructions for connecting your Telegram bot to the ChatGPT neural network. Yes, today there are already quite a lot of ready-made solutions on the network, namely bots for the Telegram messenger, working in conjunction with artificial intelligence. But are they worth using? The answer here is ambiguous. If the bot is of high quality and stable in operation, you will have to pay for it, and constantly. Yes, and the price in this case will be quite impressive. If there is no fee, then most likely you will have to suffer from annoying advertising, constant addition to some groups, mailing lists, which will significantly reduce the comfort of work. Therefore, a more reliable option is still to create your own tool.
The last point that I would like to draw your attention to — the fact that work with Telegram channels, including using bots, should be carried out through mobile proxies. This is the easiest and most convenient option to ensure a stable, secure and functional network experience without any restrictions. Follow the link https://mobileproxy.space/en/user.html?buyproxy to get acquainted with the possibilities of mobile proxies from the MobileProxy service .Space as one of the best solutions on the market today.
In this case, you get a dedicated channel with unlimited traffic and access to almost 1.4 million IP-addresses that you can change on a timer, by sending from your personal account. It will also be possible to select the appropriate geolocation and mobile network operator to effectively bypass regional blocking. We also suggest that you study the current tariffs and choose the option that will be optimal for your work, both in terms of the duration of the proxy server lease and the price.