How to take a good screenshot: tools and tips
In everyday work, users often have the following question: “How to take a screenshot of the screen.” A simple click on the corresponding button is clearly not enough, since in the end you get a snapshot of absolutely the entire screen, along with open tabs, documents launched by programs. In addition, the quality of such a screenshot will leave much to be desired. That is, in this case we are talking about getting a solution that will be as simple and convenient to use as possible, but at the same time will allow you to get a really high-quality result.
Now we will dwell in more detail on how to still create a high-quality screenshot of the screen on a computer using keyboard shortcuts, additional applications that can be installed on your device, as well as online solutions. Here are a number of recommendations that will greatly simplify your job of taking screenshots and allow you to get excellent results.
Why you may need a screenshot
Let's start with the fact that under the term “Screenshot” we mean screenshot which is done without tools like camera, smartphone. Many users face the need to create it in everyday life. In particular, they may be required in the following situations:
- Contacting the technical support service of a particular service or store. Thanks to the screenshot, you will have visual evidence that there is a specific problem that you would like to solve with the help of a specialist. Showing such an image will be much more effective than talking in words about what happened and what does not suit you about all this.
- Creating instructions for users on how to work with a particular program, service, gadget, etc. Using screenshots, you can demonstrate all these actions that users will need to perform to get the desired result. Moreover, it will be possible to add additional inscriptions and pointers to the screenshots, which will greatly simplify the work of mastering the new program.
- Save stills from your favorite films, scenes from computer games, original pictures along with captions. This is all that can become the basis of any collections or selections.
- Formation of physical evidence. Alternatively, you can make a screenshot of a receipt for payment for goods or services in order to send it to the seller, because money does not always reach your account instantly. You can also take a screenshot of your order basket to show the seller that you did not receive the item you actually ordered, etc.
- Saving elements of correspondence in instant messengers and social networks if you connect to them via a computer. What's great is that you can select a single fragment rather than taking a screenshot of the entire screen.
There are a lot of options where a person can use screenshots in their daily practice. And there is a simple explanation for this: the human brain remembers visual information much more efficiently. In addition, such files can be saved for yourself and used in the future, if the need arises. Now let's look a little more closely at what screenshot formats you can ultimately get.
Possible screenshot format options
From the very beginning, we want to pay attention to the format of the screenshot, since it largely affects the quality of the finished image. Send blurry pictures lacking detail — this is clearly not something that will allow the recipient to understand exactly what information you would like to convey to him.
Today, users have the opportunity to receive a screenshot in the following formats:
- PNG. A fairly common graphic format that can save an image without losing its quality. That is, there is no option to compress the image. But you must understand that with its help you will not be able to save large files.
- JPEG. Unlike the previous option, the possibility of compressing the resulting image is already provided here. But this process will be accompanied by a deterioration in quality.
- GIF. This is the only screenshot production format that supports animation and transparency. This provides compression of the image, but its quality is not lost.
That is, if your priority is to obtain a high-quality image, but small in size, then it is quite possible to use the PNG format. In addition, today there are many services that allow you to convert some formats to others, while giving users the opportunity to choose the image quality that will be optimal for them at one time or another. The resulting screenshots can be immediately sent to recipients or saved to your device for later work.
Now let's move on directly to how you can take a screenshot of the screen on your computer. Let's start by getting acquainted with standard applications.
We use standard screenshot programs
Absolutely all personal computers and laptops have operating systems installed that allow for the generation of screenshots. Now let's look at the most popular solutions:
- Scissors application. This is standard software built into the Windows operating system. We would like to immediately draw your attention to the fact that in the next update of the 10th version of the operating system, the developers promise to remove this tool and transfer all its functionality to the “Sketch on a screen fragment” option. So, using “Scissors”, you can take a snapshot of either the entire screen or a separate fragment. You can also take a screenshot of the currently active window. The image that you receive as a result can be saved to your computer or sent by mail or via instant messengers. To activate the “Scissors” you will need to go to the “Start” menu, and then select the “Windows Accessories” tab. In the list presented here we find the application we need. You can also use the search directly through the “Taskbar”. Just enter the name in the appropriate field and use the search results.
- The “Sketch on a fragment of the screen” application. This is one of the latest innovations in the Windows operating system. Unlike "Scissors" here you can already create images of exactly the area that you would like to capture. You can end up with fragments of a rectangular shape or any other arbitrary shape. You can also take full screenshots of the active window. To use this solution, you need to go to the Start menu. and there in “Standard Windows” select the appropriate icon. We would also like to draw your attention to the fact that you can launch this application by simultaneously pressing the key combination Win + Shift + S.
- Setting up hot keys. To activate this option, you need to go to the “Start” menu, select the “Keyboard” tab in it. and go down to the keyboard shortcut block: Print Screen. Here you need to move the slider from inactive to active. In particular, today in "Windows" different keyboard shortcuts are used. Win + PrtScr on a computer or Fn + PrtSc if you are working from a laptop. In this case, you can get a screenshot in PNG format without third-party programs, which will be automatically saved in the “Screenshots” folder. or in “Images”. Print Screen+Paint — this is the combination that will allow you not only to take a screenshot, but also to open it in the appropriate graphic editor for subsequent editing. In this case, you initially need to click on the “Print Screen” button, and then turn on “Paint” and insert a picture. Another key combination option for taking a screenshot — This is Alt + PrtScr. With its help, you can take a picture of the active window and immediately copy it to the clipboard. You can then use any graphic editor to save the photo or make appropriate adjustments to it.
As you can see, there are options for taking a screenshot using the built-in tools of the operating system, including Windows. enough. But we would like to immediately draw your attention to the fact that you are unlikely to be able to get a truly high-quality solution here without additional editing. In addition, the functionality here is somewhat limited, which does not allow you to ultimately get a picture that fully meets your wishes.
Now let's move on to learning how you can take a screenshot using external specialized programs.
Features of taking screenshots using programs
Today there are more than enough programs on the Internet designed for generating screenshots. The most common solutions here include Monosnap, LightShot, Joxi, KiberInfinity's Screen Shooter, Greenshot. But, despite all their diversity, the operating principle of most of them will be quite similar.
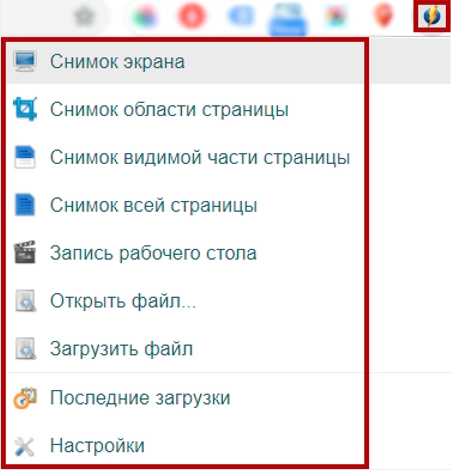
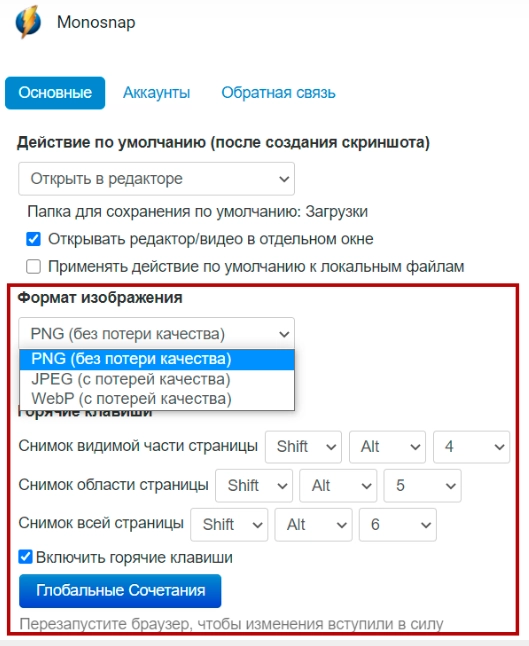
Let's look at the features of how such screenshots work using Monosnap as an example. You can download this program to your computer or use it as an extension for Chrome browser. We would like to point out that with this solution you can take a screenshot of the entire screen or a separate fragment of it, receive a photo of a separate page or part of it, and also record a video. Pay attention to the photo. Here we have listed all the functions of this screenshot.
If you plan to use the program on your computer, we recommend setting up hot keys. In particular:
- Ctrl+Alt+5. Used to form a snapshot of a specific area.
- Ctrl+Alt+6. By clicking on these key combinations, you can get a screenshot of the entire screen.
- Ctrl+Alt+1. Click on these buttons simultaneously to open the image from the clipboard.
- Ctrl+Alt+0. After pressing this key combination you will open the last image.
- Ctrl+Alt+F. You should use this combination if you want to show or hide the drop zone.
Also through the main menu of the program, you can upload a file, video, view recent downloads, make individual settings and even get feedback from support.
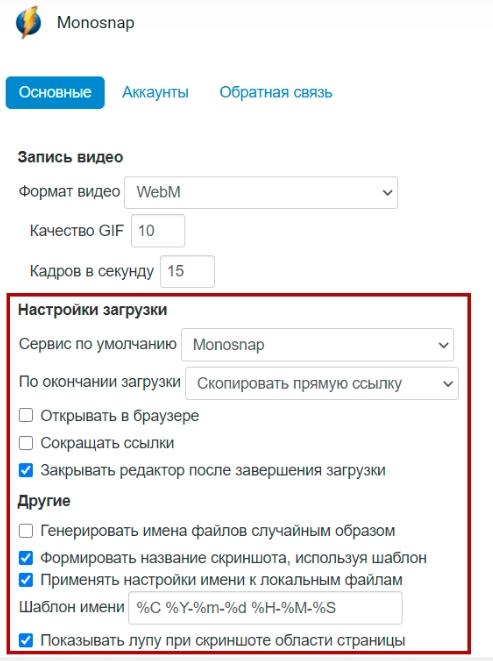
This program also allows you to choose where your files will be saved and in what format. These works are performed through the “Settings” option. In particular, the options for saving name and image templates will look like this:
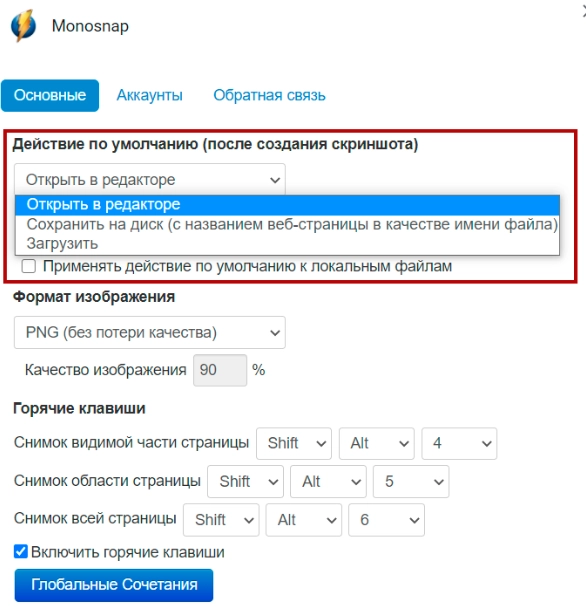
After taking a screenshot, you can open the resulting images in the editor, load them to the clipboard, or save them to your hard drive. In the photo you see all the actions that can be done after taking a screenshot.
For the changes you have made to take effect, you must restart your browser.
You will also need to select the image format that suits you, as well as configure hotkeys. In the latter case, you should simply check the box next to the “Enable hot keys” option. And again, it restarts the browser so that the changes made become relevant.
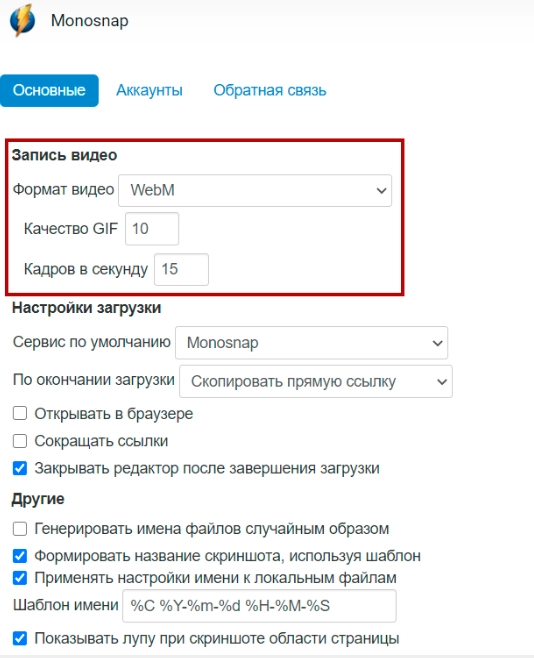
The last point in this block that we would like to draw your attention to is setting the parameters for video recording. In this case, we indicate the format, the desired quality, as well as the optimal number of frames that will be saved in one second.
It would also be a good idea to remove the cursor from the image, since in most screenshots it will turn out to be a completely unnecessary element.
As you can see, the Monosnap program is quite simple in settings. You will only need to complete this work once and then use it without any restrictions. Similar work will need to be done when using other screenshots.
Online solutions for taking screenshots
If at the moment you do not want to install any specialized programs or extensions, then you can get a fairly high-quality screenshot using specialized online services. They work on a fairly simple principle. In particular, you simply insert a link to the site, add the settings you need, and only then download the finished screenshot to your computer.
Let's look at the operation of such online services using Snaggy as an example. With its help, you can quickly create screenshots, edit them, save them to your computer, or share links to the screenshot. Moreover, it has a built-in online image editor. There is also its own cloud image storage, which can be used by everyone who works with this service.
Snaggy itself has a fairly simple and intuitive interface. Directly on the main page there are instructions for working with it. In particular, the sequence of actions that users will need to implement in order to get a screenshot is described, in particular:
- Go to the window that you want to take a snapshot of at that moment.
- Press the Alt+Print Screen buttons simultaneously.
- Return to the main page of the service with Snaggy.
- Press the Ctrl+V buttons on the keyboard at the same time or click on the right mouse button and select the “Paste” function there. As a result, you will receive a link to the created screen.
If you want to make any adjustments to the resulting image, modify it, add text accompaniment, arrows and other elements, then you need to go to the built-in site editor. With its help, you can, among other things, also crop the picture to the size you need. There are also hotkeys here that you can customize for yourself to organize the most convenient subsequent work.
But we would like to immediately draw your attention to the fact that there is a fairly large amount of advertising on this site. But if this moment does not bother you, then you can safely take this decision into your arsenal.
We would also like to draw your attention to the fact that you have the opportunity to take a high-quality screenshot using the built-in browser option “View code”. Such a solution will be extremely convenient to use if you need to take a screenshot of a website or a document that contains a large number of pictures and small text. Other tools that we talked about above in our selection in this case will not allow you to get a good result. That is, we are talking about creating your own screenshot directly on the site using an option such as “View code”.
To solve the problem you need:
- Go to the page you would like to take a photo of.
- Right-click or use the keyboard shortcut Ctrl+Shift+I. After this, a new menu will open in front of you, in which you need to select an option such as “View code”. It is almost at the very bottom of the list.
- After that, use the mouse to enlarge the area of the screen that you want to take a picture of and release it. The photo is ready.
You can also make a number of adjustments to get a screenshot of the format, size and quality that suits you.
Recommendations for designing screenshots
In this review, we talk not only about the ways in which you can take a screenshot, but also about how to make it of the highest quality possible. That is, one that would be simple and easy to understand. Now that you have already chosen the most suitable methods for creating screenshots, let's move on to the recommendations that will help you design your image as correctly as possible:
- We perform the correct trimming. Your screenshot should not contain unnecessary elements. If it turns out that you still have them in the original photo, then you need to use editing and remove them. In the same way, you should not cut off the text or pictures too much, because this affects not only visual perception, but also the information content of your screen. The center of your photo screen should be the image. If the background is colored, then trim strictly along the edges so that there are no third-party elements. In the case of a white background, small indents are allowed. Thanks to this, the user will also be able to understand that the screenshot in front of him represents the main idea that the author would like to convey. Also, the pictures should not contain advertising or third-party elements, because this will only distract the attention of users and prevent them from focusing on the main picture.
- Highlight certain elements in the screenshot. This solution should be used when you want to point the user to individual elements of your screenshot. We have already said that to solve such a problem, an arrow, a selection in the form of a circle, rectangle, line, as well as a number or inscription can be used. To create such elements, you can use either a built-in or external editor. It’s also a good idea to shade out extraneous elements in the photo. That is, those that in this case do not carry a semantic load, but will distract the attention of the audience.
- Pay special attention to the design of tables. Here it is also worth shading out third-party elements, as well as using arrows and highlights in order to convey the desired information to the user. But at the same time, it is necessary to ensure that the arrows and selections do not intersect with each other, do not overlap each other, or crowd together in one place. It may be necessary to make additional adjustments to the tables even before generating the screenshot. Alternatively, you can make the rows taller and separate the parameters that need to be emphasized in different parts of the table.
Additional recommendations for improving the quality of screenshots
Now we will take a closer look at the recommendations that will allow you to get a high-quality screenshot. In particular:
- Upload the resulting image in PNG format. Let us remind you that when you select the JPEG format, the image will be automatically compressed, which will result in the appearance of blurriness and unclearness in the pictures. That is, it is optimal to set the photo to be saved in PNG format at the settings stage. To do this, you need to right-click on the application icon itself, and then go to its settings and remove the corresponding format there. If necessary, you can change these settings immediately before saving the screenshot.
- Do not use external servers in your work. The fact is that such hardware often has a very short shelf life for documents, including screenshots. That is, the risk that by trusting external servers you will lose all your screenshots: they will simply become unavailable after a short period of time. A much more reliable solution would be to configure uploading to FTP or simply save pictures to your computer. This way you can be completely sure that no one will delete them without your knowledge.
- Don't forget to turn off the cursor image. Having a cursor in the photo is only allowed if you want to directly show the audience which button or icon they should click when making settings. In all other cases it should not be in your picture. That is, you will need to check exactly where your cursor is located each time before taking a snapshot and move it out of the snapshot area. If you don’t want to do this work manually, if you need to take a screenshot of the entire screen, then just go to the screenshot settings and uncheck the box next to the “Take screenshot with cursor” option.
- Customize hotkeys that are convenient for you. This is a solution that will greatly simplify your work with a screenshot. So, you can set a suitable solution that will allow you to take pictures of a specific portion of the screen, and not of everything that is currently open on the monitor. The corresponding combinations are set in the screenshot settings. We talked about possible settings options at the beginning of the review.
- Use elements that allow you to control the reader's attention. This is especially true for cases when you use a screenshot when preparing a presentation or instructions. In order for a person to understand exactly what you would like to draw his attention to, it is worth highlighting the relevant elements, numbering them, leaving signatures and tips. This will allow you to build a logical sequence of actions that even a person for whom all this is new can easily navigate. But it is important not to forget about the aesthetics of the finished picture. So, with the help of screenshot programs, you can create a separate button or column or element using a frame or arrow. But you shouldn’t use two types of selection at the same time, because in the end you will get a picture that is quite difficult to perceive. Use arrows and numbers to show the sequence of actions. But still, arrows will be preferable, as they make the image more visual. Numbers should be used when you have several arrows and they will be located close to each other. As a result, you will not get the visibility you want. Another recommendation in this block — Don't build very long sequences. You must understand that a person will be able to focus on a maximum of 3 elements at a time. If there are more of them, perception will deteriorate and you will not be able to convey the desired information. And if necessary, actions and elements of the same type can be grouped by highlighting them with the appropriate number and providing a detailed explanation below. Thanks to this, you will receive a structured presentation of data that will be easier to understand.
- Pay attention to detail. In this case, we are talking about not missing small points that could cause difficulty in the perception of your material by users. In particular, show where this or that icon is located on the screen, do not throw away the logo or the window where additional recommendations are indicated. This is all to improve understanding of the action algorithm.
- To get a single harmonious picture, you need to approach the selections used responsibly. Everything you use in your work must be done in the same style. That is, it is important for you to pay attention to the color and thickness of the lines. You shouldn’t be too zealous with the palette of shades, because few users will be able to appreciate the color variety. An abundance of shades, on the contrary, will confuse you and will not allow you to understand what exactly you wanted to show.
- Observe symmetry and proportion. A neatly aligned picture, evenly spaced description, outlined frames — this is all that will increase the aesthetics of the image, show users that you worked on your project, that you wanted to make it really useful for the audience.
- Do not forget about the confidentiality of information. In this case, we are talking about not accidentally adding confidential information to the screenshot, in particular account identifiers or some other personal data, information about income, and wallet status. In order to hide such information, you can use an editing tool such as Blur. Alternatively, to compile such guides, you can use test accounts rather than real ones. A similar solution is offered by the same Google, in particular when working Google Analytics.
To summarize
We hope that the information we provide will be sufficient for you to create screenshots that are truly high-quality and useful for your audience. You decide for yourself which solution to implement the task at hand. These could be tools that are already provided by default in your operating system, third-party programs that, in addition to taking a picture, can also record video and allow you to edit screenshots. You can also use online services, which allow you to complete this work as quickly as possible. If you need to take a high-quality screenshot of an element with very small font, then in this case you can use the “View code” function.
It is best to save the resulting image in PNG format on an internal server or your own computer, and not on external sources. At the preliminary settings stage, it is worth setting hot keys and also disabling the display of the cursor. In order to control the attention of the user audience, use arrows or some kind of highlighting of certain elements. Try to avoid sequences that are too long. It is better to divide such screenshots into several or group similar actions.
The last point that I would like to draw your attention to is the need for additional connection to the operation of mobile proxies. The fact is that not all services intended for generating screenshots will be available due to the presence of certain regional restrictions. Thanks to the substitution of IP-addresses and geolocation, you can easily replace your real technical parameters with others, which will allow you to bypass the prohibitions. Moreover, with reliable mobile proxies, you are guaranteed confidentiality of your online work and protection from any unauthorized access.
The best solution in this market segment today in terms of functionality and price is offered by the MobileProxy.Space service. In this case, you will be provided with a personal channel with unlimited traffic, as well as access to more than two million pools of IP addresses and a huge variety of geolocations from different countries in the world region. Thanks to simultaneous operation on the HTTP(S) and Socks5 protocols, the security and stability of the connection is ensured. Which mobile proxies will be simple in settings and subsequent operation? You will be able to change the address either forcefully via a link from your personal account or automatically, having previously set up a timer in the range from 2 minutes to 1 hour.
You can read more about all this here. If additional questions arise during the work, you will need the help of specialists; 24-hour technical support service is at your service.