No network, no proxy: what to do to restore work
Today, the use of mobile proxy servers for stable and efficient work without any restrictions – this is a fairly common practice. With their help, a high level of anonymization of actions on the network, increased connection security, bypassing regional blocking, the possibility of multi-accounting, the use of automated software for promoting personal pages without a ban, and more.
System administrators are in charge of maintaining corporate networks, and ordinary users do not even think about how everything works and how it works. And even if some problem arises in the work, they will not even think about how to solve it, but simply turn to specialists for help.
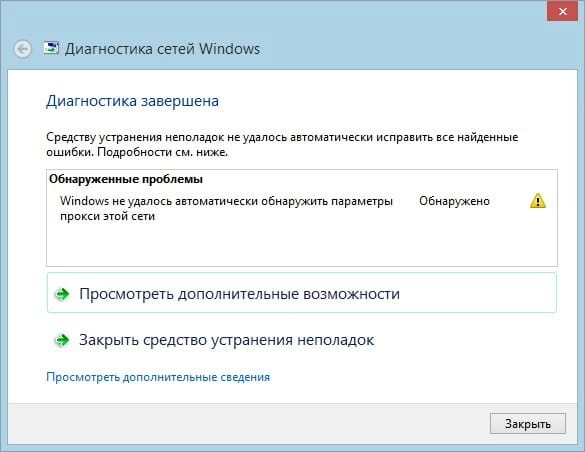
What should regular users do when they encounter the error "Windows could not automatically detect this network's proxy settings"? A similar message on the screen of his PC can be seen by a person who has encountered a network problem and manually launched the network diagnostic utility Windows. That is, this is a problem that the system cannot automatically solve. Therefore, it simply informs the user.
As practice shows, the most common reason for such a – pre-written and included script for automatic proxy settings directly in the browser itself. As an option, it can also be turning off your proxy server or a mistake made at the stage of connecting it to work, in particular, incorrect specification of technical parameters.
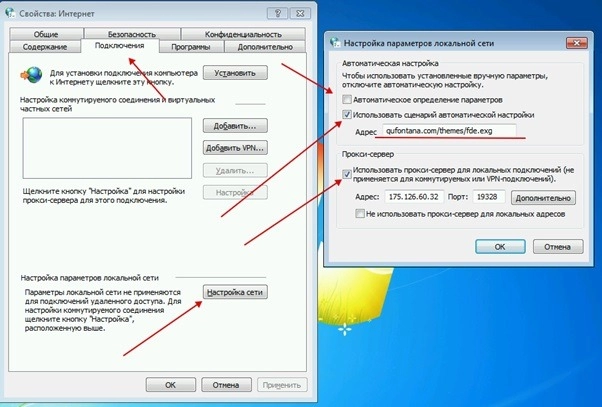
The simplest solution that will solve the problem in more than half of the cases – uncheck the box everywhere the inscription "use a proxy server"; in the settings of the operating system or browser (depending on how the connection was made). To do this, press the key combination Win + R, then inetcpl.cpl, and then go to the "Connections" tab, click on "Network Settings". In the window that opens, remove the top two checkboxes that launched the process of automatic identification of parameters and ensured the launch of auto-configuration scripts.
But what if you followed these steps and the error persists and Windows still won't start? Then we carefully read our material and take appropriate actions, following the recommendations. The problem is exacerbated by the fact that it can be caused by many reasons. And there is no universal solution. Therefore, in this article, we will alternately consider the solutions, starting from the most common and to quite rare ones. So we will try to find a way to solve your problem.
The simplest steps that can help solve the problem
Before moving on to rather complex and time-consuming solutions, it is necessary to try simpler, but nevertheless quite effective solutions. We do each of them in turn in the hope that the error "Windows could not automatically detect the proxy settings for this network" won't disappear:
- Turn off all equipment: personal computer, modem or Wi-fi, other devices that you use to access the Internet. This must be done correctly, and not just pull the plug out of the socket. We wait a few minutes, and then turn everything back on. The fact is that an absolutely correct shutdown of the equipment ensures a complete reset of the state of both electronic and software components to those indicators that were in the system even before the last power-up. That is, you have the opportunity to go back a step before there was a problem with Windows. Have you done all this, but it did not help, and the error continues to be displayed? Go to step number 2.
- Restoring the system. The fact is that in the Windows operating system, starting with Windows 7, automatic backup is provided. This point is already in the settings automatically. In Windows 10, such protection will be enabled by default not initially, but after the first system update. That is, the likelihood that you have a backup copy is quite high. Even if the recovery result is unsatisfactory, you will not lose the information stored on your PC. You can undo everything and return to the original state. All work is performed through the "Recovery Wizard" option. Click on the – analogue of the "Start" button directly to the OS. In the search bar, write the word "Recovery". In the search results, select the option "System Restore". We launch the Wizard and sequentially, step by step, perform the actions, following its instructions. Did the error remain? Then go to the next step.
Understanding and reading
The first thing you should pay attention to is the part of the phrase with the error, namely "Failed to AUTOMATICALLY FIND". What is she talking about? The fact that the operating system is trying to independently identify the proxy settings. But why? There is a possibility that not the parameters themselves were specified in the settings, but only the path to them, that is, the place where they should be present. And what can this mean? Either the specified location does not contain the required parameters, or the path to them is incorrectly specified. To identify and fix the problem, perform the following steps:
- Go to the block with proxy settings. Directly in the Windows search bar, we write the word "proxy". In the results, select the link "Proxy server settings"; and follow it.
- Go to the properties window of Internet Explorer, and in it select the "Connections" tab. Select "Network settings". In the event that you do not use a proxy, then you just need to uncheck all the boxes in the window that opens in front of you.
- Click on the "Save" button to save all your changes. Try to resume.
It is highly likely that the actions you performed will give the desired result, and you will be able to log into the system. The fact is that the technical data specified in the automatic proxy settings could be inherited from the previous user of the device. If we are talking about a corporate PC, then perhaps such actions were the result of the work of a system administrator. But we can not discard such an option as the impact of malicious software. To exclude the latter option, run a scan with an antivirus program. This must be done even if the system started after removing all the marks. If the problem really was in malware, then those checkboxes that you unchecked will reappear the next time you start the system.
Reset network settings
If you have already reached this point, then the actions described above did not have the desired result, and the error remained relevant. And now we will reset the network parameters. Therefore, your primary task – save the relevant data. The fact is that each Internet user receives the network address and other parameters automatically via DHCP. But if this is not the case for you, then the data is still worth saving. This will save you a lot of time when reconfiguring. The easiest way is here – use the configuration file. You can also use the special ipconfig /all command by typing it directly at the command line. After that, you will see all the parameters of the adapters that are currently working in the system. And if there are several of them, then it is better to save the parameters of each option. We perform the following actions:
- We start command line mode in Windows. To do this, in the search bar of the operating system, we type "cmd". Based on the results of the issuance, go to the context menu, note in it that the work is being done on behalf of the administrator.
- In the command line window, enter ipconfig / all and click on the "Enter" button, confirming the actions. Here it is easier to copy the expression, because in case of an error, the system will not understand what exactly you want from it. If everything is done correctly, you will get data that can be easily saved to a file. Or you can just take a screenshot or take a picture of the screen. This document will contain parameters such as IP address value, DNS servers, gateway, etc.
- It is necessary to enter five commands in order to reset the TCP / IP protocol, on the basis of which the interaction between your PC and the Internet is carried out. So, we enter netsh winsock reset in order to ask the settings. Further – netsh int ip reset to reset the protocol itself. Now ipconfig/release and ipconfig /renew respectively to release and renew the IP address. The last command – ipconfig /flushdns to flush the DNS cache. If between the introduction of commands the system prompts you to restart the PC, we ignore these comments. We restart the system only after all the commands have been entered.
These actions should be successful if the problem is not related to the impact of malware, hardware, or problems on the side of the service provider. If you still cannot enter the network, then most likely DHCP is not issued automatically, that is, you need to register it yourself. And for this we need to use the technical data that you saved before resetting the network parameters.
Trying out universal commands
Most of the solutions that will help you fix the access problem have already been described. But the fact is that it is not possible to cover all possible variants of failures in one article. There are many reasons for such an error to occur. Therefore, we have made for you a selection of commands that can help in solving the problem in cases where the solutions described above did not work.
These recommendations are taken from the official Microsoft website, in particular from the section on solving such access problems. It's about:
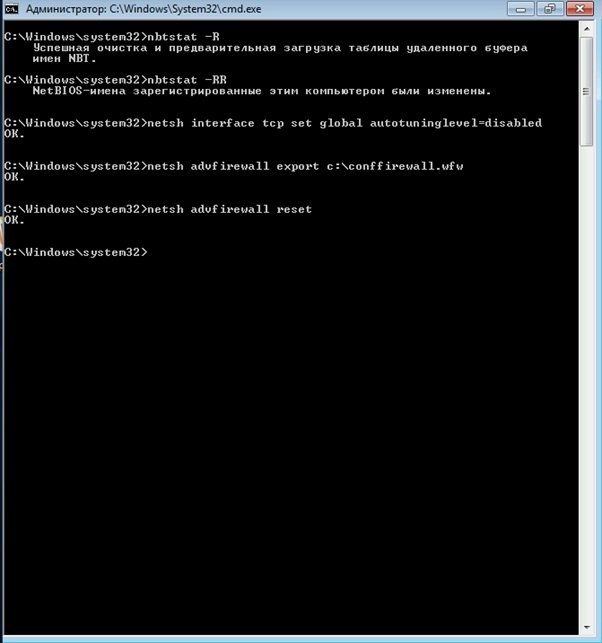
- Netbios which will clear the cache. But you need to know that this command is extremely case sensitive to the key set. Therefore, R and RR should be entered in uppercase capital letters.
- Nbtstat-R to release and clean up Netbios names.
- Nbtstat-RR to disable automatic TCP/IP receive window tuning.
- Netsh interface tcp set global autotuninglevel=disabled. This command – option for a low speed of transferring parameters in the network. Relevant for cases when automatic settings are not supported by your system.
- Netsh advfirewall reset. This is a complete reset of the firewall settings. Beforehand, do not forget to save the basic settings to the conffirewall.wfw file. This can be done directly in the root directory of drive C.
After completing all commands, it is recommended to reboot the system for the changes to take effect. We hope that this is your problem with the error "Windows could not automatically detect the proxy settings for this network" fixed.
But another thing every netizen needs to know is that it's easier to prevent a problem than to fix it. Therefore, if you decide to use proxy servers for anonymous and secure work, then the choice should be made in favor of a reliable and proven solution. And free servers – this is an option that should be completely discarded from consideration. But what is better to pay attention to is mobile proxies from the MobileProxy.Space service. By following this link https://mobileproxy.space/user.html?buyproxy you can get acquainted with the functionality, tariffs and make sure in manufacturability and stability of this solution. Such proxies will become a reliable assistant in your work and minimize the likelihood of various errors and failures. Use mobile proxies and see for yourself.