Zoom: basic settings for stable operation

Zoom — an extremely popular and in-demand tool for organizing video conferences, meetings, lessons, discussions, lectures, webinars, as well as informal online communication. With its help, you can organize personal and group chats, audio calls, and provide shared access to various files. This application is also suitable for exchanging text and graphic files, sending various invitations, and storing data. It is suitable for working with different operating systems. In practice, it has been widely used in the field of education. It is also widely used by various business representatives to communicate with colleagues, business partners, clients, including those located abroad.
Zoom is distinguished by fairly broad functionality, convenience and ease of use. This is what contributed to its increased popularity among many categories of users. Now let's look in more detail at what advantages and disadvantages this application has. Let's tell you how conferences and webinars differ in Zoom. Let's take a closer look at the features of setting up the application before launching it. We'll show you how to organize the most stable and functional work with this application thanks to the additional connection of mobile proxies.
Main advantages and disadvantages of the Zoom application
We will begin our introduction to the application for organizing various video conferences and webinars by describing the main advantages of this solution. In particular, we highlight the following points:
- Ability to connect a large number of participants to an online event. Zoom allows you to interact online with a fairly wide public. Even with the free plan, you will have the opportunity to connect up to 100 users to a conference or webinar.
- Ensuring high quality audio and video. These are the parameters that will be extremely important for absolutely every online event. Regardless of how many people you have connected to the conference, you need to make sure that each of them clearly sees the material being demonstrated and hears the interlocutors.
- Multi-platform. It is enough to send the user a link so that the person can connect to your conference. It doesn’t matter whether he does this through his own browser, smartphone or any other device. Conveniently, other participants do not need to install the corresponding application for themselves. Your link will be enough to organize a video conference.
- No lags or delays. Despite the fact that Zoom can be called a multifunctional solution, it will be highly stable in operation. If you notice any problems with speed or access, you can be sure that the whole issue is a poor Internet connection. The site will have nothing to do with such failures.
- Ability to customize screen sharing. Such a solution will be convenient if you need to add visibility to the event. Already in the free version of the application there are several options for working with the screen. You yourself choose this solution, which will be the most convenient for your upcoming work. But we would like to draw your attention to the fact that only a user who has administrator rights can share the screen. That is, if you are invited to a conference via a link, you will not be able to share the screen and show its contents to other participants.
- Ability to continue the webinar on another platform. This solution will be relevant if you need to switch from one device to another directly during a conference. Alternatively, you may need to show a picture or do some drawing. It will be much more convenient to do this from a tablet than from a computer.
- Add visualization directly during the conference. The point is that you can make the cursor movement on the screen visible during the event. It will also be possible to add diagrams, text content, drawn elements to the presentation and do everything that will make it more informative and easy to understand. You can just as easily delete and move added fragments.
- Ability to record a conference. Such a solution will be convenient if you subsequently need to once again analyze the event, prepare a summary of it, or simply save it for history. Using Zoom, you can record both the entire event and its individual elements, pausing the recording and resuming it when you need it.
- Providing feedback. Zoom has a tool called “Raise Hand.” It is worth using it if you, as a conference participant, would like to add something on your own, make any assumptions, or ask a question. You can also use the “Reactions” stickers to express your own emotions about the material presented by the conference presenter. Such a decision can also be written down as a feedback, as it will make the presenter understand that the audience is really listening to him and is reacting in some way to the information provided.
- Availability of built-in chat. With its help, you can communicate with other conference participants without interrupting the speaker. It provides the opportunity to correspond both in a general chat, which will be read by all conference participants without exception, and to use personal correspondence with one or another participant. Moreover, there is a so-called “chat with yourself”, where you can conveniently add various notes, video and audio files, photos or any other materials from the conference. You will be able to replenish them from each new webinar and store them here for 10 years. If you want to save important data, it is recommended to use a separate file for this.
- Speaker management. Such a solution will be extremely convenient in the event that different speakers will take part in the conference and the organizer will need to provide an opportunity for each of them to speak. This way he can turn the sound on and off at any time.
- Convenient and fast sending of invitations. We have already said that in order for people to connect to your conference, it will be enough to simply send them an appropriate invitation. To do this, you, as the organizer, create a conference. The program will automatically provide you with a link to it. You copy it and send it to everyone you would like to see at your webinar. You choose the method of sending the invitation yourself: social networks, instant messengers, email, SMS messages, etc.
- The ability to create session rooms directly during the event, as well as group them according to certain criteria. We would like to note that in the basic, free version, this option is disabled by default. But you can go to the application settings directly on the website and enable it for yourself personally, if the need arises.
As you can see, there are quite a lot of advantages characteristic of the Zoom application. And they can rightfully be called key for solutions that are used in practice to organize various video conferences, online meetings, seminars, etc. But still, as with any other technical solution, there are both advantages and disadvantages. And it wouldn’t hurt to take them into account in practice before you start using Zoom. But let us immediately note that the only nuance that users highlight in practice is that you will have to pay extra for options that may actually be required in your work.
That is, the basic free version does not include all the solutions that you may need in your workflow. In particular, this includes restrictions on the number of participants of 100 people. For an additional fee, you can organize rallies for up to 300 people. Also, restrictions in the basic tariff imply unlimited communication with only one of the users, while with other people there will be a time limit. Specifically, after 40 minutes the session will end and you will need to reconnect the session again. The only thing is that it will also be necessary to re-invite all participants to the conference. Another nuance that would be useful to take into account is that only one person, in particular the moderator, can enter a conference. If you want to entrust this work to several people, then you will have to purchase a similar option.
In all other respects, there are no fundamental restrictions or prohibitions. You yourself choose the option of functionality that will be optimal for the upcoming work. You decide whether to pay extra for it or not.
Now let’s take a closer look at the fundamental differences between webinars and conferences on Zoom.
Types of online events in Zoom
Using Zoom, you can organize various online events depending on their format. In particular, there are two main categories, and additional breakdown is already provided within each of them:
- Conferences. Such events involve partial interactivity. They are suitable for working with a large number of participants. At the same time, users are shown desktop screens, sound and camera are turned on. The administrator can monitor the list of present participants, etc. Depending on how such a meeting is organized, the conference can be instant or scheduled. The first option is mainly used in situations where it is necessary to organize a quick, important meeting, discuss the details of a particular project with colleagues, and convey the most important information literally here and now. A planned conference is created in advance, its participants receive information in advance about the date and time of the event, its name, and the main topic. Examples of such a solution include online lessons, presentations, and webinars. There will also be an opportunity to set basic settings for photos and videos before the conference begins.
- Webinars. This format got its name from the combination of two words: “web” and "seminar". That is, we are talking about organizing a format of communication in which several participants will speak simultaneously. In this case, the exchange of information, as well as its study, will be carried out through the built-in chat. This excludes the message in visual mode. The number of participants who can be connected to a webinar is limited to 10,000, while for a conference this figure is only 1,000. Also, the difference in this case will be in the type of subscription. So, the conference is free, but in order to hold a webinar you will need to pay a certain amount.
Which communication option you will use in this case should be determined depending on what tasks you are facing at a given time. We would also like to draw attention to the aspect that, depending on the option chosen, you will be able to use Zoom for free or you will still have to deposit a certain amount into the service account.
Now let's move on directly to how to get started with the Zoom platform.
Setting up the Zoom program for work
The first thing you need to do before starting to work with the Zoom platform is to download this application and register. Initially, go to the official website of this application and select “Register for free” from the proposed options. Here we indicate the date of birth. We would like to immediately draw your attention to the fact that the system does not save these parameters, so you do not have to specify the correct data. Next, you should specify your email address or log in directly via Facebook, Google account. It is also possible to use a single sign-on system. You must provide a correct email address, since you will receive a confirmation directly to it after registration. You can click on the “Login” option. directly in the message that will be sent to you by email, or you can copy the existing link and paste it into your browser.
In parallel, the platform will offer you to invite partners, colleagues or students to participate in conferences. If you plan to use the platform to work with different people and solve diverse problems, then you can skip this stage for now. To start the conference, the site will prepare you a separate link, which you will need to send to participants before the upcoming event.
Zoom also offers to make a number of settings for subsequent work that will make the site as convenient as possible for you. In particular, we are talking about the following aspects:
- General settings. Here you need to go to the “Settings” block, and then select the “General” tab. If you plan to use Zoom quite often, then a good option would be to set an option such as “Start on boot Windows". Thanks to this, every connection you make to the operating system will automatically involve downloading Zoom. We would also like to draw your attention to such a setting as “Reminder”. With its help, you will not miss a planned event, since the system will notify you in advance about its start.
- Sound settings. This involves both checking the connection itself and determining the volume of the speakers and microphone. We would like to draw your attention to the fact that if you do not make the appropriate settings, the program will automatically adjust the speech volume. If this solution does not suit you, disable it yourself.
- Video settings. At this stage, you need to set the optimal camera size relative to the size of the screen itself, and also enable HD mode for good image quality. If you want to make the picture more attractive and smooth out various visual effects, you can use the “Tweak my appearance” option. In this case, the program itself will make the necessary adjustments.
- Setting up the chat. Here we need to specify the period of time in which it will be possible to change the user’s status to “out of office”, and also select the most appropriate option for reflecting unread messages. Even at this stage, you have the opportunity to enable pop-up messages, if such a solution will be convenient for you in future work.
- Add contacts. This is necessary so that you can connect to conferences those participants with whom you plan to communicate in the future. To do this, directly in the main menu, click on the “Contacts” button, and then indicate the email addresses of all those participants whom you would like to involve in your work. If you wish, you can divide all contacts into separate groups, separating, as an option, students by class, employees by department, business accounts from personal ones, etc.
This completes the preliminary preparatory work. You can proceed directly to creating a conference. Read on to find out how to do this.
Creating a conference in Zoom
The platform offers users a fairly impressive set of settings that allow them to adjust its work to individual preferences, as well as make adjustments to the broadcast directly during it. So, to create a conference in Zoom, you need to go to your personal account and click on the “Organize a conference” button. The system will immediately offer you to choose one of three options:
- with video;
- no video;
- exclusively screen sharing.
In order to automatically invite participants to a particular broadcast, you do not have to personally send everyone a link. All you need to do is go to the participants control panel and select the “Invite” option here. After this, all the contacts that you specified earlier will open in front of you. Check the box next to those users whom you would like to add to your conference in this case. After that, they will receive your invitation by email or messenger. It all depends on what settings you set earlier. Immediately before the conference itself, you will need to click on the “Accept” button so that those users who connect to you via the link can join the event.
Additional recommendations
To make working with the Zoom platform as convenient and simple as possible for both you and other participants, you need to make a number of additional settings, in particular:
- Setting up session rooms. This is what will allow you to create one or more rooms for a separate group of participants. This solution is relevant when organizing lessons when the teacher would like to explain the material in more detail to a certain group of children while others continue to work. This option is also worth using for those who would like to discuss a specific issue with a specific person or several people without distracting others. A similar option is present in the free version of the application, but it must be additionally configured through the official website. To do this, you should go to your personal account, and then in the settings block select the “Conference” option, and then “At the conference” (extended). Here we activate the session room option. To save the settings, click on the corresponding button.
- Setting up screen sharing. You can use this option from absolutely any device on which Zoom is installed. Next, go to the settings block and in it select the “Screen sharing” section. This is enough for the monitor to display all those pages and running programs that are currently running for you. You regulate them yourself so that in the end conference participants see only the information they need.
- Conference planning. This block is relevant for planned events. That is, it is assumed that you form the basic settings in advance. Here you need to go to the “Scheduled” section through the settings menu. In it we indicate the time and date of the start of the event, its topic, and also select an identifier. Set a password for access and turn on the video. You must also indicate from which device the sound will come, be it a phone or a computer. It is also possible to combine both options. To save all the settings, just click on the “Schedule” button. Now you will have a link, which you will need to send to all conference participants.
- Making changes. If your plans have changed and you need to make certain adjustments to the specified data, you need to click on the “Change” button located directly next to the planned event. An editing window will automatically open in front of you, where you make all the necessary changes. Here you can also delete the conference if it is no longer relevant. If you deleted an event by mistake, you can restore it through the “Recently Deleted” section. This offer will be available for 7 days from the moment the conference is deleted.
Now you know what advantages and disadvantages the Zoom platform has, and you can also make all the necessary settings. As you can see, there is nothing complicated in this process. Just follow the recommendations we have given.
Zoom tariff packages
We have already said that the Zoom platform can be used for free. But the service also offers a number of paid tariffs for study, work, and business. Now we present the features of each of the available options:
- Basic free package. Its functionality will be quite enough to conduct small broadcasts. So, if communication between two people is planned, then the number of such conferences will be unlimited. There are also no restrictions on group conferences, but in this case you can connect no more than one hundred people to them, and the event time itself is limited to 40 minutes. If you need more time, you will need to reconnect. This package supports HD format, screen sharing, and private group chat. It will also be possible to record a conference and work together with several participants on a message board.
- Professional package. This solution will cost you about $150 per year. It is suitable for organizing events for small groups, in particular up to 100 people. However, the number of possible conferences is not limited. Here it is already possible to organize simultaneous broadcasting in various social networks. Along with conferences, you can also run webinars. You can store recordings up to 1 GB in the cloud. The broadcast time itself can be increased to 24 hours if desired.
- Business package. Its price starts from $200 per year and is suitable for small and medium-sized organizations. Up to 300 people can participate in the conference simultaneously. At the same time, it provides a single sign-on system and the ability to decrypt records located in cloud storage. In this case, a personalized URL is highlighted and there is a personal telephone number for the support service, where you can contact if difficulties arise in your work.
- Package "Enterprise". Cost starts from $200. Intended for use by large organizations where it is planned to connect a large number of employees to participate in the conference, in particular up to 1000 people (relevant for the “Enterprise +” tariff, while the “Enterprise” package provides the ability to connect up to 500 people). We would like to draw your attention to the fact that such a package can only be activated through the platform’s sales department. At the same time, you get a separate account manager, as well as access to cloud storage, where you can store unlimited amounts of data. There is also a transcript of the recordings.
Which option to choose — It’s an individual matter and depends on the specifics of your business or the tasks you face.
As you can see, using Zoom — This is one of the most convenient technological and efficient solutions for organizing video conferences, seminars, webinars and other online events. But before putting this solution into operation, you need to understand that it is not available to all users today. The network has a number of restrictions, in particular related to regional laws. Moreover, as practice shows, the Zoom service is often blocked by Firewall. In view of this, the use of additional security tools for working with the site will never be superfluous.
We are talking about connecting mobile proxies to work. This is one of the most effective and high-tech solutions on the market today. Now let's look in more detail at how to make this connection and where to buy mobile proxies, which in practice will fully meet your expectations in terms of functionality, reliability and stability.
Configuring mobile proxies in Zoom correctly
Connecting mobile proxies to the Zoom service — This is something that will allow you to effectively bypass various regional restrictions and all kinds of blocking, and ensure a high level of confidentiality and security for your work on the Internet. With this solution, you can be sure that your calls and video communications will not be intercepted. This means that the anonymity of both personal and business communication will remain. That is, mobile proxies for Zoom — this is what will ensure you the most stable experience on the Internet in general and with the Zoom platform in particular.
The first thing we would like to draw your attention to is that proxy debugging is not provided in the service’s own settings. This means that to solve the problem you will need to use the built-in capabilities of Windows or another operating system installed on your PC, or additional utilities. We would like to draw your attention to the fact that if you decide to make settings through the operating system, then in the future all your work with the Internet will be carried out through proxy servers. If you want to use a proxy only with Zoom or a number of other applications, then a simpler solution would be to use the utility. Thanks to the flexibility of settings, you can choose the option that will be most convenient for you. In particular, the Proxifier application would be a good solution both at the setup stage and in subsequent use. Now let’s talk about how to directly perform the setup itself.
In this case, we perform actions in the following sequence:
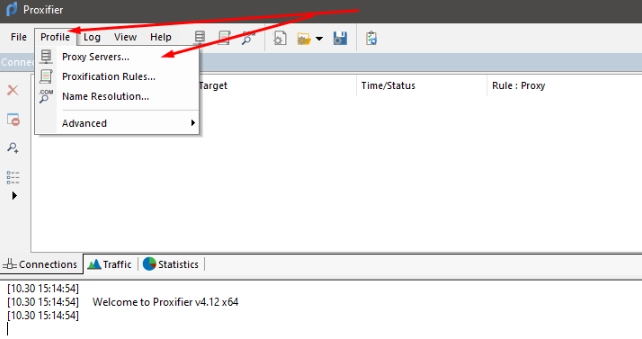
- Download the Proxifier program for yourself and run it on your computer. Directly in the main menu, in the top vertical line we find the “Profile” tab. We go into it and from the drop-down menu select the “Proxy Servers” option.

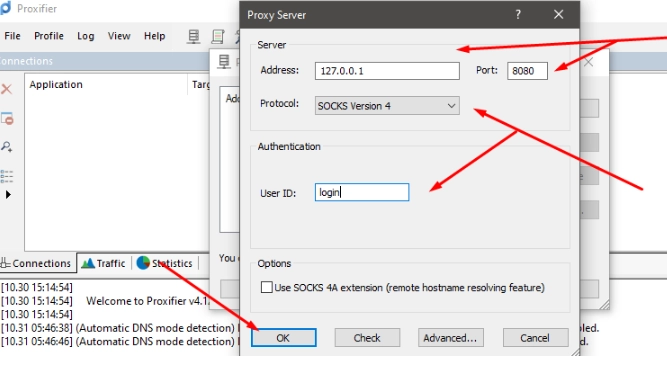
- Now you need to create a new connection. To do this, we click on the “Add” button located on the left side of the new window that will open in front of you. After this, another window will open in front of you, where you will need to specify the technical parameters of your proxy server, in particular its IP address, as well as the port and type of protocol through which the connection will be made. If you have authentication enabled, you should enter your username and password in the appropriate block. After all parameters have been specified, click on the “OK” button. in the lower right part of the active window, thereby saving the changes made.
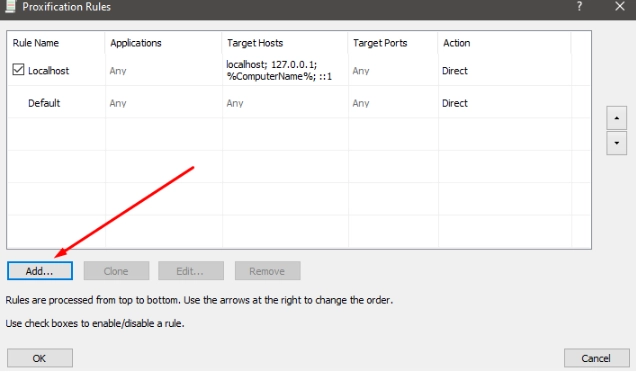
- Now we return to the “Profile” tab again. and select the “Proxification Rules” option directly in the main application menu. This is necessary so that you can set your own rules for work, adapting the application to your individual preferences. In the new window that opens, click on the “Add” button.
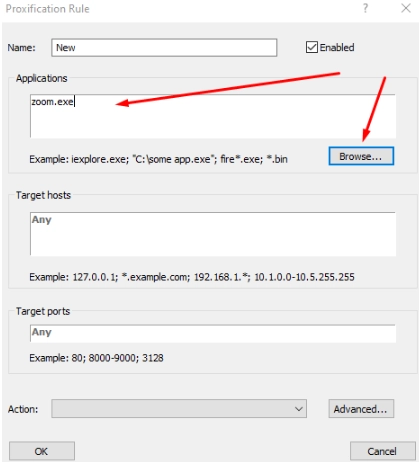
- Your actions at this stage — This is to find the executable file of the Zoom service. To do this, click on the “Browse” button, and then study all the options that are open to you and select the file with the extension (.exe). This is your executable file. You can also use the program shortcut. We go lower and in the “Action” column select the proxy server whose parameters you specified in the previous steps. To save all settings, click on the “OK” button.
This completes the configuration of mobile proxies in the Zoom application. If you need to make any changes in the future, you can use this very algorithm by adjusting the corresponding indicators. But here it is very important to correctly choose the most suitable proxy server for yourself. The best option — This is a solution that can be rotated. With their help, you can organize conferences from different IP-addresses, thereby providing yourself with the most flexible settings and increased ease of use.
It is precisely these solutions that the MobileProxy.Space service offers. Here you can buy mobile proxies for any period of time, from 1 day to 1 year, and take advantage of a free two-hour trial. As a result, you get a personal dedicated channel without traffic limits, access to more than two million pools of IP-addresses, and the ability to set up a forced change using a link from your personal account or a timer, having previously configured it for an IP change interval from 2 minutes to 1 hours.
For more details on all the features of mobile proxies, please follow the link https://mobileproxy.space/en/user.html?buyproxy. If you encounter any difficulties in your workflow or require additional advice and assistance, contact our 24-hour technical support service.